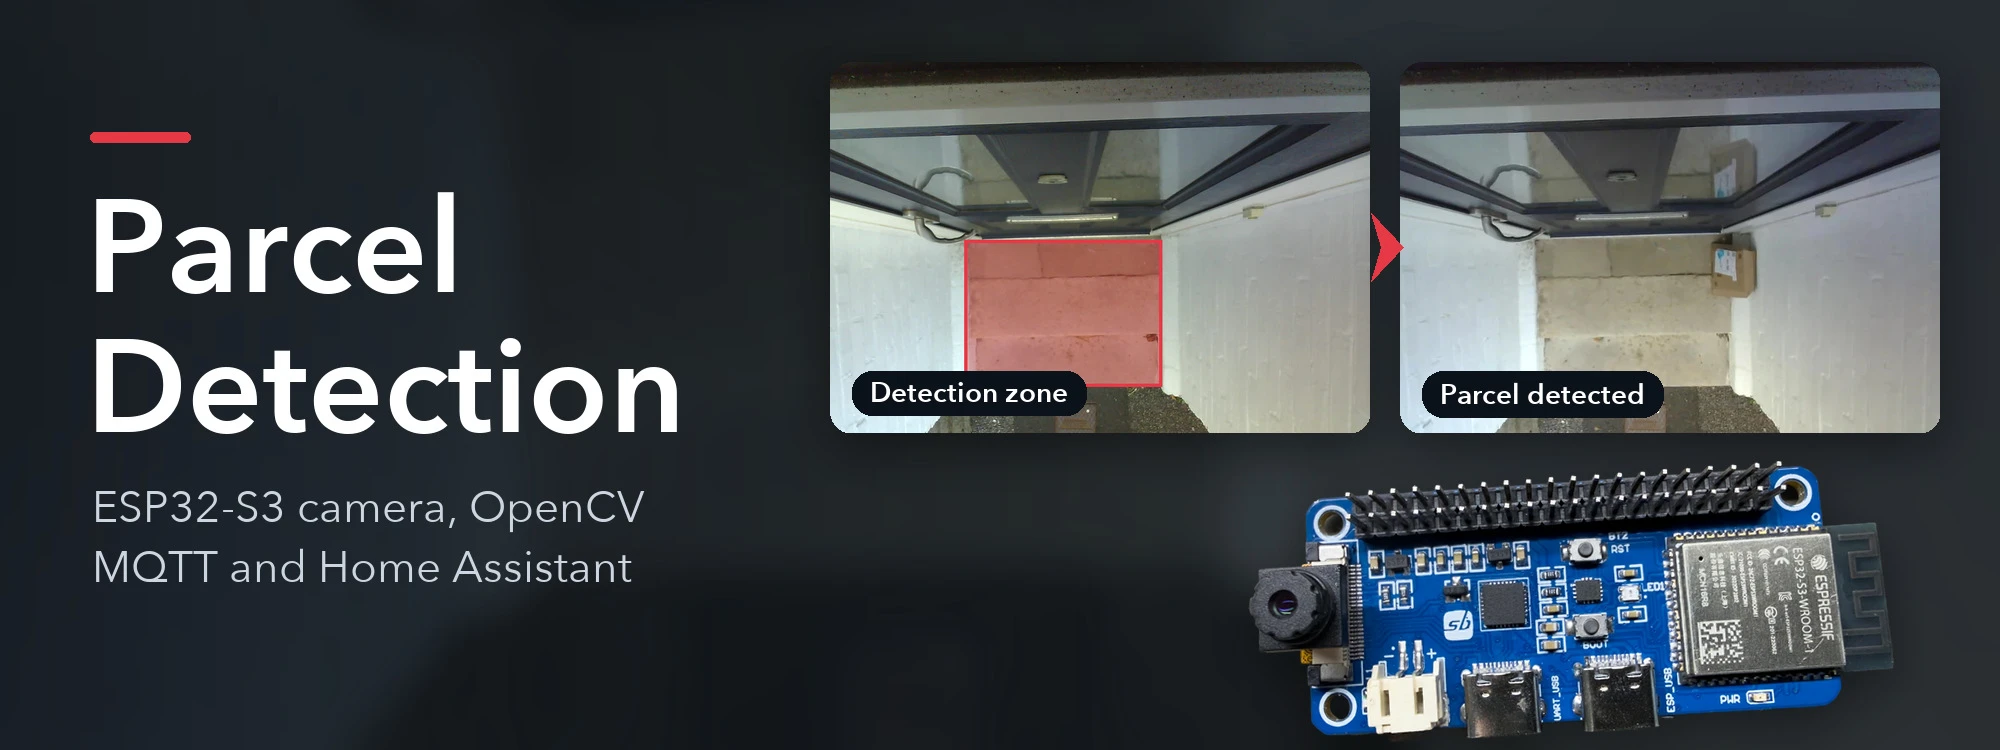
In the past few years, we have found that most delivery drivers just leave the parcel at the door, quickly take a photo and drive away without ringing the doorbell or knocking the door, which means a parcel can sit there for a while before anyone notices or an email delivery notification arrives.
Our front door sits less than 50cm from the pavement and road with a single stone step so any parcels left on the doorstep can be easily picked up by anyone walking past the house which has happened in the past.
Finding a camera
After looking at commercial cameras, I couldn't find anything small and unobtrusive which would not stand out in our doorway which is painted white and also not be a target for anyone to damage it.
We had a StackyFi ESP32 based board which I had purchased from a Kickstarter campaign in 2024 which included a small camera module.
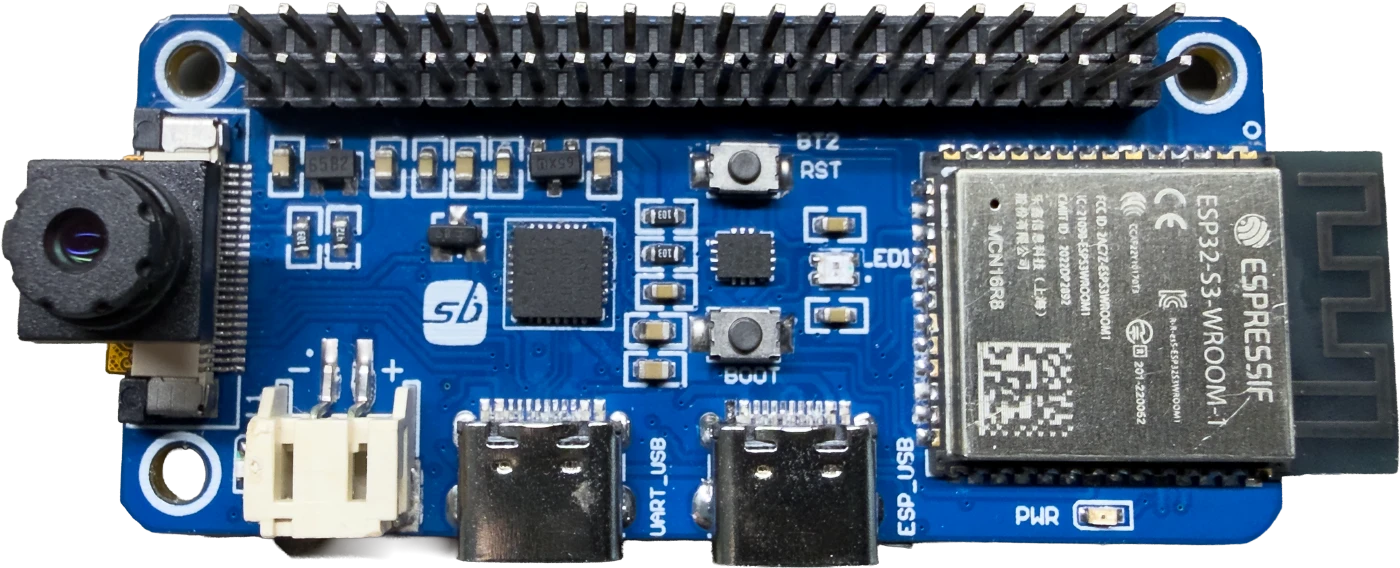
The boards specifications are:
- Processor: ESP32-S3 WROOM 1 with dual-core 32-bit LX7 processor up to 240 MHz.
- Memory: 384 KB ROM, 512 KB SRAM, Flash up to 16 MB, PSRAM up to 8 MB.
- Raspberry Pi Compatibility: Supports most Raspberry Pi HATs, eliminating the need for a Raspberry Pi board.
- Wireless Connectivity: Built-in 2.4 GHz Wi-Fi (802.11 b/g/n) and Bluetooth® 5 (LE) support.
- Storage: MicroSD card slot
- Camera I/F: FPC connector that works with OV2640 camera module
- USB-C 1.1 OTG port
- USB-C serial port
- Battery: 2-pin connector for LiPo Battery with charging circuit
- Dimensions: 65 x 30 mm
The boards are also available from SB Components.
Amazon stock a range of the camera modules with different lenses and cable lengths.
The camera and ESP32 module were fitted into a blank cover plate for a UK mains socket backing box which is only 2cm high, this is also white so it blends into the door area and powered using a 5V USB power supply.
ESP32 Camera Software
The software for the camera and ESP32 module were written in the Arduino IDE.
You need to add the ESP32 libraries and support by following the instructions on docs.espressif.com.
You also need to add the PubSubClient library in the Arduino IDE for MQTT support.
The camera software was initially based on one of the example programs in the IDE but it was modified to only return a single frame and also send data to a MQTT server for Home Assistant.
On startup: It connects to WiFi and starts an HTTP server on port 80. Any request to the device’s IP, on any path, returns one JPEG at 1280 x 1024 (SXGA). There are no buttons, streaming or settings page.
The IP address is printed to the Serial Monitor at 115200 baud once it connects.
The following topics are published to your MQTT server:
| Topic | Content |
|---|---|
| frontdoorcamera/debug | Each debug line, also printed to serial. It covers capture failures and the MQTT-connected message. |
| frontdoorcamera/ping | JSON every 60s: {"uptime":..,"rssi":..,"ip":"..","free_heap":..,"free_psram":..} |
| frontdoorcamera/status | online once connected. The broker sets it to offline itself if the board drops, via an MQTT last will, and it is retained. |
ESP32 Camera Code
The code for the camera module is as follows:
First add the includes:
#include "esp_camera.h"
#include <WiFi.h>
#include <WebServer.h>
#include <PubSubClient.h>
#include <stdarg.h>
Define the camera pins:
// Camera pins (StackyFi), change if needed for different controller board
#define PWDN_GPIO_NUM     -1
#define RESET_GPIO_NUM    -1
#define XCLK_GPIO_NUM     15
#define SIOD_GPIO_NUM     4
#define SIOC_GPIO_NUM     5
#define Y9_GPIO_NUM       16
#define Y8_GPIO_NUM       17
#define Y7_GPIO_NUM       18
#define Y6_GPIO_NUM       12
#define Y5_GPIO_NUM       10
#define Y4_GPIO_NUM       8
#define Y3_GPIO_NUM       9
#define Y2_GPIO_NUM       11
#define VSYNC_GPIO_NUM    6
#define HREF_GPIO_NUM     7
#define PCLK_GPIO_NUM     13
Add constants for variables:
// WiFi SSID and Password

const char* ssid = "YOUR_WIFI_SSID";
const char* password = "YOUR_WIFI_PASSWORD";

// MQTT (Home Assistant monitoring)
const char* mqttHost = "YOUR_MQTT_SERVER"; // MQTT Server address
const uint16_t mqttPort = 1883; // MQTT Server Port
const char* mqttUser = "YOUR_MQTT_USER"; // MQTT Server username
const char* mqttPassword = "YOUR_MQTT_PASSWORD"; // MQTT Server password
const char* mqttClientId = "frontdoorcamera"; // MQTT topic
const char* topicDebug = "frontdoorcamera/debug";    // serial debug lines
const char* topicPing = "frontdoorcamera/ping";      // JSON heartbeat every 60s
const char* topicStatus = "frontdoorcamera/status";  // "online" / "offline" (last will)
const unsigned long PING_INTERVAL_MS = 60000;

WebServer server(80);
WiFiClient wifiClient;
PubSubClient mqtt(wifiClient);
unsigned long lastPing = 0;
unsigned long lastMqttAttempt = 0;
Logging function
// Print to Serial and, when connected, publish the same line to MQTT.
void logf(const char* fmt, ...) {
  char buf[200];
  va_list args;
  va_start(args, fmt);
  vsnprintf(buf, sizeof(buf), fmt, args);
  va_end(args);
  Serial.println(buf);
  if (mqtt.connected()) mqtt.publish(topicDebug, buf);
}
Function to send a ping to the MQTT server
void sendPing() {
  char buf[160];
  snprintf(buf, sizeof(buf),
           "{\"uptime\":%lu,\"rssi\":%d,\"ip\":\"%s\",\"free_heap\":%u,\"free_psram\":%u}",
           millis() / 1000, WiFi.RSSI(), WiFi.localIP().toString().c_str(),
           ESP.getFreeHeap(), ESP.getFreePsram());
  mqtt.publish(topicPing, buf);
}
Non-blocking reconnect, tried at most every 5 seconds
void mqttMaintain() {
  if (mqtt.connected()) {
    mqtt.loop();
    if (millis() - lastPing >= PING_INTERVAL_MS) {
      lastPing = millis();
      sendPing();
    }
    return;
  }
  if (WiFi.status() != WL_CONNECTED || millis() - lastMqttAttempt < 5000) return;
  lastMqttAttempt = millis();
  if (mqtt.connect(mqttClientId, mqttUser, mqttPassword, topicStatus, 1, true, "offline")) {
    mqtt.publish(topicStatus, "online", true);
    logf("MQTT connected, IP %s", WiFi.localIP().toString().c_str());
    sendPing();
    lastPing = millis();
  } else {
    Serial.printf("MQTT connect failed, rc=%d\n", mqtt.state());
  }
}
Any request returns a fresh 1280x1024 JPEG at high quality
void handleCapture() {
  // Discard one buffered frame so the returned image is current, then
  // retry a few times: large frames occasionally time out or overflow.
  camera_fb_t *fb = esp_camera_fb_get();
  if (fb) esp_camera_fb_return(fb);

  fb = nullptr;
  for (int attempt = 0; attempt < 4 && !fb; attempt++) {
    fb = esp_camera_fb_get();
    if (!fb) {
      logf("Capture attempt %d failed", attempt + 1);
      delay(100);
    }
  }
  if (!fb) {
    logf("Capture failed after retries");
    server.send(500, "text/plain", "Camera capture failed");
    return;
  }

  server.sendHeader("Cache-Control", "no-store");
  server.setContentLength(fb->len);
  server.send(200, "image/jpeg", "");
  WiFiClient client = server.client();
  const uint8_t *p = fb->buf;
  size_t remaining = fb->len;
  while (remaining && client.connected()) {
    size_t n = client.write(p, remaining > 4096 ? 4096 : remaining);
    if (n == 0) break;
    p += n;
    remaining -= n;
  }
  esp_camera_fb_return(fb);
}
Setup function to start camera and server
void setup() {
  Serial.begin(115200);
  delay(1500);  // give the USB serial monitor time to attach
  Serial.println();

  camera_config_t config;
  config.ledc_channel = LEDC_CHANNEL_0;
  config.ledc_timer = LEDC_TIMER_0;
  config.pin_d0 = Y2_GPIO_NUM;
  config.pin_d1 = Y3_GPIO_NUM;
  config.pin_d2 = Y4_GPIO_NUM;
  config.pin_d3 = Y5_GPIO_NUM;
  config.pin_d4 = Y6_GPIO_NUM;
  config.pin_d5 = Y7_GPIO_NUM;
  config.pin_d6 = Y8_GPIO_NUM;
  config.pin_d7 = Y9_GPIO_NUM;
  config.pin_xclk = XCLK_GPIO_NUM;
  config.pin_pclk = PCLK_GPIO_NUM;
  config.pin_vsync = VSYNC_GPIO_NUM;
  config.pin_href = HREF_GPIO_NUM;
  config.pin_sccb_sda = SIOD_GPIO_NUM;
  config.pin_sccb_scl = SIOC_GPIO_NUM;
  config.pin_pwdn = PWDN_GPIO_NUM;
  config.pin_reset = RESET_GPIO_NUM;
  config.xclk_freq_hz = 20000000;
  config.frame_size = FRAMESIZE_SXGA;      // 1280x1024 (smaller frame allows longer exposures in low light)
  config.pixel_format = PIXFORMAT_JPEG;
  config.grab_mode = CAMERA_GRAB_LATEST;
  config.fb_location = CAMERA_FB_IN_PSRAM;
  config.jpeg_quality = 6;                 // high quality (range 0-63, lower = better; low values overflow the frame buffer)
  config.fb_count = 2;

  if (!psramFound()) {
    Serial.println("PSRAM not found - enable PSRAM in the Tools menu");
    return;
  }

  esp_err_t err = esp_camera_init(&config);
  if (err != ESP_OK) {
    Serial.printf("Camera init failed with error 0x%x\n", err);
    return;
  }

  // Low-light tuning
  sensor_t *s = esp_camera_sensor_get();
  s->set_gain_ctrl(s, 1);                    // auto gain on
  s->set_exposure_ctrl(s, 1);                // auto exposure on
  s->set_gainceiling(s, GAINCEILING_128X);   // allow far more gain than the 2x default
  s->set_aec2(s, 1);                         // night-mode AEC DSP
  s->set_ae_level(s, 1);                     // bias exposure slightly brighter
  s->set_lenc(s, 1);
  s->set_bpc(s, 1);                          // fix hot pixels that show up at high gain
  s->set_wpc(s, 1);

  // WiFi config and setup

  WiFi.mode(WIFI_STA);
  WiFi.setAutoReconnect(true);
  WiFi.begin(ssid, password);
  WiFi.setSleep(false);
  while (WiFi.status() != WL_CONNECTED) {
    delay(500);
    Serial.print(".");
  }
  Serial.println();
  Serial.println("WiFi connected");

  server.onNotFound(handleCapture);  // every path serves the image
  server.on("/", handleCapture);
  server.begin();
  mqtt.setServer(mqttHost, mqttPort);
  mqtt.setBufferSize(512);

  Serial.print("Camera ready: http://");
  Serial.println(WiFi.localIP());
}
Loop to keep alive
void loop() {
  server.handleClient();
  mqttMaintain();
  delay(2);
}
Downloads
The package problem
Detecting that something has appeared in a fixed view sounds easy. Compare the current image with an empty one and see what changed. The trouble is that almost everything changes in an outdoor image during the day. The brightness moves with the clouds, the sun puts shadows across the steps, the camera adjusts its exposure and white balance, and at night it can switch to greyscale infra-red. A simple pixel difference triggers on all of it. As this was my first attempt at using OpenCV, I used Claude Code to help with the filters and detection code.
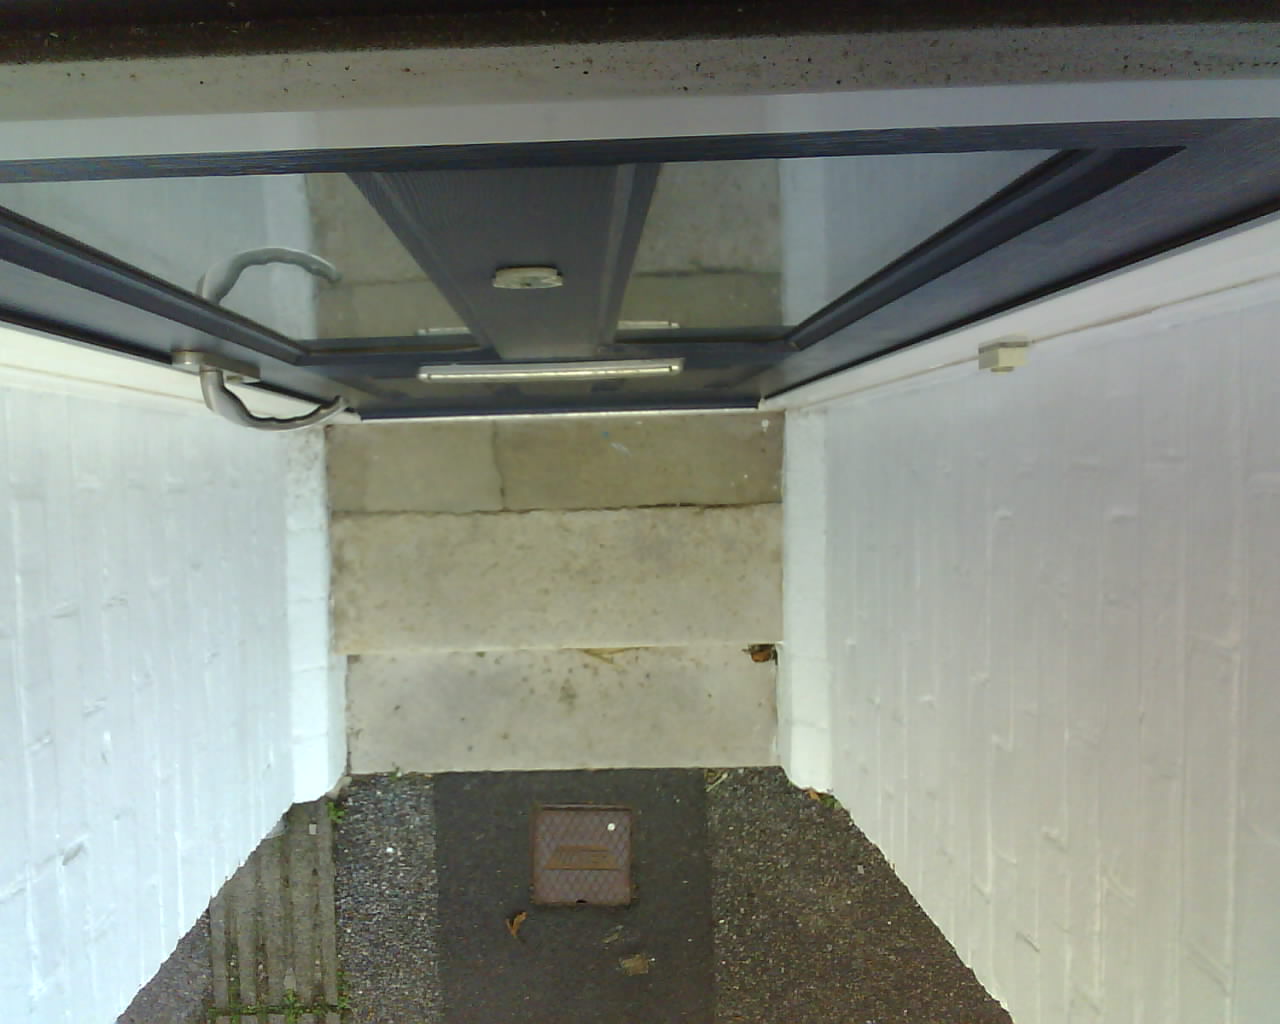
The camera is mounted in a recessed entrance, so the lighting is varied, and wet stone is a different colour to dry stone as well.
Why not an object detector
My first thought was to run a ready-made object detector on the server. The common models are trained on a general set of classes, and "parcel" is not one of them. Suitcases and handbags are, but a brown cardboard box seen from directly above is a hit and miss for those. A purpose-built package model exists in some camera software, but I wanted something that I could run and understand on my own server with no extra hardware.
I went with change detection against a reference image of the empty steps, and spent most of the effort on making that ignore lighting changes.
How the detection works
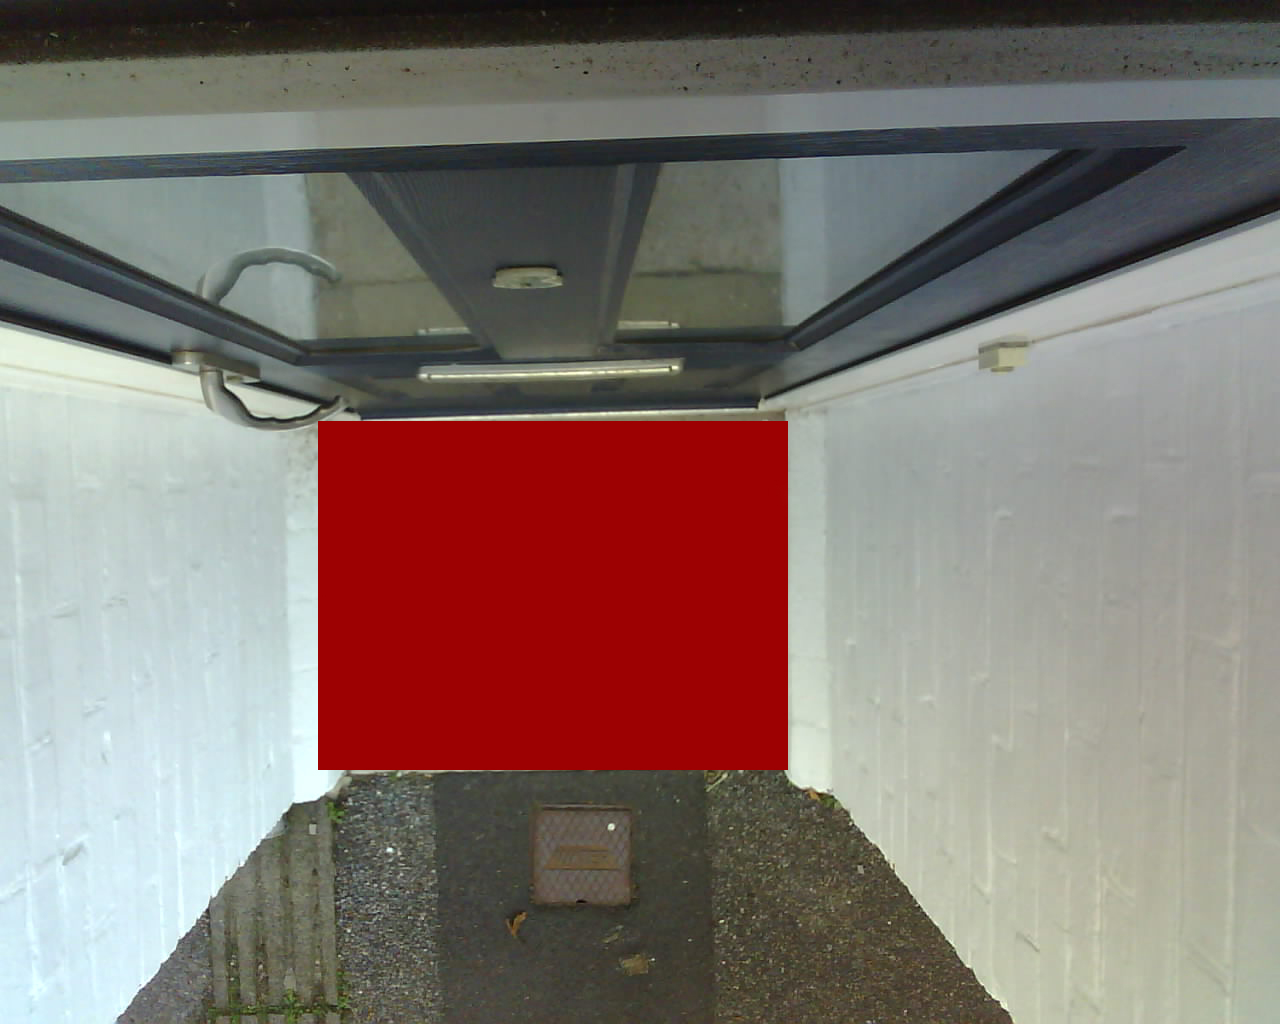
The detector grabs a snapshot every three seconds, crops it to the zone I drew, and compares it with the stored reference using three different checks.
The first looks at structure. The image is normalised so that each pixel is compared with the average and spread of its neighbours, which removes the overall brightness and leaves only the edges and texture. The second looks at luminance after fitting and removing a smooth plane from the difference, so a general brightening, darkening or soft shadow across the zone is cancelled out but a patch that is lighter or darker than the concrete around it is not. The third does the same with colour, which picks up cardboard against grey concrete and ignores white balance drift.
A pixel counts as changed if any of the checks flags it. Small blobs are thrown away, so leaves and insects are ignored, and the share of the zone that has changed is worked out.
That only tells me that something is different, so the timing matters as much as the image. A change has to stay put with no movement for 45 seconds before a parcel is reported, which keeps people walking up to the door from setting it off. It is cleared the same way once the zone matches the reference again for a similar period. While the steps are empty the reference slowly follows the scene, and there are separate day and night references for when the camera switches to infra-redor low light mode.
The Detection Code
The project is built using one Python file using OpenCV, NumPy, requests and paho-mqtt. The mask is built from the red-painted image with a small helper script, and everything else is set in a config file. Full source is in the downloads section at the end.
To install it on the Linux server:
Copy the parcel-detector folder to your home folder, i.e: /home/yourusername/parcel-detector
cd /home/yourusername/parcel-detector
python3 -m venv .venv && .venv/bin/pip install -r requirements.txt
Note: Do not run the first command with sudo. I did, which left a root-owned virtual environment that pip then could not write to.
The camera and MQTT details go in config.ini. The camera needs only the address that returns a single JPEG, and the broker section takes the host and login. The detection settings have sensible defaults, although the trigger thresholds needed some changes, as covered below.
Taking the reference image
With the steps empty and in daylight, run:
.venv/bin/python parcel_detector.py set-ref
Repeat it once after dark so it has a night reference as well. The check command takes an image or grabs one from the camera and prints how much of the zone has changed, and can save a copy with the detected area outlined:
.venv/bin/python parcel_detector.py analyze --save out.png
Testing
Before trying the code with the real camera, I tested it with edited copies of my empty-steps picture. Making the image much darker or brighter, adding a soft shadow, adding noise and drawing a small leaf all gave no detection, and a cardboard-coloured box was detected in both normal and dim light.
The one case that fooled it was a large hard-edged shadow across half the zone, which looks to the luminance check a lot like a dark parcel. It is a limit of the method, and I have not seen it happen in practice yet. If it does, the luminance threshold can be raised.
Real parcels found a few issues with the settings. I put a small box on the step and the detector reported 6.5% of the zone as changed, which was below the 8% I had set to trigger it. The outline was in the right place, so it was just my threshold being too high for a small parcel. Dropping the trigger to 3% fixed it, and the 45 second wait stops the lower setting from causing false alarms.
Anything much smaller than that, such as a thin envelope, would still be missed.
MQTT and Home Assistant
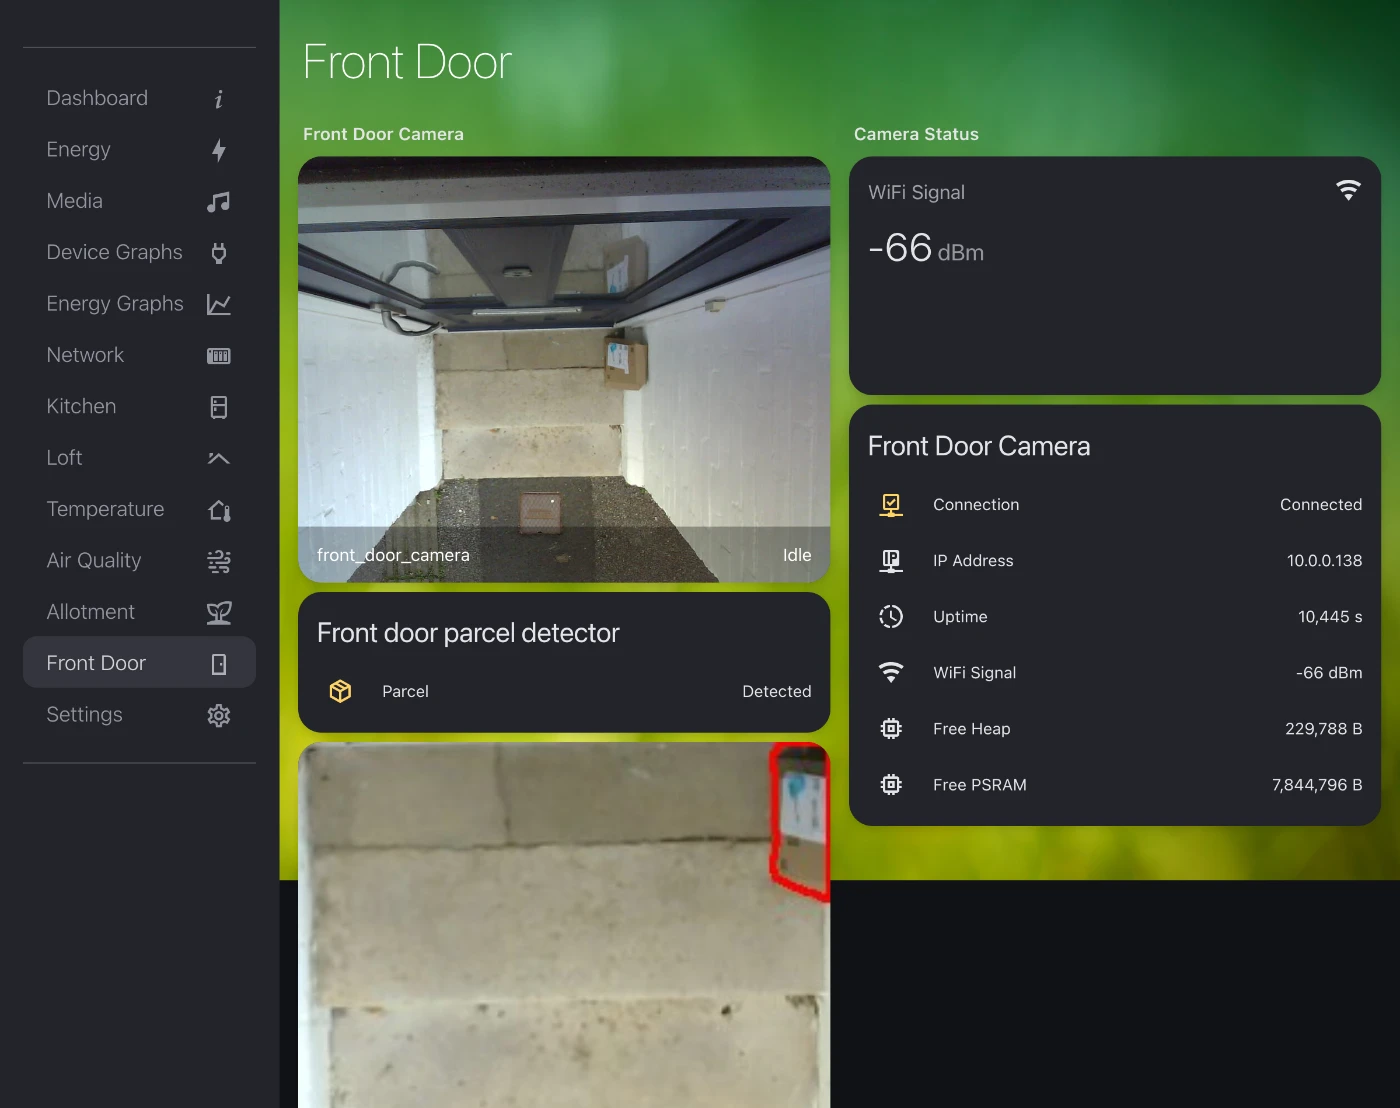
The detector publishes to MQTT using Home Assistant's discovery format, so there is nothing to set up on the Home Assistant side. A "Front door parcel detector" device appears with a parcel sensor, which is on or off, and an image entity holding the last annotated snapshot. If the camera cannot be reached for a few attempts the sensor goes unavailable rather than staying on a stale value.
Manual Downtime monitoring: In Home Assistant, the status topic is the quickest signal. You can also alert when ping hasn’t arrived for about 2 minutes. A sensor for the status topic looks like this:
mqtt:
  binary_sensor:
    - name: "Front Door Camera"
      state_topic: "frontdoorcamera/status"
      payload_on: "online"
      payload_off: "offline"
      device_class: connectivity
Showing the camera image
You can use Home Assistant’s built-in Generic Camera integration, which fetches a single JPEG from a URL, and that’s what the sketch serves. You need to set a static IP address for the camera, you can often configure this in your network firewall.
- Go to Settings → Devices & Services → Add Integration → Generic Camera.
- Set Still Image URL to http://camera-ip/. Leave the stream URL empty, because the sketch has no stream.
- Leave authentication on none, and leave “Verify SSL” alone (it’s plain HTTP).
- Submit. HA shows a preview, so you can confirm it’s working.
The camera entity can then go on a dashboard with a Picture Entity or Picture Glance card.
To add the other data into Home Assistant, add these to your configuration.yaml. They need the MQTT integration to be set up in Home Assistant, pointing at the same broker. If you already have an mqtt: section, merge these under it instead of making a second one.
mqtt:
  binary_sensor:
    - name: "Front Door Camera"
      state_topic: "frontdoorcamera/status"
      payload_on: "online"
      payload_off: "offline"
      device_class: connectivity

  sensor:
    - name: "Front Door Camera Debug"
      state_topic: "frontdoorcamera/debug"
      icon: mdi:bug

    - name: "Front Door Camera Uptime"
      state_topic: "frontdoorcamera/ping"
      value_template: "{{ value_json.uptime }}"
      unit_of_measurement: "s"
      device_class: duration
      expire_after: 150

    - name: "Front Door Camera WiFi Signal"
      state_topic: "frontdoorcamera/ping"
      value_template: "{{ value_json.rssi }}"
      unit_of_measurement: "dBm"
      device_class: signal_strength
      expire_after: 150

    - name: "Front Door Camera IP"
      state_topic: "frontdoorcamera/ping"
      value_template: "{{ value_json.ip }}"
      expire_after: 150

    - name: "Front Door Camera Free Heap"
      state_topic: "frontdoorcamera/ping"
      value_template: "{{ value_json.free_heap }}"
      unit_of_measurement: "B"
      expire_after: 150

    - name: "Front Door Camera Free PSRAM"
      state_topic: "frontdoorcamera/ping"
      value_template: "{{ value_json.free_psram }}"
      unit_of_measurement: "B"
      expire_after: 150
You can then add these new entries into your Homeassistant user interface.
Mobile Phone notifications
I already had a notify action for our phones called "notify.all_ios", so the automation is short. It triggers when the parcel sensor changes to on, waits a few seconds for the snapshot to arrive and sends the notification with the picture attached.
alias: Parcel detected at front door
triggers:
  - trigger: state
    entity_id: binary_sensor.front_door_parcel_detector_parcel
    from: "off"
    to: "on"
actions:
  - delay: "00:00:03"
  - action: notify.all_ios
    data:
      title: Parcel Detected
      message: Parcel Detected at front door
      data:
        image: "{{ state_attr('image.front_door_parcel_detector_parcel_snapshot', 'entity_picture') }}"
mode: single
Replace the entity names and the notify action with your own.
Things to be aware of with this code
- The reference needs retaking if the camera is knocked or the steps are repainted. If more than 85% of the zone changes at once, the detector assumes the camera has moved and ignores the frame.
- Very small items will not be detected unless the trigger thresholds are lowered, which makes false alarms more likely.
- A large, static, hard-edged shadow can look like a parcel.
- It does not know what the object is. A bag, a bin or a delivery driver sitting on the step for a minute would all be reported.
Downloads
Future Plans
It has been a useful little project and it was a good excuse to learn how much can be done with OpenCV and no machine learning at all. Lighting is the hard part of any outdoor camera project, and normalising the image and being patient with the timing did more than any amount of tuning of the thresholds. I may try adding a second stage that runs a small classifier on the changed area, so it can tell a parcel from a bin bag. If you have tried something similar, let me know in the comments.
The camera does not have any built in infrared lights and the lens has a infrared filter so I cannot use any external lights for night time detection. I will look into other camera options later if I start getting more night time deliveries.


Comments