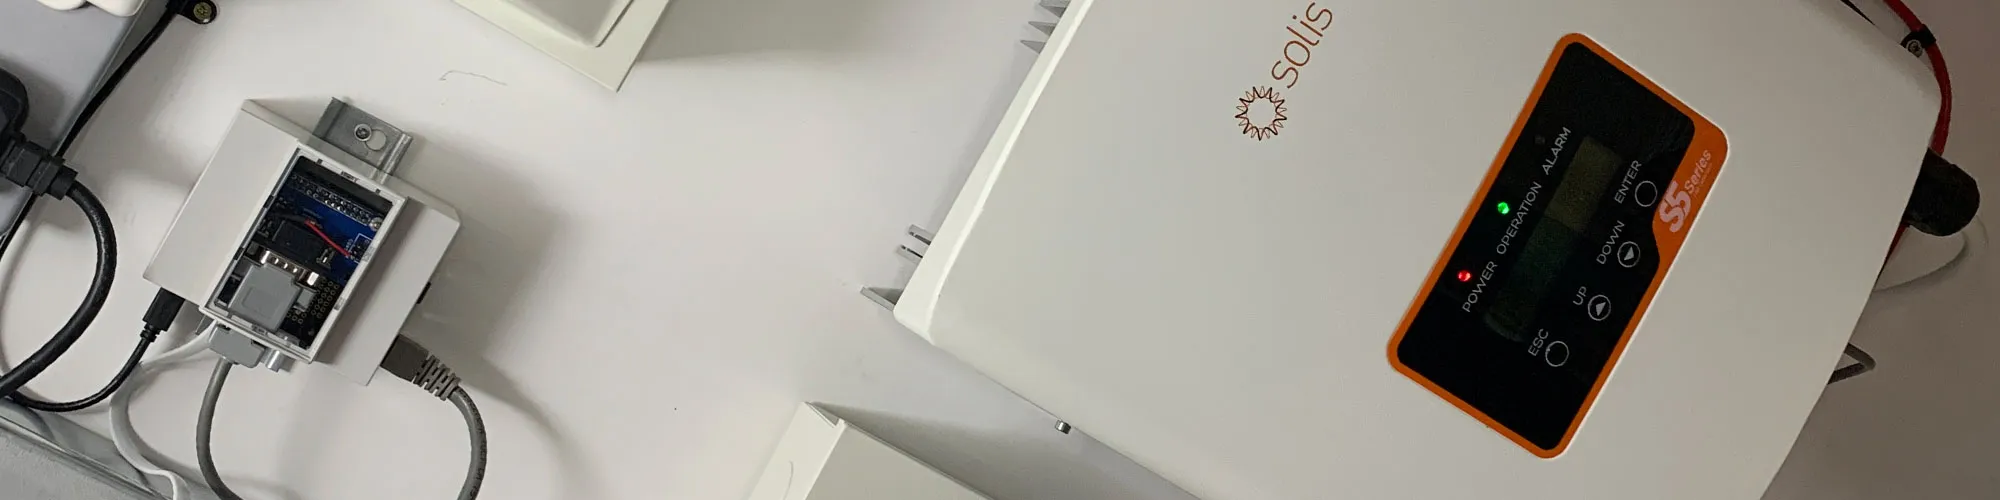
Our plans to upgrade our solar PV system this year are slowly progressing with installing a new Solis 1.5kW inverter and an EM112 Series Energy Meter, which have RS485 output and communicate using Modbus protocol.
Following being scammed by the Zero Home Bills solar panel supplier, we placed an order with another supplier whose website showed that they had the panels we required in stock, but after a few days, they contacted me to say they did not have them, and the website hadn't been updated for a long time. They are now looking for alternative panels which are similar dimensions to fit across our roof.
Solar Panel Sizes
The space available on our roof is 4 meters across and 3.8 meters high, and with the fixing hardware, we would not be able to fit four regular-size panels as they are typically 2,108mm x 1,048mm in size; this would limit us to a single row of 3 panels, and with 400W panels, this would only give us a theoretical maximum output of 1.2kW.
We found panels produced by JA Solar which are 1689 x 996mm and have a 330W output, and we could fit 5 or 6 of these on the roof between the chimneys. To minimise shadows over the top row of panels, we decided to mount 2 on the top row and 3 below, which will give us a theoretical maximum output of 1.6kW, which is suitable for the Solis Solar 1.5kW Mini 5G Inverter.
To mount the new panels, we ordered 4 x 3.3m mounting rails and associated fixings and brackets from Dragons Breath Solar, who have been very helpful when selecting the hardware needed.
New install in the basement
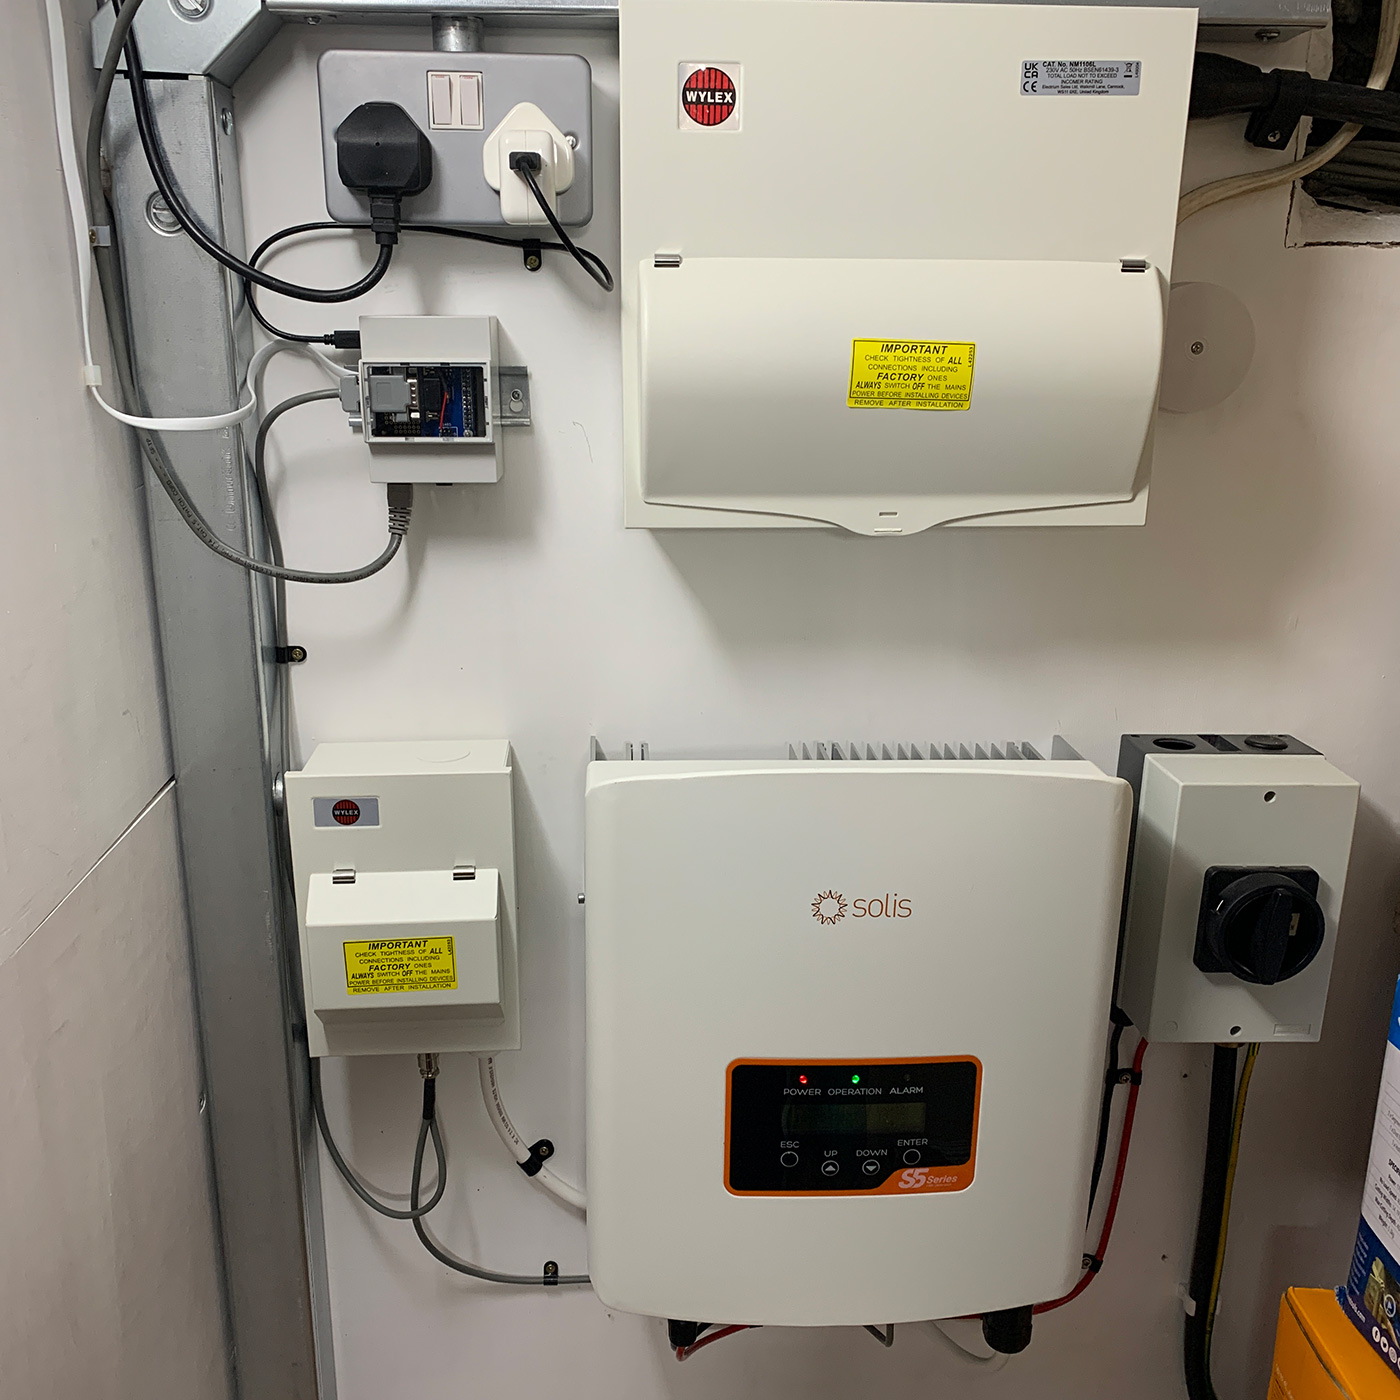
We decided to move our solar PV inverter installation from its previous location in the loft to the shed below the house. This has thick stone walls and a concrete ceiling and has space to install 2 inverters and a battery system later if required.
To get the solar PV power from the roof down to the basement shed, we purchased 20 meters of 6mm armoured cable; this was routed down the back of the house and into the shed through the stone wall.
This feeds into a DC isolator and onto the new solar PV inverter.
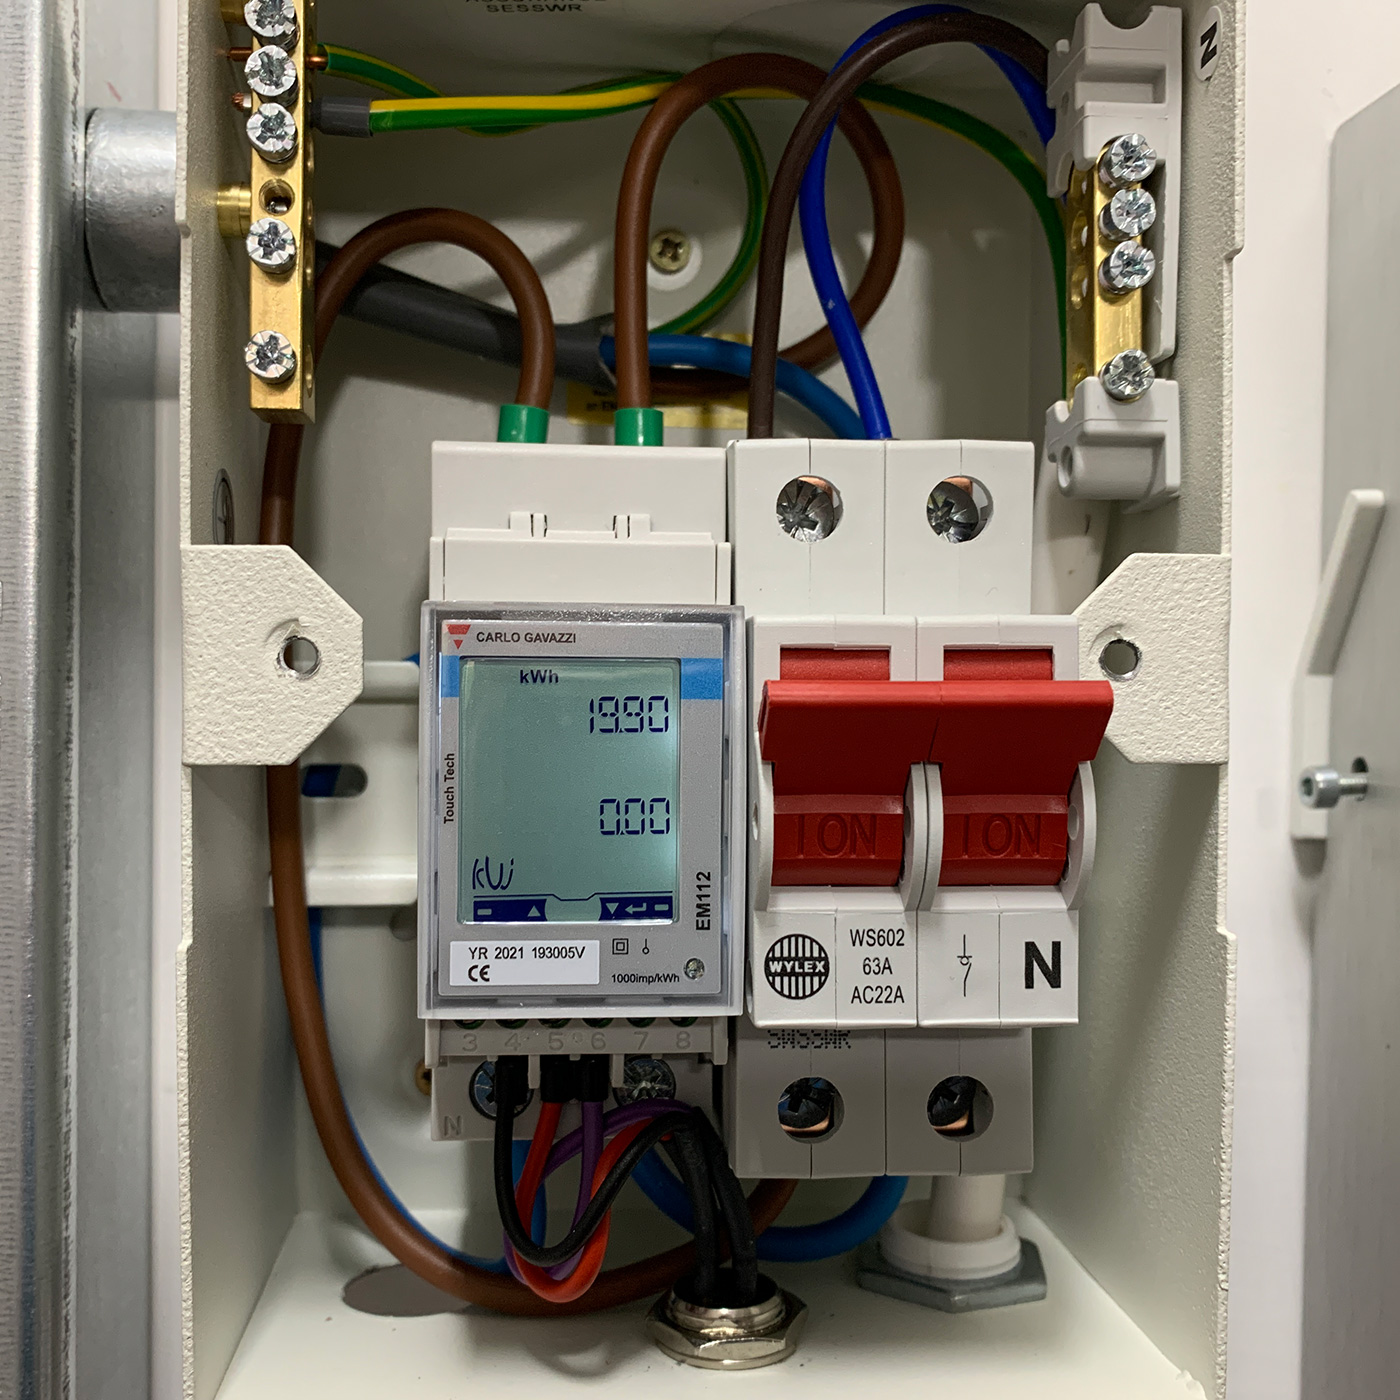
The new inverter is connected to a double pole mains isolator. It has an EM112 Series Energy Meter fitted in the same box to monitor energy production and consumption of the inverter. This is connected to the fuse box and has a 16 amp RCBO to protect the circuit.
Reading Data for Home Assistant
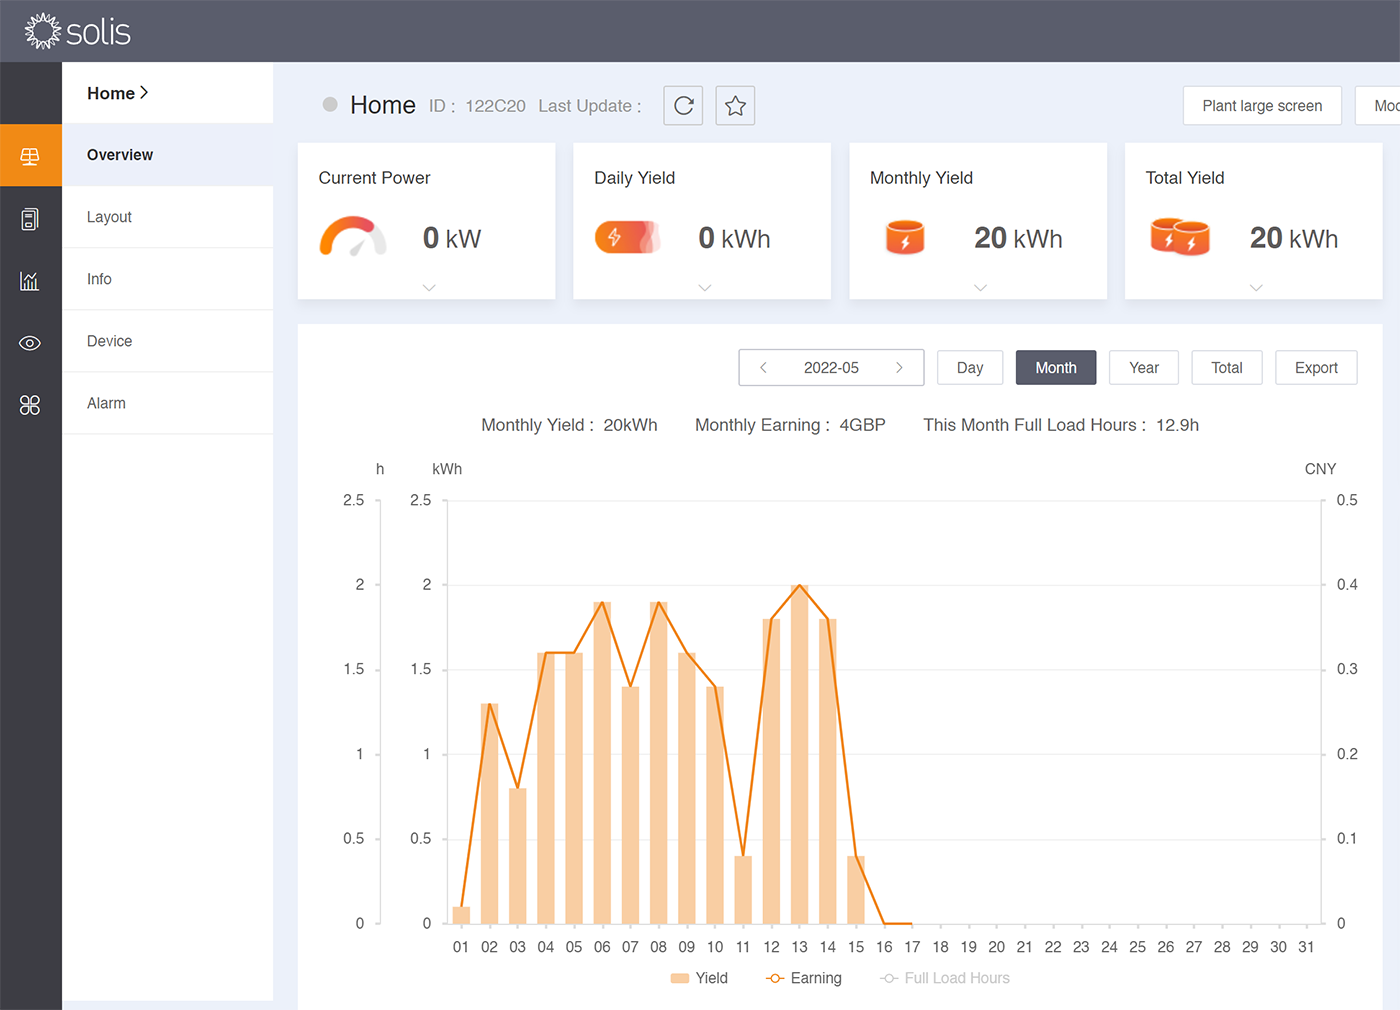
Using the Solis Data Logging Stick, which uses WiFi to communicate, we were able to set up the inverter to send data to the remote soliscloud service, but we could not find any way to get capture data apart from scraping the basic status page built into the WiFi adapter which only gave watts being produced and daily output.
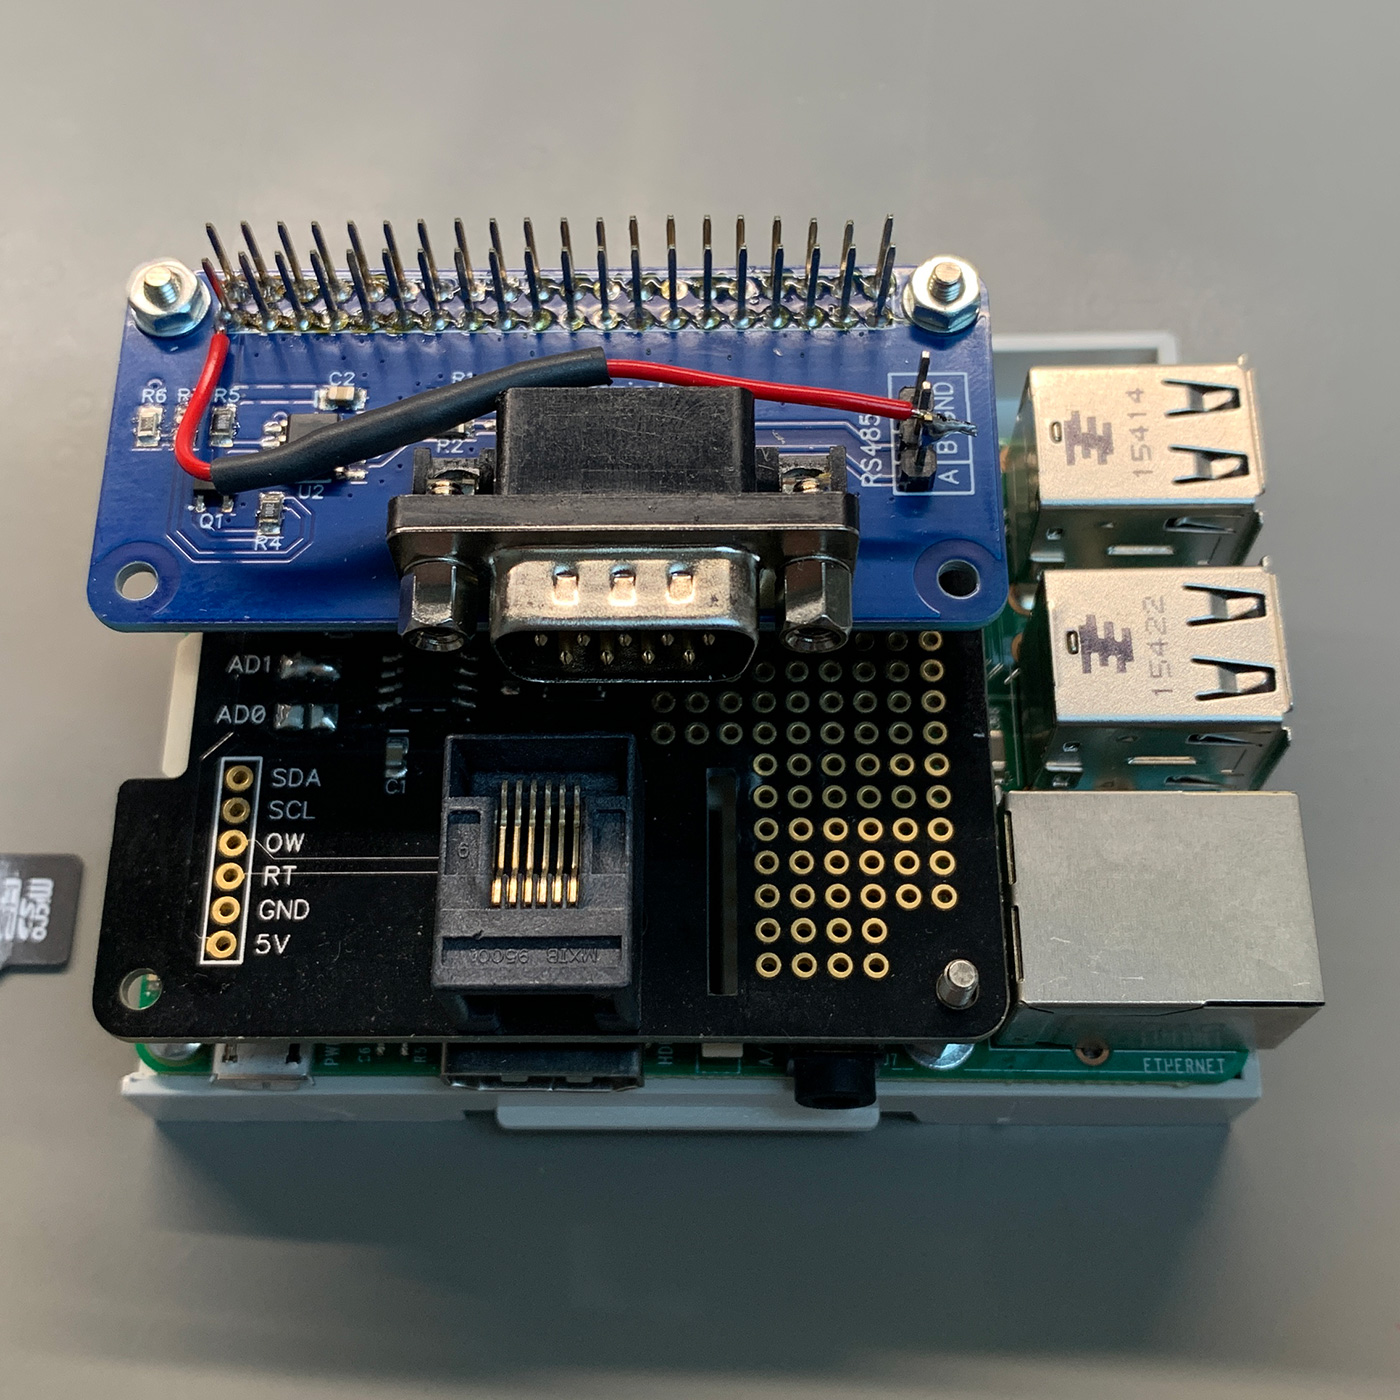
As the Solis inverter uses RS485 to communicate with the data logging stick, we tried to connect to the inverter using one of our RS485 Raspberry Pi development boards from abelectronics.co.uk/p/77/rs485-pi and a Raspberry Pi 3. I found code on sequr.be/blog, which reads the data from the inverter and sends it to an MQTT broker. This is how we wanted to use the data with Home Assistant reading the MQTT data from the broker. We can also use this to upload to our long-term storage data logger online.
The data COM port on the base of the Solis inverter uses a small round 4-pin plug with a screw thread to hold it in place when connected. After a lot of searching, I found that the connector is an Exceedconn EC04681-2014-BF. Pin 3 on the connector is connected to A on the RS485 Pi, and pin 4 is connected to B.
RS485 uses two wires and sometimes a ground connection, so we used a twin-screen cable to go between the inverter to the EM112 Series Energy Meter and then onto the Raspberry Pi with a DB9 connector connected to the RS485 Pi board. This shields the inner data wires from external interference.
On the Raspberry Pi, we also installed a 1-Wire Pi Plus board, and this is used with a temperature sensor fitted in the shed to monitor the air temperature, which is also posted to the MQTT server and Home Assistant.
Setting up the Raspberry Pi
We installed a new Micro SD card with the latest Raspberry Pi OS, and after updating the software, the serial port and i2c bus were enabled.
The following packages are installed using:
sudo apt update
sudo apt install -y python3 python3-pip
python3 -m pip install -U pyserial
python3 -m pip install -U minimalmodbus
python3 -m pip install -U paho.mqtt
Troubleshooting connection issues with the Solis Inverter
With the Solis inverter connected to the Raspberry Pi, we were initially unable to communicate with the inverter, and the Python scripts returned connection errors.
We tried several RS485 Pi hats, but all had the same issue.
With the RS485 Pi connected to the energy meter, we could read the data but not from the inverter.
After several frustrating days of trying different combinations of RS485 hats, different wiring connections, with and without termination resistors and ordering a USB RS485 adapter which would also fail to connect, we tried to install the Data logging WiFi adapter. We connected the A and B wires to the pins on the adapter's circuit board. With the inverter set to address 2 we could then read the data from the Raspberry Pi, but the WiFi adapter could not read the data as it was expecting the inverter to be on address 1.
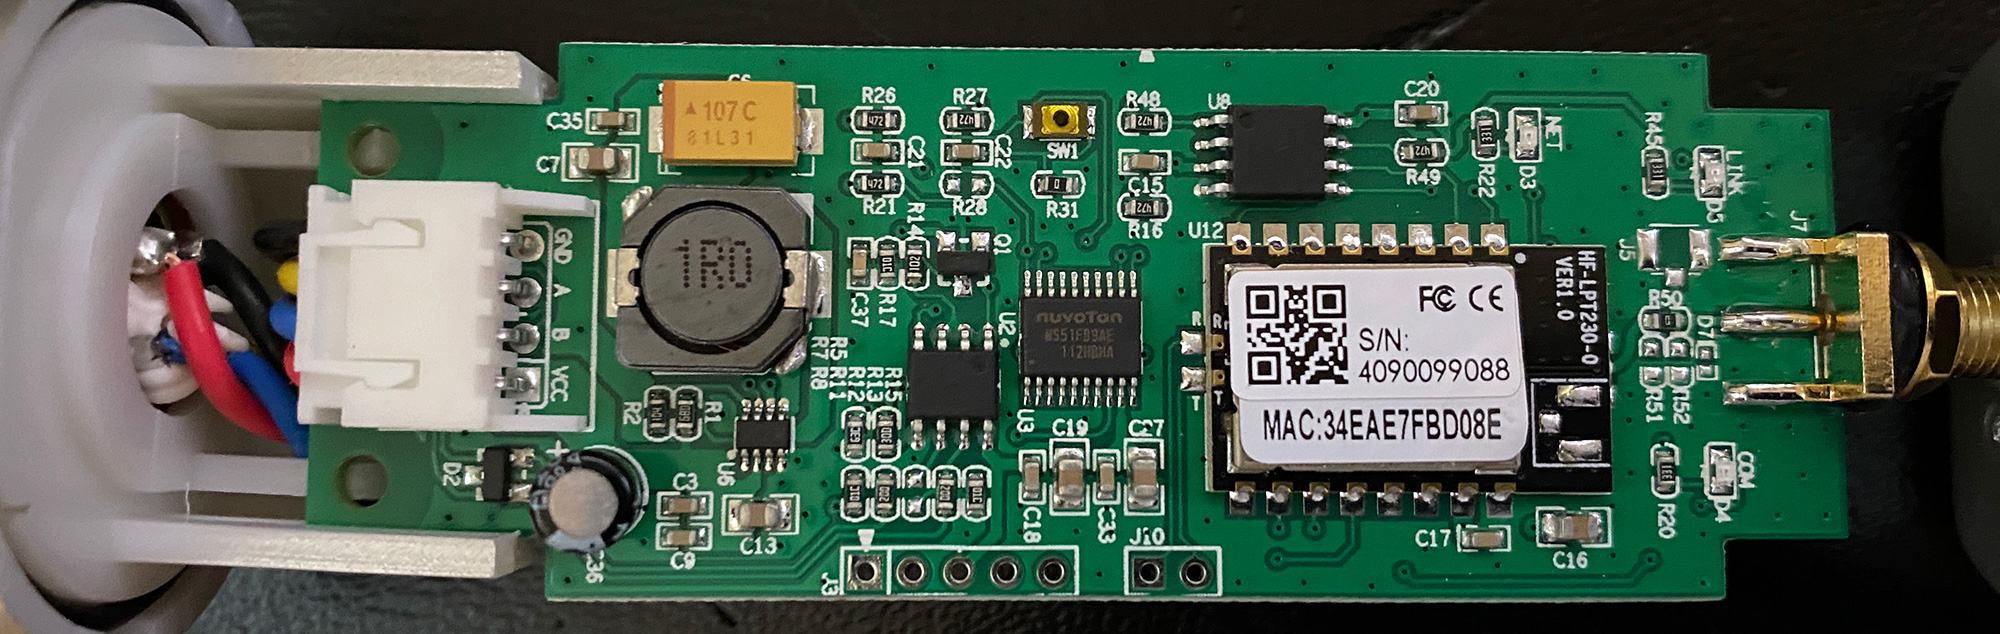
Removing the WiFi adapter and connecting directly to the inverter's COM port resulted in no data again so we knew that there was something on the WiFi adapter enabling the data from the inverter.
The adapter was placed under the microscope, and we traced the data A & B lines from the plug to the RS485 chip on the PCB. We found that there are 10K ohm resistors fitted on the A & B data lines with the A channel having a 10K pull-up resistor to 3.3 volts and the B channel having a 10K pull-down resistor to ground.
We then added the 10K pull-up and pull-down resistors to the RS485 Pi board and connected it directly to the Solis inverter. The RS498 bus was working correctly, and we could read values from the device.
I found several documents related to the available Modbus registers on the Solis inverters, but the list on AGGsoftware was the most compressive. The page is no longer on their website and I have copied the following table from the web archive for future reference:
| MODBUS offset | Description | Units | Data type |
|---|---|---|---|
| 3021 | System time year | a | word |
| 3022 | System time month | word | |
| 3023 | System time day | a | word |
| 3024 | System time | word | |
| 3025 | System time | word | |
| 3026 | System time second | word | |
| 3028 | Inverter total power generation | kW | dword |
| 3030 | Inverter power generation in the month | kW | dword |
| 3032 | Inverted last month's power generation | kW | dword |
| 3034 | Inverter power generation today | kW | word |
| 3035 | Inverter yesterday's power generation | kW | word |
| 3036 | Inverter power generation this year | kW | dword |
| 3038 | Inverter last year's power generation | kW | dword |
| 3048 | Dc voltage 1 | V | word |
| 3049 | Dc current 1 | A | word |
| 3050 | Dc voltage 2 | V | word |
| 3051 | Dc current 2 | A | word |
| 3052 | Dc voltage 3 | V | word |
| 3053 | Dc current 3 | A | word |
| 3054 | Dc voltage 4 | V | word |
| 3055 | Dc current 4 | A | word |
| 3056 | Total dc output power | W | dword |
| 3070 | Dc bus voltage | V | word |
| 3071 | Dc bus half voltage | V | word |
| 3072 | Ab line voltage / phase A voltage | V | word |
| 3073 | Bc line voltage / phase B voltage | V | word |
| 3074 | Ca line voltage / C phase voltage | V | word |
| 3075 | Phase A current | A | word |
| 3076 | Phase B current | A | word |
| 3077 | Phase C current | A | word |
| 3078 | Active power | W | integer |
| 3082 | Apparent power | V | integer |
| 3091 | National standard | word | |
| 3092 | Inverter temperature | word | |
| 3093 | Grid frequency | Hz | word |
| 3094 | Current state of the inverter | word | |
| 3103 | Actual power | word | |
| 3104 | Actual power | smallint | |
| 3114 | Set the flag bit | word | |
| 3125 | Electricity meter total active power generation | Wh | dword |
| 3127 | Meter voltage | word | |
| 3128 | Meter current | word | |
| 3129 | Meter active power | integer | |
| 3131 | Energy storage control switch | word | |
| 3132 | Battery voltage | V | word |
| 3133 | Battery current | A | smallint |
| 3134 | Battery current direction | word | |
| 3135 | Llcbus voltage | V | word |
| 3136 | Bypassac voltage | V | word |
| 3137 | Bypass ac current | A | word |

Python Code and upload scripts
To test the Solis Inverter, we created the following Python script, which connects to the inverter with its address ID set as 2 and then reads the data from the registers:
import minimalmodbus
import socket
import serial
import time

solis1500 = minimalmodbus.Instrument('/dev/ttyAMA0', 2)
solis1500.serial.baudrate = 9600
solis1500.serial.bytesize = 8
solis1500.serial.parity = serial.PARITY_NONE
solis1500.serial.stopbits = 1
solis1500.serial.timeout = 3

# get data from solis mini 3000

print("SSW (Solis Mini 3000 4G)")
AlltimeEnergy_KW_z = solis1500.read_long(3008, functioncode=4, signed=False) # Read All Time Energy (KWH Total) as Unsigned 32-Bit
print("Generated (All time):" +str(AlltimeEnergy_KW_z) + "kWh")
Today_KW_z = solis1500.read_register(3014, functioncode=4, signed=False) # Read Today Energy (KWH Total) as 16-Bit
print("Generated (Today) :" + str(Today_KW_z/10) + "kWh")

Solis1500_ACW = solis1500.read_long(3004, functioncode=4, signed=False) # Read AC Watts as Unsigned 32-Bit

Solis1500_DCV = solis1500.read_register(3021, number_of_decimals=1, functioncode=4, signed=False) # Read DC Volts as Unsigned 16-Bit

Solis1500_DCI = solis1500.read_register(3022, number_of_decimals=0, functioncode=4, signed=False) # Read DC Current as Unsigned 16-Bit

Solis1500_ACV = solis1500.read_register(3035, number_of_decimals=1, functioncode=4, signed=False) # Read AC Volts as Unsigned 16-Bit

Solis1500_ACI = solis1500.read_register(3038, number_of_decimals=0, functioncode=4, signed=False) # Read AC Current as Unsigned 16-Bit

Solis1500_ACF = solis1500.read_register(3042, number_of_decimals=2, functioncode=4, signed=False) # Read AC Frequency as Unsigned 16-Bit

Solis1500_Temp = solis1500.read_register(3041, number_of_decimals=1, functioncode=4, signed=True) # Read Inverter Temperature as Signed 16-Bit

Solis1500_AlltimeEnergy_KW = solis1500.read_long(3008, functioncode=4, signed=False) # Read All Time Energy (KWH Total) as Unsigned 32-Bit

Solis1500_Today_KW = solis1500.read_register(3014, number_of_decimals=1, functioncode=4, signed=False) # Read Today Energy (KWH Total) as 16-Bit

print("{:<23s}{:10.2f} W".format("AC Watts", Solis1500_ACW))
                       print("{:<23s}{:10.2f} V".format("DC Volt", Solis1500_DCV))
print("{:<23s}{:10.2f} A".format("DC Current", Solis1500_DCI))
print("{:<23s}{:10.2f} V".format("AC Volt", Solis1500_ACV))
print("{:<23s}{:10.2f} A".format("AC Current", Solis1500_ACI))
print("{:<23s}{:10.2f} Hz".format("AC Frequency", Solis1500_ACF))
print("{:<23s}{:10.2f} °C".format("Inverter Temperature", Solis1500_Temp))
print("{:<23s}{:10.2f} kWh".format("Generated (All time)", Solis1500_AlltimeEnergy_KW))
print("{:<23s}{:10.2f} kWh".format("Generated (Today)", Solis1500_Today_KW))
To test the EM112 Series Energy Meter, we created the following Python script, which connects to the meter, which had its address ID set as 5 and then reads the registers data:
import minimalmodbus
import serial

### Registers

REG_VOLTS =         0x00  # 2 word INT32
REG_AMPS =          0x02  # 2 word INT32
REG_WATTS =         0x04  # 2 word INT32
REG_VA =            0x06  # 2 word INT32
REG_VAR =           0x08  # 2 word INT32
REG_W_DMD =         0x0A  # 2 word INT32
REG_W_DMD_PEAK =    0x0C  # 2 word INT32
REG_PF =            0x0E  # 1 word INT32
REG_HZ =            0x0F  # 1 word INT32
REG_KWP_TOTAL =     0x10  # 2 word INT32
REG_KVARH_TOTAL =   0x12  # 2 word INT32
REG_KWP_PARTIAL =   0x14  # 2 word INT32
REG_KVARH_PARTIAL = 0x16  # 2 word INT32
REG_KWN_TOTAL =     0x20  # 2 word INT32

instrument = minimalmodbus.Instrument('/dev/ttyAMA0', 5, debug = True)
instrument.serial.baudrate = 9600   # Baud
instrument.serial.bytesize = 8
instrument.serial.parity   = serial.PARITY_NONE
instrument.serial.stopbits = 1
instrument.clear_buffers_before_each_transaction = True
instrument.serial.timeout  = 0.5   # seconds

Realtime_Volts = instrument.read_register(REG_VOLTS, functioncode=4, signed=False)	 # Read Volts
Realtime_Amps = instrument.read_long(REG_AMPS, functioncode = 3, signed = True, byteorder = 3) / 1000	 # Read Volts
Realtime_Watts = instrument.read_long(REG_WATTS, functioncode = 3, signed = True, byteorder = 3) / 10	 # Read Volts
Realtime_KW_Partial = instrument.read_long(REG_KWP_PARTIAL, functioncode = 3, signed = True, byteorder = 3) / 10	 # Read Volts

print("Volts:               " + str(Realtime_Volts))
print("Amps:                " + str(Realtime_Amps))
print("Watts:               " + str(Realtime_Watts))
print("KW Partial:          " + str(Realtime_KW_Partial))
With the data now showing correctly from both devices, the next stage was to create a new Python script which reads the meter and inverter and uploads this to our MQTT server. To do this, we used the following code:
#!/usr/bin/python3
"""
Python script to monitor inverter electric meter and forward data to mqtt broker
"""
from __future__ import absolute_import, division, print_function, \
                                                    unicode_literals
import minimalmodbus
import serial
import sys
import re
import paho.mqtt.client as mqtt
import sched, time

DEBUG = False

def trace(output):
    if DEBUG:
        print(output)

mqtt_broker = '192.168.1.10'
mqtt_user = 'user'
mqtt_pass = 'password'
mqtt_port = 1883

### Energy Meter Registers

### All registers use function code 4

METER_REG_VOLTS =         0x00  # 2 word INT32
METER_REG_AMPS =          0x02  # 2 word INT32
METER_REG_WATTS =         0x04  # 2 word INT32
METER_REG_VA =            0x06  # 2 word INT32
METER_REG_VAR =           0x08  # 2 word INT32
METER_REG_W_DMD =         0x0A  # 2 word INT32
METER_REG_W_DMD_PEAK =    0x0C  # 2 word INT32
METER_REG_PF =            0x0E  # 1 word INT32
METER_REG_HZ =            0x0F  # 1 word INT32
METER_REG_KWP_TOTAL =     0x10  # 2 word INT32
METER_REG_KVARH_TOTAL =   0x12  # 2 word INT32
METER_REG_KWP_PARTIAL =   0x14  # 2 word INT32
METER_REG_KVARH_PARTIAL = 0x16  # 2 word INT32
METER_REG_KWN_TOTAL =     0x20  # 2 word INT32

### Solis 1500 Registers

### All registers use function code 4

SOLIS1500_REG_ACWATTS =   3004  # Read AC Watts as Unsigned 32-Bit
SOLIS1500_REG_DCVOLTS =   3021  # Read DC Volts as Unsigned 16-Bit
SOLIS1500_REG_DCCURRENT = 3022  # Read DC Current as Unsigned 16-Bit
SOLIS1500_REG_ACVOLTS =   3035  # Read AC Volts as Unsigned 16-Bit
SOLIS1500_REG_ACCURRENT = 3038  # Read AC Current as Unsigned 16-Bit
SOLIS1500_REG_ACFREQ =    3042  # Read AC Frequency as Unsigned 16-Bit
SOLIS1500_REG_ALLTIMEKW = 3008  # Read All Time Energy (KWH Total) as Unsigned 32-Bit
SOLIS1500_REG_TODAYKW =   3014  # Read Today Energy (KWH Total) as 16-Bit

client = mqtt.Client("P1") #create new instance
energymeter = minimalmodbus.Instrument('/dev/ttyAMA0', 5, debug = False, close_port_after_each_call = True)
solis1500 = minimalmodbus.Instrument('/dev/ttyAMA0', 2, debug = False, close_port_after_each_call = True)

# The callback for when the client receives a CONNACK response from the server.
def on_connect(mqttc, obj, flags, rc):
    if rc!=0:
       trace("Bad connection Returned code=",rc)
       # trace("MQTT Connected with result code "+str(rc))
    #else:

def on_disconnect(client, userdata, rc):
    trace("MQTT Disconnected with result code "+str(rc))

def data_loop(sc):
    client.connect(mqtt_broker, mqtt_port, 60) # connect to mqtt broker

    # Get data from energy meter
    try:
        Realtime_Volts = energymeter.read_long(METER_REG_VOLTS, functioncode = 3, signed = True, byteorder = 3) / 10	 # Read Volts
        Realtime_Amps = energymeter.read_long(METER_REG_AMPS, functioncode = 3, signed = True, byteorder = 3) / 1000	 # Read Volts
        Realtime_Watts = energymeter.read_long(METER_REG_WATTS, functioncode = 3, signed = True, byteorder = 3) / 10	 # Read Volts
        Realtime_KW_Partial = energymeter.read_long(METER_REG_KWP_PARTIAL, functioncode = 3, signed = True, byteorder = 3) / 10	 # Read Volts

        client.publish("/home/solarpv/meter/volts",Realtime_Volts)
        client.publish("/home/solarpv/meter/amps",Realtime_Amps)
        client.publish("/home/solarpv/meter/watts",Realtime_Watts)
        client.publish("/home/solarpv/meter/kwtotal",Realtime_KW_Partial)
    except Exception as err:
        print(err)

    # Get data from Solis 1500 Inverter
    try:
        Solis1500_DCV = solis1500.read_register(3021, number_of_decimals=1, functioncode=4, signed=False) # Read DC Volts as Unsigned 16-Bit
        Solis1500_DCI = solis1500.read_register(3022, number_of_decimals=0, functioncode=4, signed=False) / 10 # Read DC Current as Unsigned 16-Bit
        Solis1500_ACV = solis1500.read_register(3035, number_of_decimals=1, functioncode=4, signed=False) # Read AC Volts as Unsigned 16-Bit
        Solis1500_ACI = solis1500.read_register(3038, number_of_decimals=0, functioncode=4, signed=False) / 10 # Read AC Current as Unsigned 16-Bit
        Solis1500_ACW = solis1500.read_long(3004, functioncode=4, signed=False) # Read AC Watts as Unsigned 32-Bit
        Solis1500_ACF = solis1500.read_register(3042, number_of_decimals=2, functioncode=4, signed=False) # Read AC Frequency as Unsigned 16-Bit
        Solis1500_Temp = solis1500.read_register(3041, number_of_decimals=1, functioncode=4, signed=True) # Read Inverter Temperature as Signed 16-Bit
        Solis1500_AlltimeEnergy_KW = solis1500.read_long(3008, functioncode=4, signed=False) # Read All Time Energy (KWH Total) as Unsigned 32-Bit
        Solis1500_Today_KW = solis1500.read_register(3014, number_of_decimals=1, functioncode=4, signed=False) # Read Today Energy (KWH Total) as 16-Bit

        client.publish("/home/solarpv/pvvolt",Solis1500_DCV)
        client.publish("/home/solarpv/pvamp",Solis1500_DCI)
        client.publish("/home/solarpv/gridvolt",Solis1500_ACV)
        client.publish("/home/solarpv/gridcurrent",Solis1500_ACI)
        client.publish("/home/solarpv/gridpower",Solis1500_ACW)
        client.publish("/home/solarpv/gridfrequency",Solis1500_ACF)
        client.publish("/home/solarpv/devicetemp",Solis1500_Temp)
        client.publish("/home/solarpv/totalpower",Solis1500_AlltimeEnergy_KW)
        client.publish("/home/solarpv/todaypower",Solis1500_Today_KW)
        client.publish("/home/solarpv/online",1)

        trace("{:<23s}{:10.2f} W".format("AC Watts", Solis1500_ACW))
                               trace("{:<23s}{:10.2f} V".format("DC Volt", Solis1500_DCV))
        trace("{:<23s}{:10.2f} A".format("DC Current", Solis1500_DCI))
        trace("{:<23s}{:10.2f} V".format("AC Volt", Solis1500_ACV))
        trace("{:<23s}{:10.2f} A".format("AC Current", Solis1500_ACI))
        trace("{:<23s}{:10.2f} Hz".format("AC Frequency", Solis1500_ACF))
        trace("{:<23s}{:10.2f} °C".format("Inverter Temperature", Solis1500_Temp))
        trace("{:<23s}{:10.2f} kWh".format("Generated (All time)", Solis1500_AlltimeEnergy_KW))
        trace("{:<23s}{:10.2f} kWh".format("Generated (Today)", Solis1500_Today_KW))
    except Exception as err:
        trace(err)
        client.publish("/home/solarpv/pvvolt",0)
        client.publish("/home/solarpv/pvamp",0)
        client.publish("/home/solarpv/gridvolt",0)
        client.publish("/home/solarpv/gridcurrent",0)
        client.publish("/home/solarpv/gridpower",0)
        client.publish("/home/solarpv/gridfrequency",0)
        client.publish("/home/solarpv/devicetemp",0)
        client.publish("/home/solarpv/online",0)

    client.disconnect() # disconnect from mqtt broker

    sc.enter(60, 1, data_loop, (sc,))

def main():

    s = sched.scheduler(time.time, time.sleep)

    client.username_pw_set(mqtt_user, mqtt_pass)
    client.on_connect = on_connect
    client.on_disconnect = on_disconnect

    energymeter.serial.baudrate = 9600   # Baud
    energymeter.serial.bytesize = 8
    energymeter.serial.parity   = serial.PARITY_NONE
    energymeter.serial.stopbits = 1
    energymeter.clear_buffers_before_each_transaction = True
    energymeter.serial.timeout  = 0.5   # seconds
    energymeter.mode = minimalmodbus.MODE_RTU

    solis1500.serial.baudrate = 9600   # Baud
    solis1500.serial.bytesize = 8
    solis1500.serial.parity   = serial.PARITY_NONE
    solis1500.serial.stopbits = 1
    solis1500.clear_buffers_before_each_transaction = True
    solis1500.serial.timeout  = 0.5   # seconds
    solis1500.mode = minimalmodbus.MODE_RTU

    s.enter(60, 1, data_loop, (s,))
    s.run()

if __name__ == "__main__":
    main()
The script sends the data to an MQTT server on IP 192.168.1.10. This needs to be changed with the username and password to suit your MQTT server. The script runs every 60 seconds.
For the Maxim ds18b20 1-wire temperature sensor, we used the following Python script, which reads the connected sensor and the Raspberry Pi CPU temperature and uploads it to the MQTT server:
#!/usr/bin/env python3
"""
Python script to monitor serial port and forward sensor data to mqtt broker
"""
from __future__ import absolute_import, division, print_function, \
                                                    unicode_literals
import serial
import datetime
import sys
import re
import paho.mqtt.client as mqtt
import sched, time
DEBUG = False

def trace(output):
    if DEBUG:
        print(output)

mqtt_topics = {
    "/sys/bus/w1/devices/28-000003c45227/temperature": "/home/shed/temperature", #shed temperature
    "/sys/class/thermal/thermal_zone0/temp": "/home/devices/solar_raspberry_pi/temperature", #solar raspberry pi temperature
}

mqtt_broker = '192.168.1.10'
mqtt_user = 'user'
mqtt_pass = 'password'
mqtt_port = 1883

client = mqtt.Client("P1") #create new instance

# The callback for when the client receives a CONNACK response from the server.
def on_connect(mqttc, obj, flags, rc):
    if rc!=0:
       trace("Bad connection Returned code=",rc)
       # trace("MQTT Connected with result code "+str(rc))
    #else:

def on_disconnect(client, userdata, rc):
    trace("MQTT Disconnected with result code "+str(rc))

def data_loop(sc):
    try:
        # loop through sensors and get values
        for sensor, topic in mqtt_topics.items():
            with open(sensor, 'r') as file:
                data = file.read()

                temperature = int(data) / 1000
                trace(temperature)
                # publish to mqtt
                client.connect(mqtt_broker, mqtt_port, 60)
                client.publish(topic,temperature)
                client.disconnect()
    except Exception as err:
        trace("Failed to open files: {0}".format(err))

    sc.enter(60, 1, data_loop, (sc,))

def main():
    s = sched.scheduler(time.time, time.sleep)

    client.username_pw_set(mqtt_user, mqtt_pass)
    client.on_connect = on_connect
    client.on_disconnect = on_disconnect

    s.enter(60, 1, data_loop, (s,))
    s.run()


if __name__ == "__main__":
    main()
Home Assistant
To add the new data to Home Assistant, new MQTT sensors were added to the configuration.yaml
# Start solar pv

- platform: mqtt
  state_topic: "/home/solarpv/pvvolt"
  name: "SolarPV Panel Volts"
  unit_of_measurement: V
  scan_interval: 30

- platform: mqtt
  state_topic: "/home/solarpv/pvamp"
  name: "SolarPV Panel Amps"
  unit_of_measurement: A
  scan_interval: 30

- platform: mqtt
  state_topic: "/home/solarpv/gridpower"
  name: "SolarPV GridPower"
  unit_of_measurement: W
  scan_interval: 30

- platform: mqtt
  state_topic: "/home/solarpv/totalpower"
  name: "SolarPV TotalGenerated"
  unit_of_measurement: Kwh
  scan_interval: 30

- platform: mqtt
  state_topic: "/home/solarpv/devicetemp"
  name: "SolarPV Inverter Temp"
  unit_of_measurement: C
  scan_interval: 20

- platform: mqtt
  state_topic: "/home/solarpv/todaypower"
  name: "SolarPV TodayGenerated"
  unit_of_measurement: Kwh
  scan_interval: 30

- platform: mqtt
  state_topic: "/home/solarpv/online"
  name: "SolarPV Inverter Online"
  scan_interval: 30


- platform: mqtt
  state_topic: "/home/solarpv/meter/amps"
  name: "SolarPV Total Meter Amps"
  unit_of_measurement: A
  scan_interval: 30

- platform: mqtt
  state_topic: "/home/solarpv/meter/watts"
  name: "SolarPV Total Meter GridPower"
  unit_of_measurement: W
  scan_interval: 30

- platform: mqtt
  state_topic: "/home/solarpv/meter/kwtotal"
  name: "SolarPV Total Meter TotalGenerated"
  unit_of_measurement: Kwh
  scan_interval: 30


- platform: mqtt
  state_topic: "/home/shed/temperature"
  name: "Shed Temperature"
  unit_of_measurement: °C
  scan_interval: 30

- platform: mqtt
  state_topic: "/home/devices/solar_raspberry_pi/temperature"
  name: "Shed RaspberryPi Temperature"
  unit_of_measurement: °C
  scan_interval: 30


# End solar pv
Home Assistant needs to be restarted to enable the new sensors, and after a reboot, they can be added to the user interface on a card of your choice.
Parts Used:
Solis Solar Inverter 1.5kW Mini 5G www.itstechnologies.shop/products/solis-solar-inverter-1-5kw-mini-5g-single-tracker-with-dc-isolator
Solis Data Logging Stick – WiFi www.itstechnologies.shop/products/solis-data-logging-stick-wifi-gen-3
EM112 Series Energy Meter uk.farnell.com/carlo-gavazzi/em112dinav01xs1x/digital-energy-meter-1-phase-230vac/dp/2672858
1 Wire Pi Plus abelectronics.co.uk/p/60/1-wire-pi-plus
RS485 Pi abelectronics.co.uk/p/77/rs485-pi
Maxim ds18b20 uk.farnell.com/maxim-integrated-products/ds18b20/temperature-sensor/dp/2515553
WYLEX 4-module 2-way part populated the the main switch consumer unit: screwfix.com/p/wylex-4-module-2-way-part-populated-main-switch-consumer-unit/3056j


andig
Hello Brian,
I'm a long-time reader of your blog. Not sure if it's relevant for you, but if pv-controlled EV charging is a use case you're looking into after upgrading your panels you might be interested in https://github.com/evcc-io/evcc
Cheers,
Andi
michael
Hi Brian.
Thanks a lot for this write-up.
Michael
Steve
Really Interesting! ...I am pulling my hair out trying to get 485 Modbus working on a new Solis S6 GR1P3.6-M inverter, If I transfer the Coms cable to a Solis 4G mini then it all replies perfectly (using 04 input register reads 3005 to say 3015 all addres 01), on the S6 Nothing!. On the S6 I can see the signal on A+ relative to the inverter 0V is a DC line around 4V and B- shows the request signal with a baseline approx 3.5V and top of signal 8V! . Tried your 10k pull up /downs which then show signals on A & B but still no response. I realise RS485 is differential across A-B but your findings and my experience is suggesting the inputs aren't fully RS485 compliant. What model family was your inverter? Is anyone else seeing this on and S6 series inverter? Cheers Steve T
Lakshan Wijerathna
Any one knows How to Adjust "Power Control > Set Output Power" using Modbus, any command??
Christian
Are you able to pull battery details using this modbus?
Dani
Thanks for sharing this valuable information Brian. This is a fairly recent post so I'll try my luck:
Could the raspberry pi be used to connect to the Solis inverter to irradiance and temperature sensors?
Kind Regards,
Brian
Helo Dani
I dont know if you can set the temperature sensors in the inverter via the RS485 connection but you could use Home Assistant to store the data.
Stuart
I have a SOL-4.6K-RHI-48ES-5G-DC hybrid inverter.
I just used a 120R resistor across A & B, and it worked ok.
Make sure your connector is properly plugged in. I had to removed the rubber seal. This had me scratching my head for a few hours, so I hope this post saves you some frustration.