For many years we have used our old HP MediaSmart EX475 (WHS) Windows Home Server box as a secondary NAS drive on our home network to keep a backup from our main Synology Diskstation NAS drive.
The Synology has 4 x 4TB drives configured as a RAID 5 array and this stores all our personal and work files and our very large photo archive.
To keep a duplicate of the most important files we use our older HP MediaSmart EX475 Windows Home machine with 4 x 2TB drives as a secondary backup and we also use removable single drives for a third level of backup with our photos also being backed up to Amazon using our Amazon Prime account which gives unlimited photo storage. We are using around 2TB of photo space at the moment!
Ever since we had the direct lightning strike on our home which destroyed all the computers, network devices, TVs, connected household appliances and most of the mains electrical cables which resulted in a complete rewire for the house, we keep disconnected backup devices and off-site backups for our critical data.
The HP MediaSmart server runs the Windows Home Server operating system and it has a maximum hard drive limit of 2TB per drive which we found after trying to upgrade the storage with new 3TB drives we had spare.
After finding that the new larger drives are not supported we researched different ways to use the larger drives and changing the operating system to Linux seemed to be the only way forward.
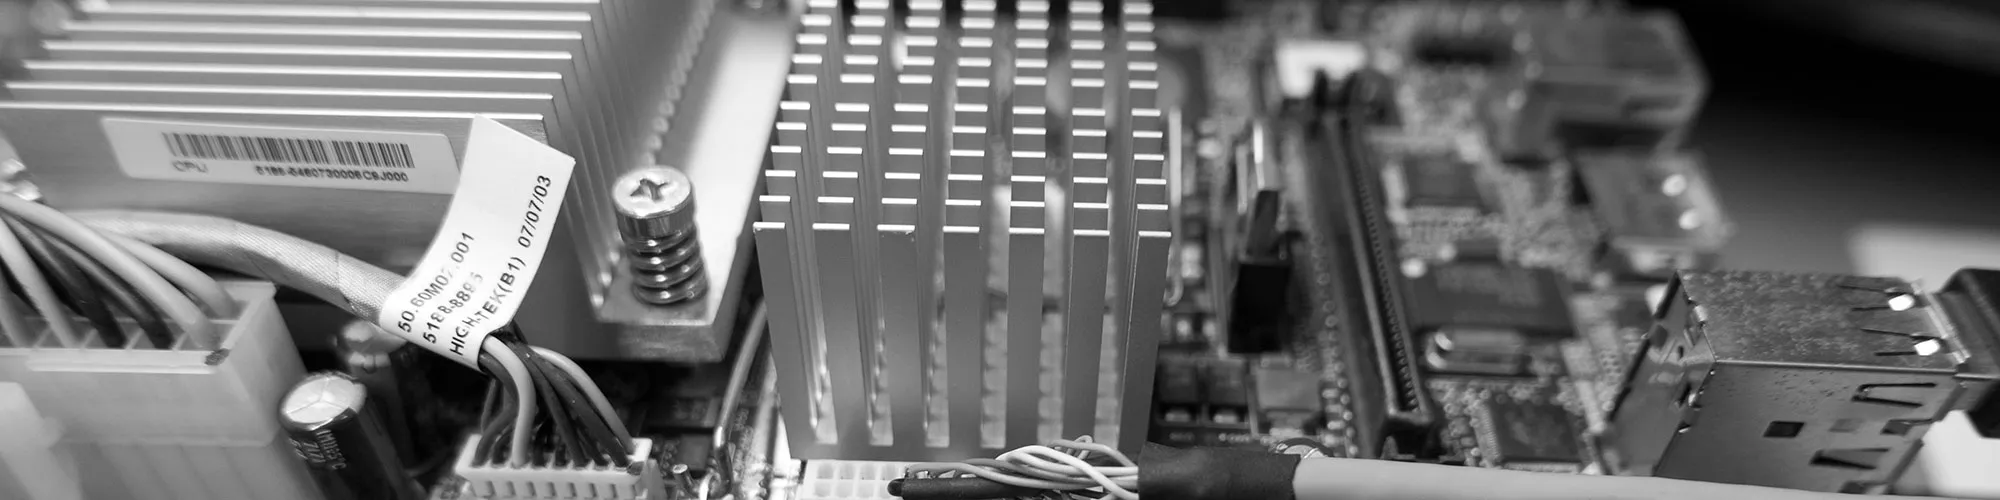
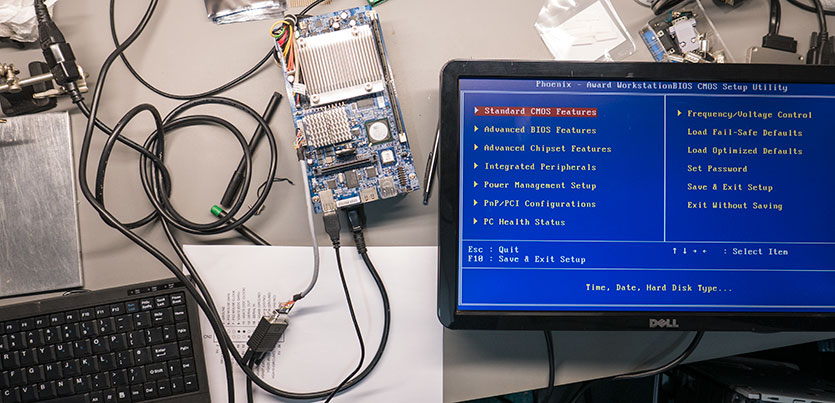
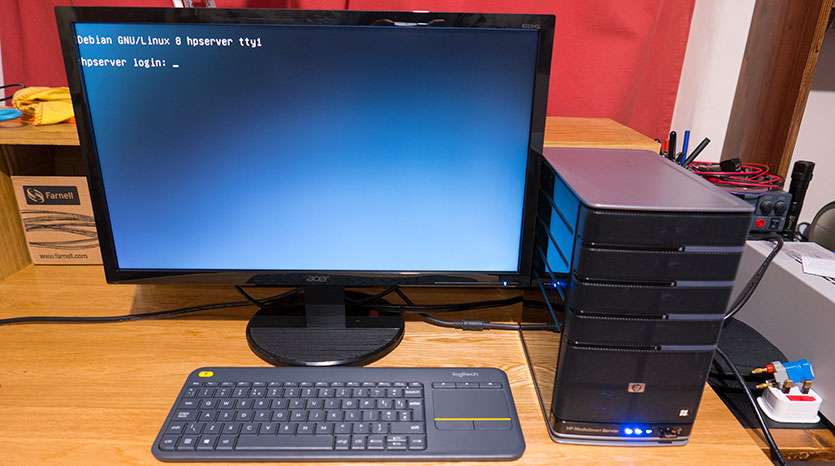
The MediaSmart server is built as a headless machine and doesn’t have any external display ports to allow us to access the BIOS to configure the boot devices so we could boot from a Linux install USB stick to set up the new operating system.
The server has an onboard flash storage device with 256MB of space with a simple recovery operating system installed for restoring the Windows Home Server operating system via the network. We investigated removing this device and replacing it with a larger capacity chip but we found forum posts from other people who had tried this which resulted in bricking the machine so we keep this in place on the board.
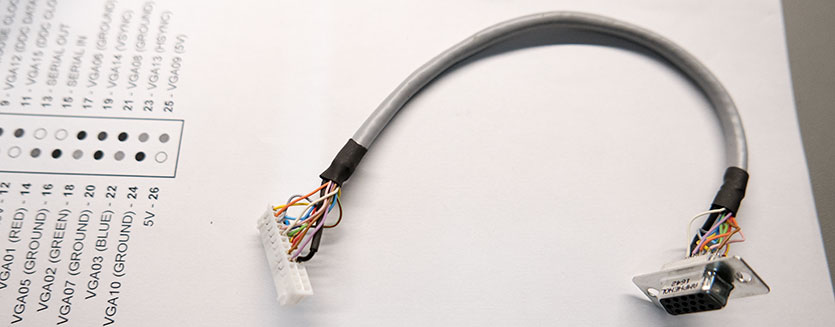
We found several blog posts which showed an internal connector which has VGA signals and PS2 ports for keyboards and mouse on the motherboard. The connector pinout is shown below.

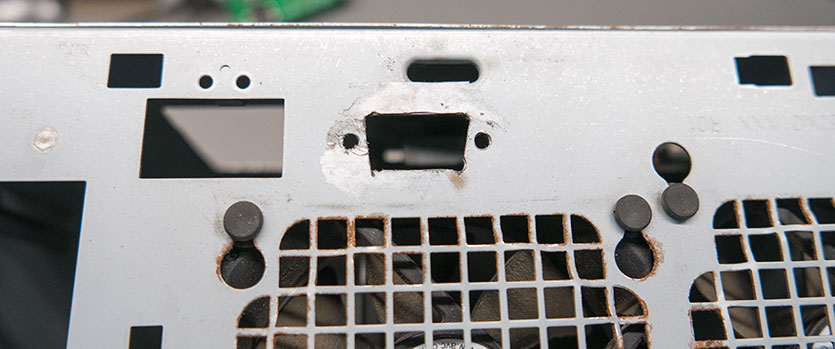
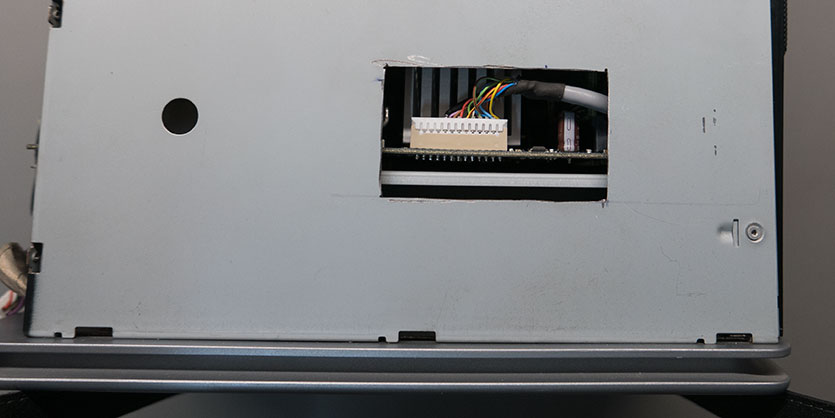
We ordered the correct connector and pins and a short cable was assembled using a screened cable to connect the motherboard to a VGA socket mounted on the back of the machine.
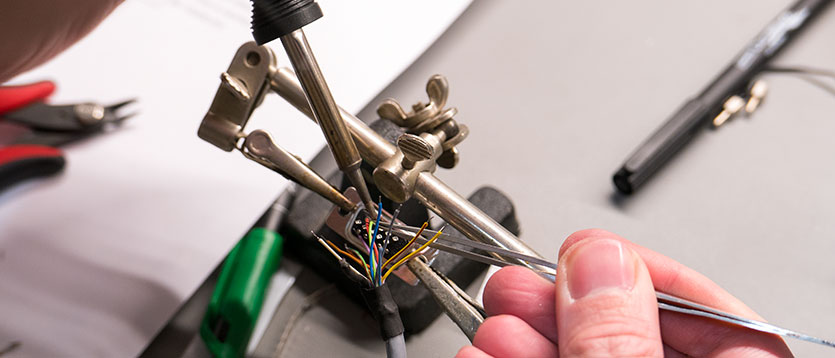
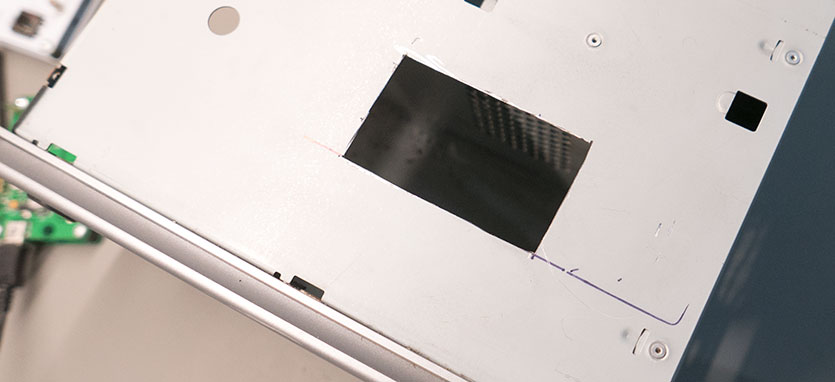
As the access to the motherboard is very restricted we decided to cut an access hole in the side of the case and cut a hole in the rear panel for the new VGA socket. The metal on the back of the machine had signs of rust on the fan vents even though the machine has always been operated indoors. We tried to cut the case on our milling machine but the cutter didn't like the thin metal and so we used cutting disks on our Dremel to make the new access hole and VGA port hole.
Once the new cable was assembled we tested the motherboard on the bench with an old VGA monitor with a keyboard/mouse combo connected and we could access the BIOS screen.
The server was then reassembled and the SSD drive was mounted into the space below the top cover.
We planned to use an external SSD drive to install Linux onto and connect it via the ESATA port on the back of the machine but we soon found that the ESATA post does not supply any power for externally connected drives requiring modifications to the ESATAp to SATA cable we had purchased from Amazon to use one of the rear USB ports to supply drive power.
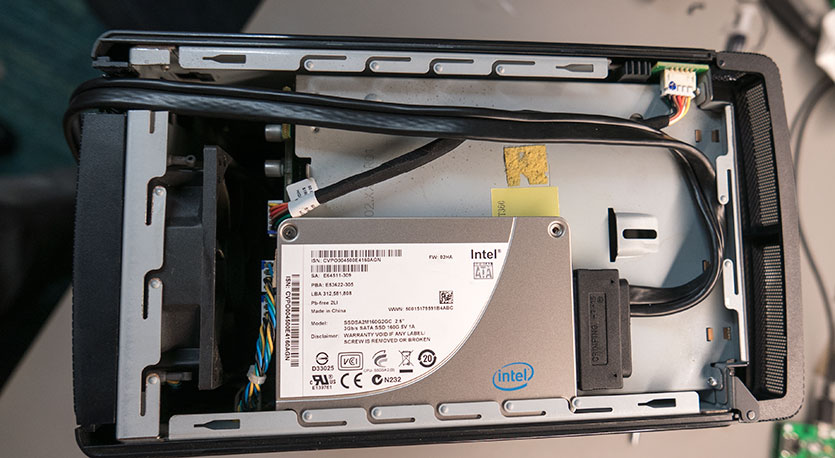
We later found that the BIOS doesn’t support booting via the ESATA drive and we then tried to install a bootloader on a USB stick to then boot the main operating system on the SSD drive but this would not work and so we had to change our plan to install the new operating system on one of the four internal hard drives and use the remaining three as a RAID array for storage. This leaves the external ESATA port free for us to add additional external storage as needed.
We tried several Linux distros to try to find one which would boot on the external drive before using Ubuntu Server.
Ubuntu Server was then installed onto one of the 3TB drives and this was partitioned with a 200Gb OS drive with the remaining space as a single network share and the other three hard drives set up as a software RAID drive which is shared on the network.
Now we no longer have the 2TB drive size limit on this NAS box we can upgrade it again in the future when we have spare larger hard drives.


Ivan-B
Which connector did you use? Like, is do you have a specific product number? Thanks!
Brian
Ivan-B, I am sorry but I can not find the part we ordered for this mod.
Mark
Hi Brian. VERY nicely done page w/ great info! Did you, by chance ever track down the PN's of the parts you used? Sounds like I'm not the only one that wants to tackle it.
Brian
Mark, Sorry but we can not find the connector in our previous orders.
Joseph
This is amazing that the Home Server community is still active after all these years. I have been wanting to make a VGA cable to and your diagram is the first clear one I could find.
@Ivan-B and @Mark here are some products to make the header connector I bought from DigiKey that I found on another site-
https://www.digikey.com/product-detail/en/jst-sales-america-inc/PHDR-26VS/455-1178-ND/608619
https://www.digikey.com/product-detail/en/jst-sales-america-inc/SPHD-002T-P0.5/455-1313-1-ND/608809
Adam
I managed to get Unraid running on mine as well as I have had Hackintosh running on it for a while.
I never found a HDD limitation I have I have 4TB drives in running the Windows Home Server OS (which might be a newer one) but I am planning on upgrading both to run Unraid (onsite and offsite) and upgrade them with bigger HDD's as I go, but I do like the option of having another HDD using the eSata port.
jim m
Can't we simply use one of the usb to hdmi dongles to get video without using the hack provided here? I used those dongles to add second and third monitors to computers in the past. Any thoughts ?? I'm getting ready to bring my HP out of the dust to setup a NAS / Server once again.
Brian
jim m, I am not sure if a USB to HDMI dongle would have driver support on the server operating system
Jim M
Well I can attest that a USB to HDMI / VGA adapter did not work for me. I really need just a super KISS (keep it simple stupid) way to install some kind of NAS software to my HP server without going through a bunch of technical crap so to speak. I can install on another pc then swap drived to the HP but without video on the HP it's just a big no-go for me.
Rado
Hi fellows, I have a EX470 HP Mediasmart.
My 500 Gb "system" disk is dead. I put a new one and tried to recover the system from the ROM using the procedure from the manual. It didn't work. I think that I did a wrong format of the disk. Can you recommend me what type of format I should use. Thanks in advance.
Tom C.
So, I picked up one of these at a Garage Sale over the weekend and got it working. That was fun. refreshing it was fun, but I got it to work once I got the right disk images. That was VERY difficult. Mine is an EX470. I just ordered some items from ebay in order to create my own VGA cable. In the chart up above, we're going to match color to color, correct? Not like I could go number to number as one has 26 pins and the other has 15..
Thanks for this article! Oh I'm also upgrading the memory on this one to 2GB and I ordered a faster processor as well. less than $10 for each of those..so...
Mitch S
You could've ordered a 4GB stick, but the PC will only see and use 3GB. I did that on my ex470. I ordered a premade vga cable from eBay several years back. I just have it dangling out from under the top cover.
Also, I recently decided to stop using WHS because it will not restore 64bit systems, but it will back them up. So I bought a 500GB SSD and I'm in the process of installing Windows Server 2016.
Mine has been up and running since 2006 with the memory and cpu upgrade.
Steve
there are VGA and PS2 x2 cables for sale on eBay they work out more than building your own but are well-made item number on eBay is item 132005092582
Steve
hi does anyone know if someone has tried to install openmediavalt on an HP ex470
Bob
Wow I didn't know there were so many other HPMSS units still out there running!
I have an HP ex485 that I am running ubuntu 16.04 LTS server. I bought a breakout box several years ago (HP MediaSmart Server VGA/PS2/Serial Debug Board) which is no longer available. Good to know there are other cables available. I am not using RAID on my box just using two drives one for the OS and Programs and one for data backup. I had to replace the power supply once but it has been running since I bought it new.
Steve Norris
Hi
This site has given me a lot of insight into the conversion of the HP Home Media Server; I have a EX470 which I pick up on eBay earlier this year. Mainly because my World Book I had in service from 2009 till early this year when the power unit gave up, so time for something new. In comes a HP Media server which silly me thought I may be able to get it to work with W10. But no, so rethink, then I thought about Openmediavault. I read about the constant update the unit does and that the OS is on a flash Rom. I acquired a header cable from Germany very expensive, connected the SVG screen, keyboard and mouse. Then booted the gem up, I was surprised to find the IDE set up in the Cmos consisted of not only the four drives in the bays but, as follows:
IDE 0 Master
“ “ 0 Slave
“ “ 2 Master
“ “ 2 Slave
“ “ 3 Master
“ “3 Slave
Plus a 247 MiB USB Disk Serial No AA04012700036216 hiding somewhere in the box.
Anyway I was lead to understand that the uppermost disk was the primary Sata Disc, so after about 30 times of trying to load openmediavault on to the disc with no luck. When it came to the setup point were the primary disc is partitioned the setup could not find a disc in the top slot. So sitting down with a cup of tea and thinking about it, I decided to boot the box and move the disc about each boot cycle and I found the the bottom slot in the box was the IDE 2 Master next one up was the Slave, then third slot up was IDE 3 then top slot was IDE 3 Slave. I then booted the unit with 1Tb Drive in IDE 2 Master and still when it come to the system disc being formatted and portioned no go.
Then I decided to try something new, with a reconfiguration to the boot order I set 1 st boot USB external, 2nd boot HDD and all following boot devices disabled. With the Openmediavault setup disc in a CD Rom connected to the bottom USB socket I did a Cmos save and reboot after the post as the CD Rom started to spin I Hot Shoed the bottom Sata HDD into the bottom slot of the unit. And let it go. The part of the setup arrived at the HDD format and partitioning and there was the drive, I clicked continue and away it went to complete the install. When the install was completed I checked the drives in Openmediavault it showed the 1Tb HDD with the system on it and a USB Disk 247.50MiB disc which I did not mount in Openmediavault. I then Shut the system down and hoped it would reboot once I had fitted the other 3 Drives (3Tb HDD’s) into the unit. On reboot I once again checked the Cmos settings to make sure they had not reset, all was good, so on with the reboot. The system rebooted OK I then configured the 3 x 3TB drives as ext4 File system not a Raid 5 which I wanted to do but I would have lost to much room, I have since backed up all my movies and 20% of my TV Recordings a total of 1.5Tb. With Plex plug-in installed I can watch the films and TV recordings on my TV connected to the hard wire network. I have yet to upgrade the Memory chips to 4Gb from 2Gb the CPU seems fast enough no stream to the TV or any of the PC, Laptops or Tablets. To do this on any HP Media Server it is necessary to have a header cable the upload cannot be done without it unless you like a lot of frustration and hassle. The noticeable thing is, it has been running now for a few weeks, a number of times been rebooted and no time has it tried to update its self. On the boot into Linux it does show widows Vista in the background but nothing else. The Linux system has updated a few times but not Vista. It is still in the process of being loaded with data and is performing well with access the the filing system from windows desktop works well.
Will keep you updated
steve
Sam piper
With the Linux server installed is there a drive limit for that I have a couple 5 terabytes would Partition meaning them into 2x2tb and 1x1tb partitions work for the original operating system
Heng Tang
Does anyone here have the 3 restore disc for HP MediaSmart Server model EX470, EX475, EX485, EX487? I would like to download an ISO from you and in exchange i can mail you one VGA connection cable and header.
Jeroen Hof
The "easiest_ way to install whs on these systems is to get a whs cd and install it on a hardisk on an other pc. The first time the system reboots during installation remove the harddisk and put the harddisk in the first bay of the mediaserver. The installation will proceed from there and after a while you can connect to it over your network. No cables or soldering .required
Sean Patterson
F.A.O. Heng Tang
I have the original disks, just contact me, send mail to SeanPatterson*myself.com
replace * with the @ sysmbol
paul rowson
heng tang did you get the disk images?? i also have them but if you have them i would like to buy a vga cable from you
paul.rowson*virginmedia.com ( replace * with @)
Rick M
I can't believe what I'm seeing. Feb 10 2020 and people are still active with these old HP Vaults.
I have 2 myself. And x310 and an EX475 I think it is. The 475 has been in the stock or for a while and up until a couple years ago the 310 was still in use just to back up a couple laptops an a couple desktops.
Something happened with the x310 and could not get it to back anything up. It would halt with some error I can't even remember what it was now. Anyway I was thinking I could reuse the box for a file server or just to store the gigs of pictures we have. So I got to investigating and found where people had made the KVM cable. So I took the pinout and an old VGA cable and some breadboard wires and made a temporary VGA cable just to see if it would POST. It did so now I'm in the process of making a proper cable. My question to anyone that's still monitoring this is what is should I use to put the old girl back to work as a file server or NAS?
Anyone have any ideas. I'm not too familiar with Linux but I can research and follow instructions. I have read about several NAS systems and Wonder if anyone has any suggestions?
I'm glad to know there are still people out there like me that like to tinker and make something old useful again instead of chunking it in the garbage and buying new. Not that something new might be a little fast or flashier. I have learned that the journey is half the fun most of the time if you get what I mean. I'm retired now not because I wanted to but my body and health says otherwise. So I need something to keep my mind sharp.
I still have the original 3.0 WHS disk but for some reason it didn't want to install. It maybe I was trying to do it from a Win10 machine.
I really didn't want to use it anyway I was just trying to see if it was still all working.
So if anyone is still there give me some ideas for a NAS box or something.
Well hope to hear from some of you others.
Thanks
Rick M
Ol' Florida Boy
MMan
Had finally time to poke my own X510. There are two unused sata ports. I found one on bottom side of board near eSata connector. Moving 4 capacitors from top side to bottom will connect eSata to port 6 of ich9 instead of sil3531 and makes it bootable. One port is still lurking somewhere.
RobH
Hi all, glad I found this site. Has anyone had any experience with a HP LX195. I'd very much like to get it running on Ubuntu server.
Hatch
Great info on making the cable, the one problem I'm having is how to take off the sides of my EX475 (bought new back in the day) without breaking anything? I'd like to have it as a decent looking system if possible.
Brian
Hatch, I think the front was held on with screws and the sides and back unclipped.
Hatch McAllister
Yep, thanks, five minutes after I posted it, I got the magic combination with the clips and finally got the back off and the same with the sides. To quote the sage Homer Simpson "DOH!" :-)
Hatch McAllister
Yep, thanks, five minutes after I posted it, I got the magic combination with the clips and finally got the back off and the same with the sides. To quote the sage Homer Simpson "DOH!" :-)
I did notice that on the VGA socket picture pin 7 is not coloured and should be a Ground (for Green) but is correct on the CN2 side.
Gordon
Great information. I have one that has the infamous fan indicator problem. I am interested in doing this exact same thing. I wondered if you tried freenas on it?
Gordon
Great information. I have one that has the infamous fan indicator problem. I am interested in doing this exact same thing. I wondered if you tried freenas on it?
Shafiq Jetha
I wish I'd found this post sooner!
I just ordered a brand new QNAP TS-351 and I'm in the process of shifting all of my data over to it from my from-new EX475. I came across this post because I was interested to know if I could expand the storage of the QNAP server into the EX750 and take advantage of those now-dormant 4 drive bays.
I'm going to give Unraid a try but if anyone has any ideas, I'd greatly appreciate them.
claude
Hello,
I discovered with pleasure this site, or we can still talk about the EX510!
I recovered one of these servers, and I have a problem starting: it seems that bay n ° 1 (the bottom one), does not work ... I cannot install a system on the server! So I tinkered with a VGA and PS / 2 cable as described in this forum, to change the boot order of the disks in the bios to use another bay. It works fine for display, but it seems either that the PS / 2 does not work (surprisingly, because the keyboard lights are active at startup), if I did not find the right key / key combination to enter the bios ... Someone here could give me the key to bios?
Thanks everyone!
claude
FOR:
MMan
[05 April 2020 at 5:59 pm
Had finally time to poke my own X510. There are two unused sata ports. I found one on bottom side of board near eSata connector. Moving 4 capacitors from top side to bottom will connect eSata to port 6 of ich9 instead of sil3531 and makes it bootable. One port is still lurking somewhere.]
hello MMan,
I just read this post (already old ...) and I am interested in getting a bootable port on my X510 ... because the bottom bay cannot be used on mine (failure ...). can you tell me what are these capacitors to "flip". Also, maybe you have a shema of this server? Thanks, if you are reading this post ...!
Janos
Hi. I would like to ask, did you managed some way to get the HDD activity leds working with linux? Could you be so kind to share more about that?
Brian
Janos, I don't think we got the leds working for the hard drive activity.
MMan
To: Claude. There are four capacitors right behind esata connector and 4 identical looking blank spots at same location on other side of pcb. I think connection for sil was on top side and ich9 on bottom.
JerryD
Hi I have a HP-EX470 and I was wonderif someone could tell me what would be a better processor to install and where I can find a good site(s) for WHS ADD Ins that work with either the ACER ASPIER H340 and / or the EX470.
Chris S
Does anyone know the max up grade for the HP 470? Ram, CPU etc. It's a very cool machine I want to use it.
Aaron
I just bought this cpu off of aliexpress. AMD Athlon X2 3250e 1.5 GHz Dual-Core AM2+ (ADJ3250IAA5DO) CPU https://www.aliexpress.com/item/32849417910.html?spm=a2g0s.9042311.0.0.74584c4daLJI9F
It was under $10 after taxes. the max cpu that people try to use overheats the unit and goes for $50 to $100 on ebay
I recently saw this blog
https://www.mass-imo.com/2015/04/hp-ex475-home-server-upgrade-part-1.html?m=1
https://www.mass-imo.com/2015/04/hp-ex475-home-server-upgrade-part-2.html?m=1
https://www.mass-imo.com/2015/04/hp-ex475-home-server-upgrade-part-3.html?m=1
and with the vga adapter i was able to get xpenology to run on it with 4g of ram and the original cpu. I am still trying to get the version 3 update for it and i was wondering about unraid. there is drivers for the lights in linux but i would rather have the interface of xpenology or unraid.
only thing is last time i tried xpenology it was unstable and the network ran at 10/100. maybe now there is a better injected driver or one you can install afterwards
Aaron
ok.. so i was able to get XPEnoboot to work and install the latest 5.2 of synology on a hp ex470 with stock cpu and 2 gigs of ram and also unraid. but both had an issue with the sis 191 nic. it was only connecting at 100Mbit. I bought a usb3 1g and it should be able to do 250-400Mbits. Trying to hunt down a single partition mbr boot 6.2 xpenology. i like the interface much better than unraid
xtornado
Greeting
A couple of days ago I bought an x510 with 4GB of RAM .... not knowing it doesn't have a VGA port ...
From the beginning I had the idea to drive OpenMediaVault from external usb SSD or in the worst case from a USB stick, but now I am thinking of using the eSATA port after new information from you
I ordered a VGA / PS2 keyboard adapter from Amazon.
While I'm waiting for it to arrive can anyone provide information if anyone has tried whether there is a limit to the disk capacity on discbay slots with linux distro
According to the manual, it says that a total 6TB disc can go on the SATA onboard.
In that case I would go with the RAID mirroring option.
And if it supports more then I would put 4x 2 TB in RAID5
RAW capacity is listed on page 6.
https://dustinimages.azureedge.net/media/d200001002269050/storageworks-data-vault-x510.pdf
Best regards
Anonymous
@xtornado
I think you may have bought an incorrect VGA adapter, because I don't see any HP MediaSmart VGA adapters on Amazon. Generally you need to look for "HP MediaSmart VGA" on ebay, and then you will see someone selling the crude old-style adapters which are just a VGA cable with a 26-pin, 2-row female header that can plug into your motherboard.
Then, you can open up your MediaSmart or DataVault, and just use the USB for keyboard / mouse.
Don't forget that you need to put a jumper on the two pins on the motherboard that are near the vertical hard drive backplane. If you don't put on the jumper, then the motherboard will not allow you to use either the USB-connected keyboard, or the PS/2-connected keyboard during the boot phase, so you will just never be able to access the BIOS to set the correct boot order of internal drives or external USB drives.
Finally, you are misunderstanding the specs of HP regarding storage.
HP originally meant these devices to run a version of Windows Home Server, and the limitations for Windows Home Server was a maximum of 2TB for each drive.
So, if you bought a device with only a 500GB drive where the OS would live, then you could only connect 3 more devices with 2TB each, and they would list a total drive amount of 6TB or 6.5TB on their specifications sheet.
**However** If you are intending to put any other operating system on the computer, then you can install hard drives that are much larger than 2TB.
So, if you do the OpenMediaVault (which is based on Linux), you should have no OS limit on how big a drive you can install into any of the four bays. -- I assume that you will be installing the OpenMediaVault OS onto a USB stick in the rear of the device, and using all four drive bays for storage.
By the way, the same drive situation should hold true for any other OS that is Linux-based, or also for BSD-based variants like the FreeBSD, or XigmaNAS, or maybe even an older version of FreeNAS that doesn't have high RAM limits.
On any of these you should be able to insert and format much larger drives. I have already heard of people using 3TB and 4TB, and there should be no practical reason why you could not use any device that can plug into a SATA connector.
xtornado
Hello
NAS build has completed, installed in small office
VGA adapter works fine, bought from amazazon.de
NAS is setup with OpenMediaVault from USB drive, flash2ram plugin installed.
Put two Toshiba P-300 3TB disks in RAID1. (I know that is not NAS disks, but works fast, and NAS is configured to go to suspend on 9PM to 6AM waked on wake on lan from Mikrotik)
thanks for reply about SATA on WHS.
Best regards
Anonymous
@xtornado — you're welcome for the SATA info.
Do you think you might be able to pull a copy of the x510 BIOS and place it somewhere on a file share for a backup.
We are trying to get backup copies of the BIOS, and the x510 series are supposed to be the same board as an EX490/495, but maybe with a different BIOS.
If you have time, would you be willing to extract a copy from the BIOS (on-chip), and then post it somewhere, with a link on this site?
Thank you
xtornado
Hello
Sorry for late replay. I don't get email notification on new post.
I visit this site again now when i was reordering my bookmarks...
Maybe i can.. i have friend who have EPROM reader/writer device.
Is it possible to save .bin from BIOS itself on usb stick like a backup?
X510 server is located about 250km (kilometers) from my current location, so maybe i can one day when i
be in my hometown.
Best regards
Simon
Would've done it different way on your place. Simply do something kexec-like, but from Windows. You have administrator (as in Windows nomenclature) permissions on this Windows OS, don't you? So that's all you need. Just not sure are ready-to-use tools (the kexec binary!) and initrd image, which will talk over network are simply out there, ready, on the Internet, but I still see it as a better (and simpler, because software-only) way.
See the idea? As easy as it gets, I think.
All the best
Simon
Scott
Anyone [still] looking to get the activity LED's working, check out this repo:
https://github.com/merelin/mediasmartserverd
Larry
Instead of the PS2 connectors, can the USB ports be used for the keyboard and mouse?
Brian
You can use the USB sockets for keyboard and mouse connections
Larry Just
Thanks Brian, for the quick response
Mike
It's Amazing to see so many people still using the old HP MSS. I just brought my old EX485 out of storage and got it working with UnRAID. Honestly, I tried so many distros, and UnRAID just works. Especially with the original single-core Celeron and 2GB of Ram. Also, I don't know if some previous owner of my unit changed the BIOS (I doubt it). But my unit booted right into the USB (All 3 USB ports tested). No tweets or VGA cable was needed. Also, it boots with all 4 HDDs installed, and all the distros I tried saw all 4 HDDs. Another interesting thing I noticed is I can boot off the Esata port, which means I can add a 5th SSD/HDD on top of my 4 internal HDDs. (One thing to note is I think this is because the EX48x doesn't have the eSata port multiplier, so BIOS sees the eSata port on boot)
Currently using it to hold my media library and have Plex Server running off it. Stream 4k over LAN with no problem. However, Software Transcoding is a no-go. Very easy to set up UnRAID all GUI, and there is no need for Command-Line, which was a very nice change from trying to get Open Media Vault working. Also, Open Media Vault web interface was very slow compared to Unraid. (Probably because OMV runs off the USB and Unraid runs off the RAM, moving OMV to one of the internal HDDs could fix that).
This isn't a knock on OMV. I don't think enough people talk about that very important point. And it's possible trying to get OMV to work on the very low specs of the HP EX485 could have caused the problems that forced me to get into the command line. But then again, UnRAID just worked with the same specs. I will say that with UnRAID, just use a USB2 stick. People say it's better to use USB2 but not a big deal if you use USB3. That was just wrong in my case. I tried three big-name brands. Not a single one would boot. (and yes, I tried many times and would double-check by using OMV boot USB and Proxmox boot USB to make use the EX485 wasn't the problem). Once I tried some noname random USB2 I had it just work the first try.
The next steps for me are to upgrade the EX485. Max the RAM at 4gb and get a quad-core working on the until. I'll also be looking at some type of custom cooling upgrade for the CPU. I'm leaning towards a "Intel Quad Q8200S" for the CPU.
I'm looking to run many. Docker Containers, maybe even a VM if the motherboard supports it, so the more cores, the better.
If anyone can recommend some 4GB RAM sticks (That I can buy in 2022). Thank You. I also need a copy of the custom BIOS required to get some of the better CPU options to work. I've seen many guides online to upgrade the EX485 bios with a custom version, but most are from 2012-2015, and most links are broken now.
NBA
Hello Everyone, can you please make it simple for me to know whether I can connect my HP Home Media Sever to Monitor directly and use it as a desktop? the ports I have in the server are USBs and ESATA + RJ45. Thank you!
Brian
You would need to add the display connector as shown in the blog. It wouldn’t be ideal as a desktop machine due to the lack of hdmi outputs
Ronald K Barnes
error, in diagram; CN2, 13 leads to 12 in monitor connector!
#20 to #07 ground (blk) left clear.
However, anyone making these connections would quickly see this.
Bojan
Hello.
One question for you?
Where to get motherboard connector for HP Media Smart EX475 VGA port - I mean internal 26 pin connector.
Thanks in advance for your reply.
Brian
There are links above in the comments to the connector from digikey
Steve
@xtornado - do you have a link for the VGA Adapter you purchased?
50MB
Hello, I would like to inquire about the BIOS model in the first picture.
Fabrizio
@ Ronald K Barnes
"07 January 2023 at 9:20 pm
error, in diagram; CN2, 13 leads to 12 in monitor connector!
#20 to #07 ground (blk) left clear.
However, anyone making these connections would quickly see this."
Is the diagram now published correct?
It doesn't work for me. The only Pin Not connected is CN2 #Pin 10 - VGA Connector #GND. Could this be the reason?