I have been using a Tacx Neo 2T indoor bike trainer for several years during the winter to try to maintain my fitness level for cycling. One problem with riding on a rigid trainer is the lack of bike movement, which is very different to riding outside where your bike moves under you as you pedal, especially when climbing, sprinting, or standing out of the saddle.
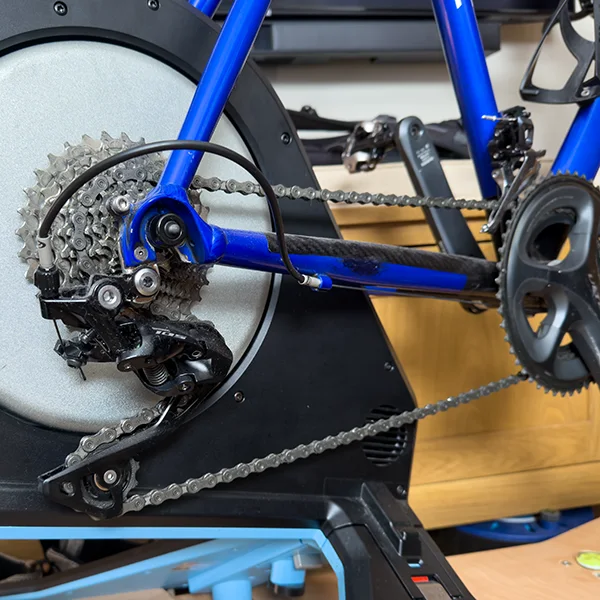
With the summer over and the weather turning colder and wetter it was time to start cycling inside more and so I decided to try building a DIY rocker plate to use with my Tacx Neo 2T smart trainer and indoor bike, which was built using a frame from eBay and other spare components from previous bikes.
A bike rocker plate is an accessory used with an indoor bike trainer when using online training software such as Zwift, MyWhoosh or Rouvy or offline apps. It is a flat platform that your trainer and bike sits on, designed to introduce controlled side-to-side and fore-aft movement while you ride indoors. Standard trainers are completely rigid and lock your bike in place, which can feel unnatural compared to cycling outdoors where your bike naturally rocks and shifts beneath you.
Commercial rocker plates are available in many different shapes and sizes and offer different functionality and spring systems, often costing over £500.
The main requirement for the rocker plate was to include both side-to-side and fore-aft movement and be compact enough to fit into the corner of my bedroom where the trainer setup is stored.
Looking at different designs for commercial rocker plates shows that many use a simple rocker mechanism with just side to side movement or models with three layers and also include fore-aft movement.
I found a lot of references to DIY rocker plates to andrewgrabbs.com who has plans for building rocker plates but the designs are too large for the limited space I have available. I also found an active Facebook group for people building their own rocker plates at facebook.com/groups/415329188897706 where they discuss different builds and materials.
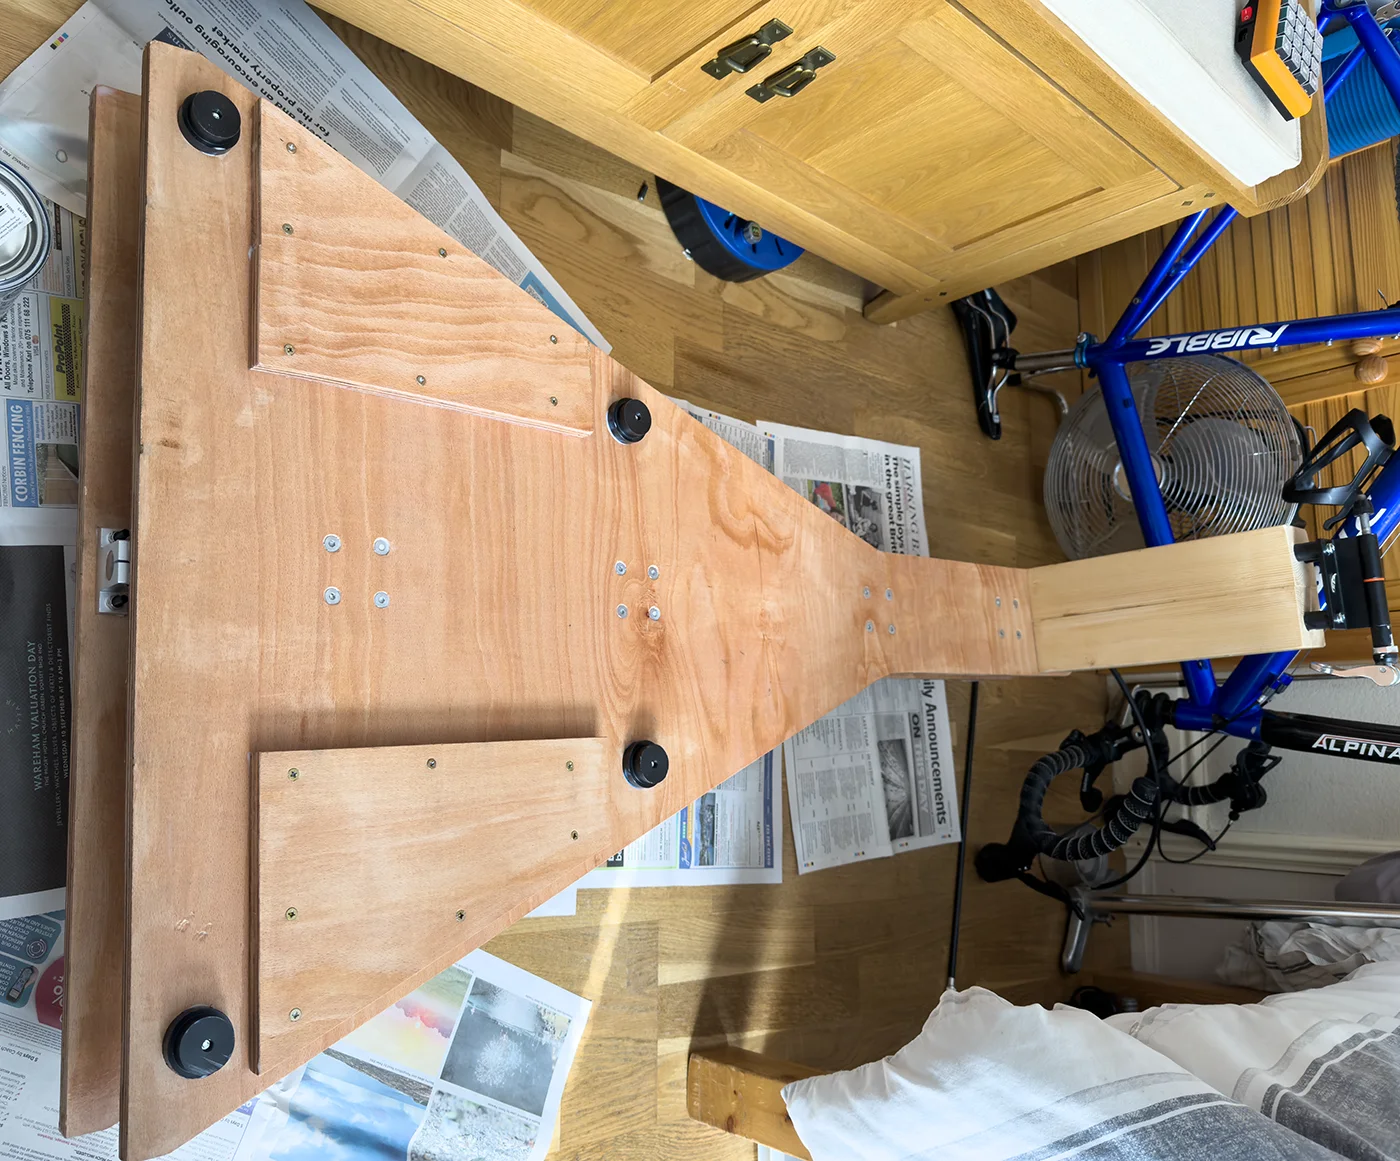
My custom bike rocker plate was designed to fit the Tacx Neo 2T trainer and the front fork is supported using a vehicle fork mount fitted to a wooden block which screws. Rubber isolators are fitted between the fork mount and the wooden block to allow a small amount of spring and steering movement at the handlebars. This replicates the feel of the front tyre squashing when you sprint on a real bike
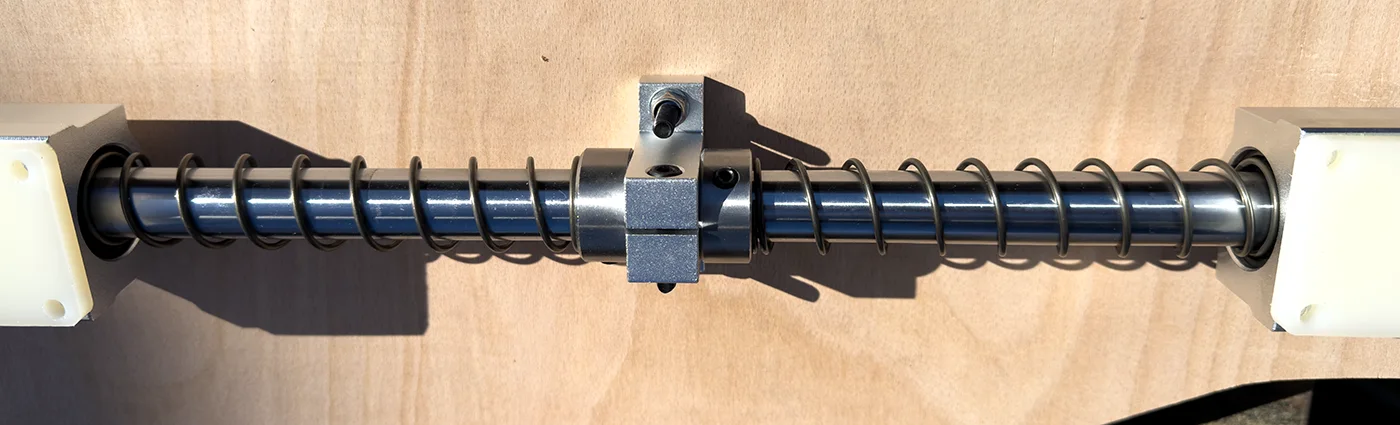
The design uses a central 20mm bearing shaft with four linear bearings fitted to the top plate and held in place using four mounting posts bolted to the base using M6 x 50mm countersink bolts.
Many of the other DIY rocker plates I have seen use the bearing blocks and base mounts to preload the central springs but I decided to add adjustable collars on the bearing shaft so the spring preload can be easily changed, altering the fore-aft movement.
The new rocker plate is 1200mm long with the front section being 140mm wide expanding to 700mm wide at the rear end.
Parts list
I used the following parts and materials to build the rocker plate:
| Part | Quantity | Price Each | Total | Link |
|---|---|---|---|---|
| 18mm x 1220mm x 2440mm Structural Hardwood Plywood | 1 | £37.40 | £37.40 | Travisperkins |
| 69MM X 69MM Planed Square Edge timber | 1 | £11.82 | £11.82 | Travisperkins |
| SK20 Bracket 20mm Linear Rail Support Mount, 4 pack | 4 | £13.89 | £13.89 | Amazon |
| SC20UU 20mm Linear Ball Bearing Slide, 4 pack | 1 | £22.99 | £22.99 | Amazon |
| 20mm Smooth Chrome Plated Steel Linear Bearing Shaft, 1200mm length | 1 | £47.17 | £47.17 | eBay |
| Shaft collars ID: 20mm, 4 pack | 1 | £9.09 | £9.09 | Amazon |
| RS PRO Alloy Steel Compression Spring, 135mm x 27mm, 1.23N/mm (pack of 5) | 1 | £13.55 | £13.55 | RS Components |
| M6 x 30 countersunk bolts, 100 pack | 1 | £10.49 | £10.49 | eBay |
| Black Socket Countersunk Screws M6 X 50mm, 25 pack | 1 | £8.99 | £8.99 | Amazon |
| 5" Mini Basketball Balls Set of 3 | 1 | £9.99 | £9.99 | Amazon |
| Ball Pump Needles | 1 | £2.99 | £2.99 | Amazon |
| 32mm Round Bullseye Precision Spirit Level | 1 | £4.49 | £4.49 | Amazon |
| Delta Bike Hitch Pro Front Fork Car Mount | 1 | £13.99 | £13.99 | Amazon |
The total cost of parts and materials was £206.85.
The design files can be downloaded from github.com/briandorey/Tacx-Neo-2T-DIY-Rocker-Plate
Assembly
The base is cut from a sheet of 18mm thick structural plywood measuring 1200mm x 1200mm, and was cut using a circular saw and jigsaw. It could be cut using a hand saw if power tools are not available.
I first placed the trainer and bike onto the wood and marked the outline and the placement of the front fork mount, the lines were extended to add the cut lines between the trainer and front mount.
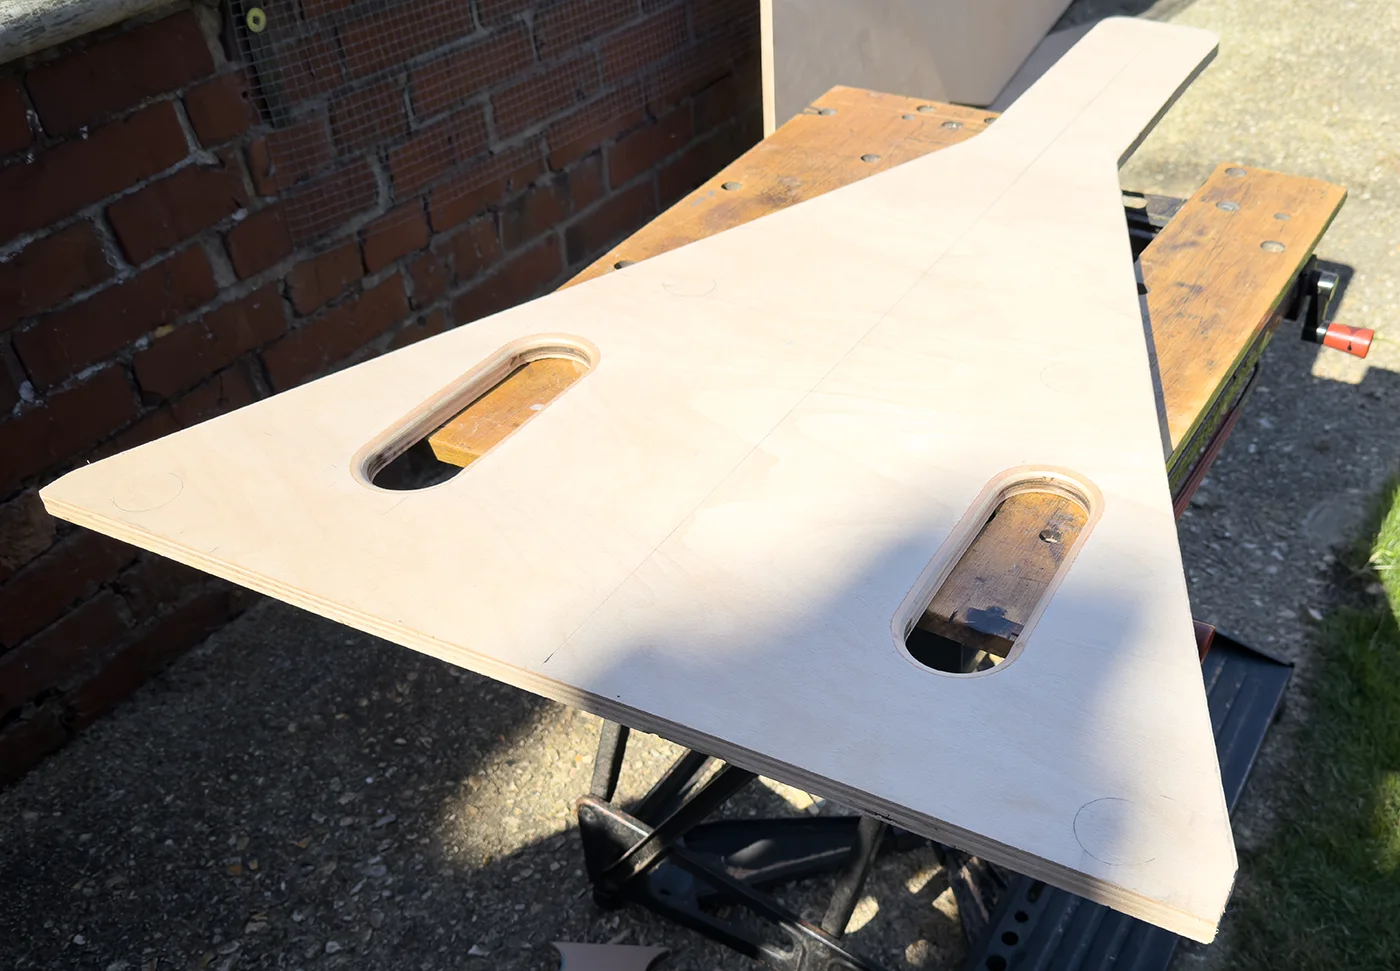
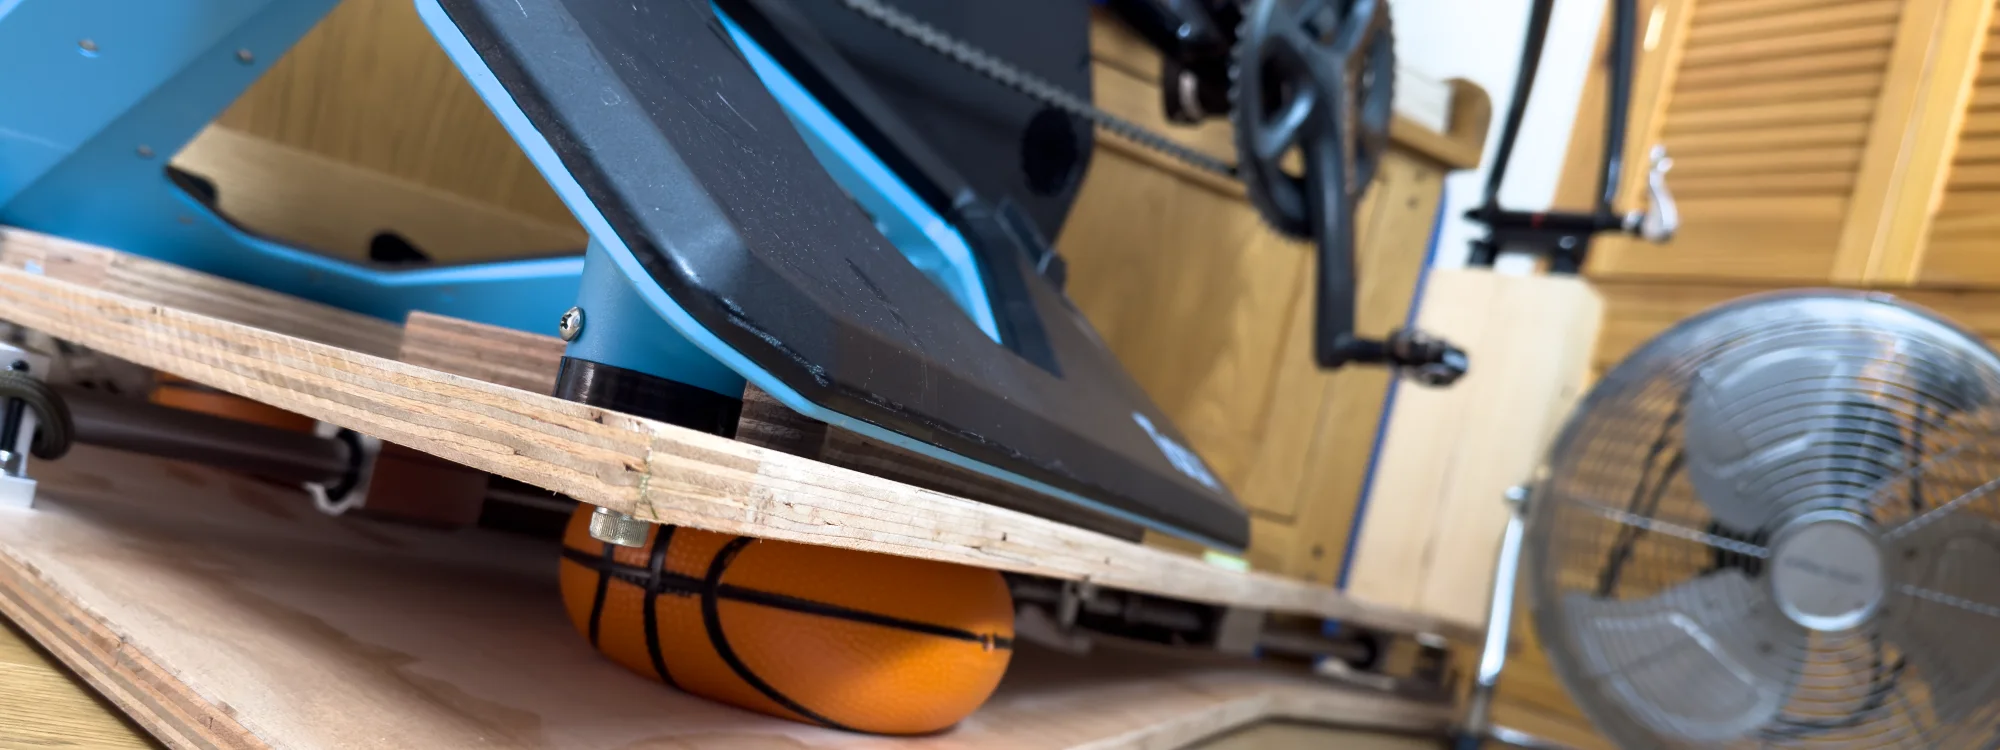
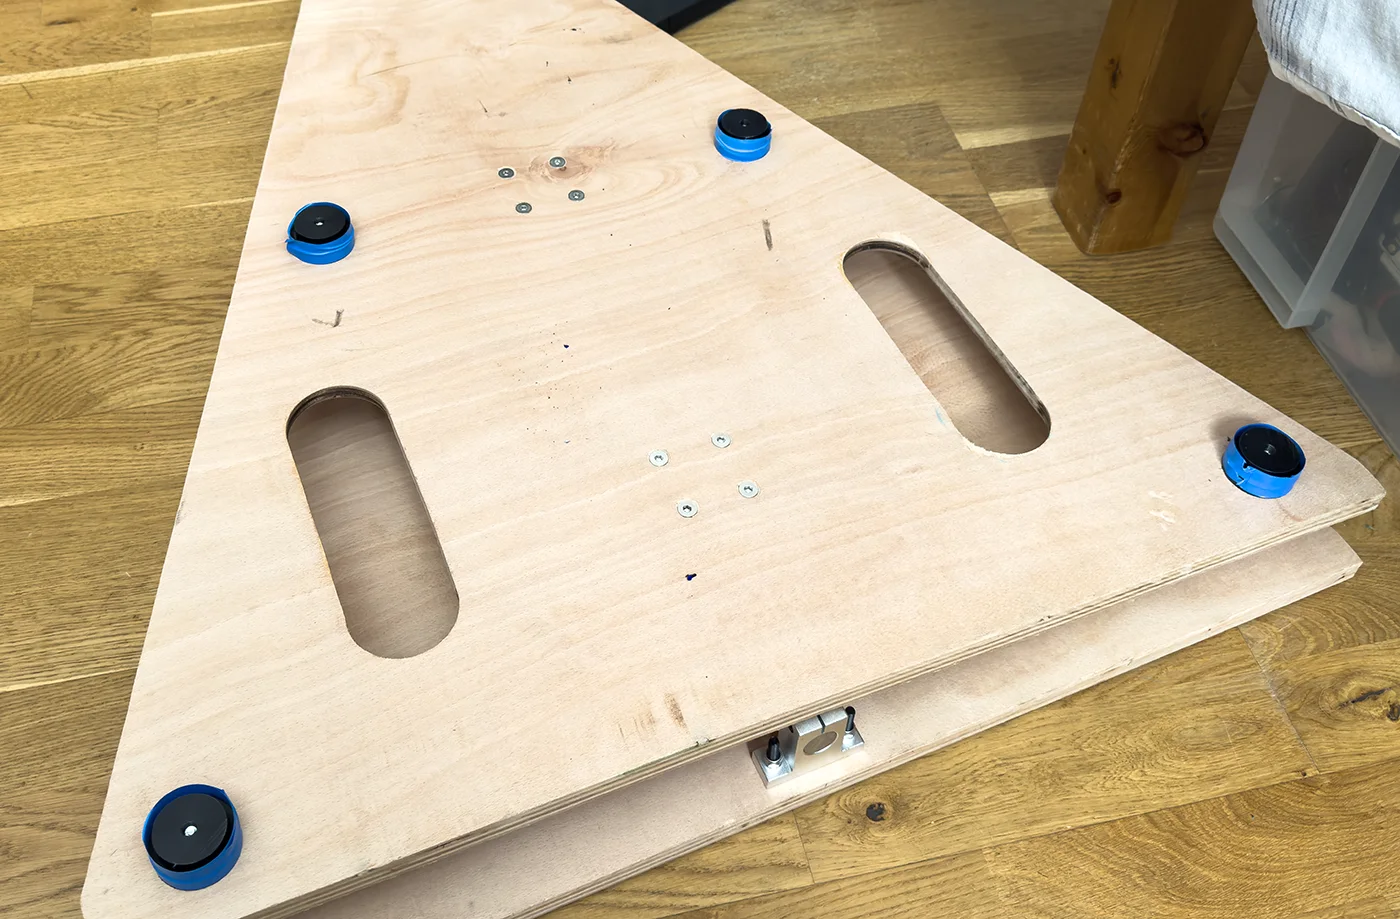
Slots were added on each side at the rear of the top plate for the 5 inch inflatable balls which are used for the side to side movement. I initially cut the slots at 60mm wide and 200mm long and rounded the edges, but after assembly I found that the balls partially pushed through the holes so I added a secondary cover to each slot held in place using 30mm screws. These stop the balls from protruding through the top plate and it helps them to roll easier for the fore-aft movement when in use.
I assembled the bearing shaft components on a table to calculate the spacing for the mounts and bearings. I added a fixed bracket on each end with the others fitted between the bearings and springs with two of the bearings being closer to the trainer end and the remaining bearings with wider spacing. 100mm spacing was added between the fixed mounts and bearings to allow ample for-aft movement.
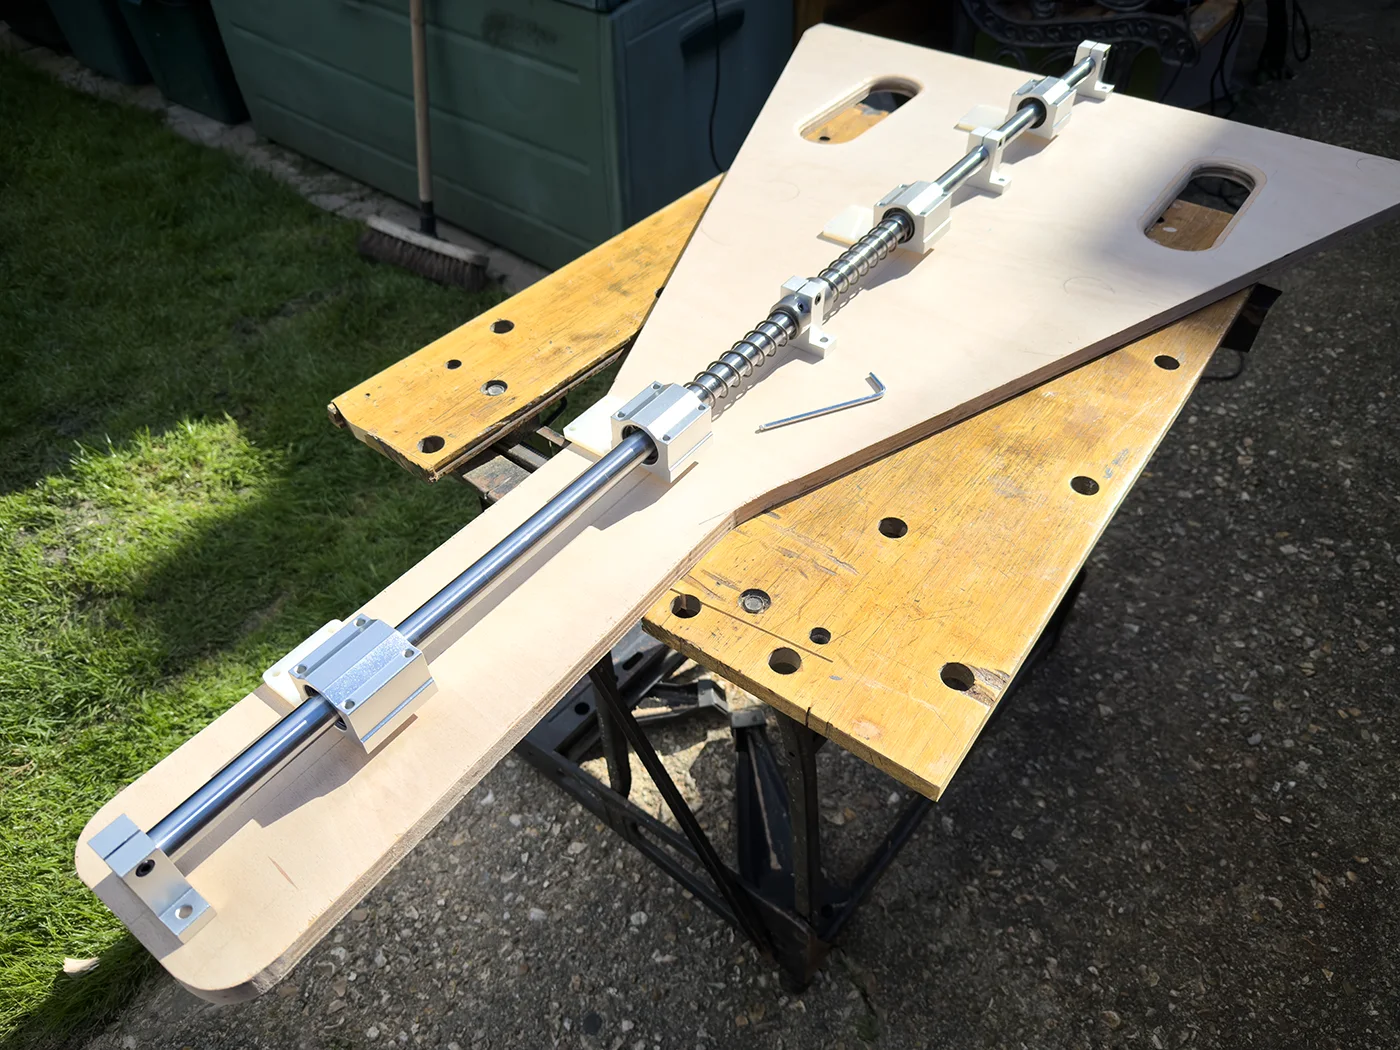
A centre line was then marked on the top and base and the locations for the 6mm holes for each bearing and mount was transferred to the wood before drilling and countersinking to accept the bolt heads.
The bearings need a 6mm thick spacer to go between the bearings and top plate. This was cut on the cnc mill from a sheet of nylon material. The bearings and spacers are bolted to the top plate using M6 x 30mm countersink bolts.
Fixing the trainer
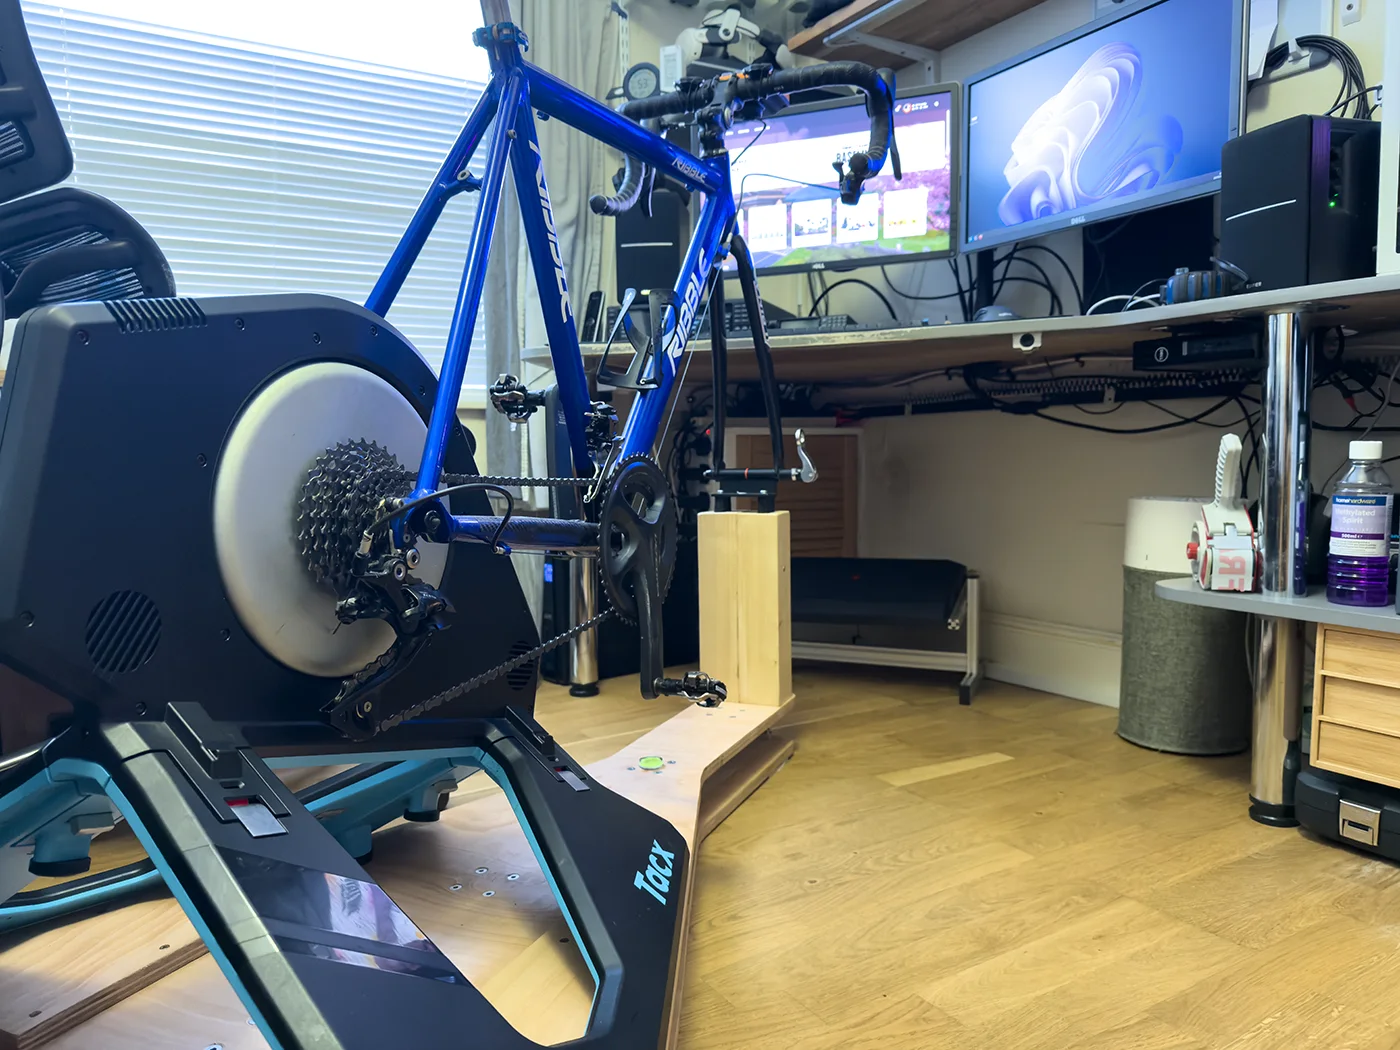
To secure the Tacx Neo 2T to the base, I first fitted the trainer to the top of the rocker plate and marked the location of each of the round feet. I then removed the four rubber feet from the trainer and machined four new feet mounts made from a rod of acetal plastic. It would also be possible to use wood for the mounts.
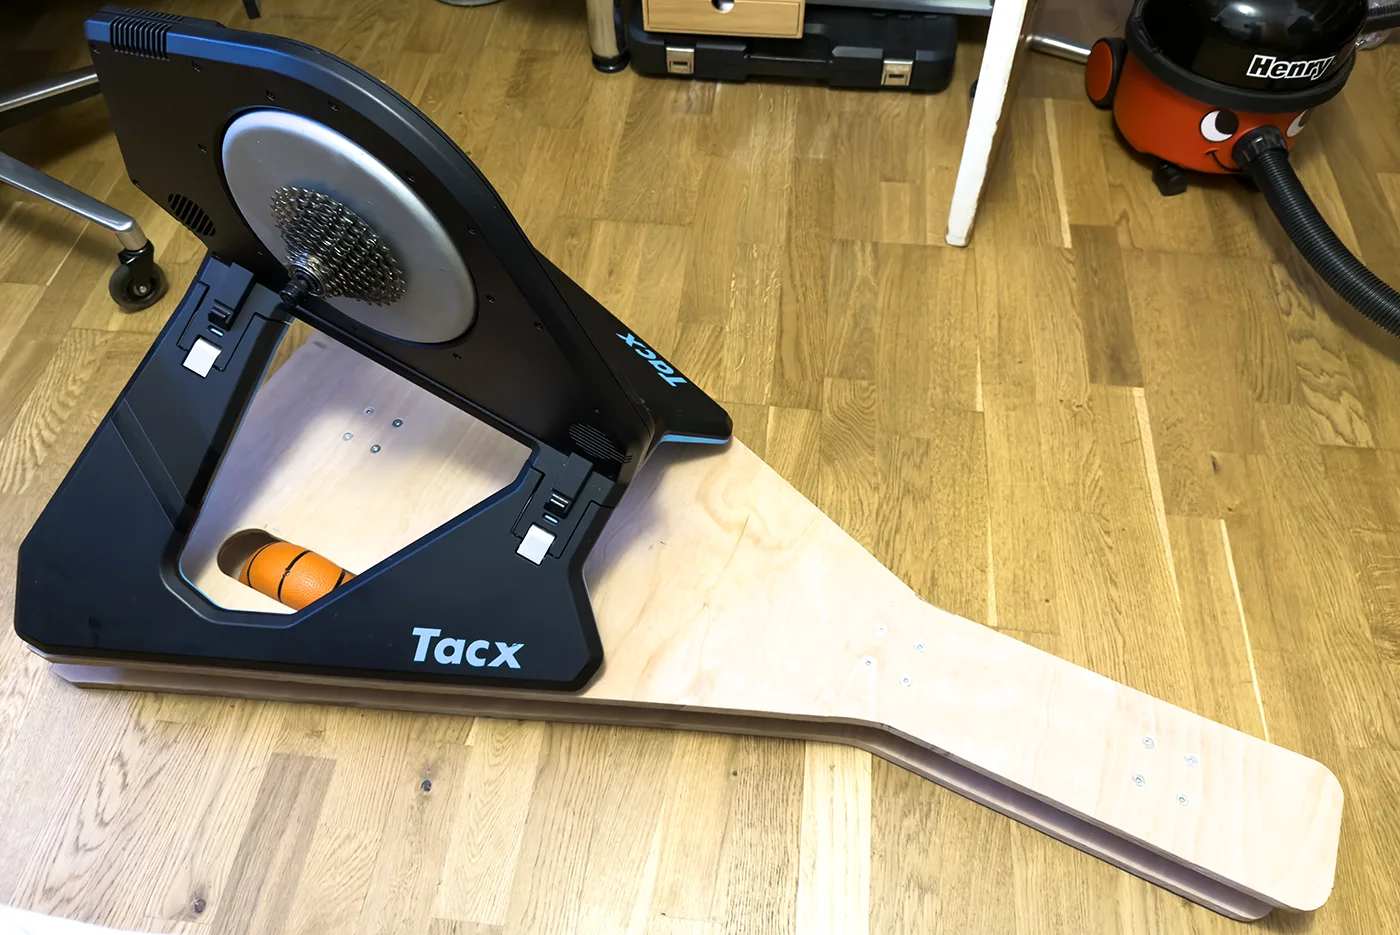
Each foot was machined with a 10mm deep recess to go into the trainers base and this was secured to the trainer after installation using small self-tapping screws to stop the trainer from lifting from the top of the rocker plate.
The centre of each foot was drilled and tapped to accept M8 bolts. The top of the rocker plate was drilled using a 10mm drill for the 8mm bolts and these were installed using large washers. I used 10mm holes to allow a small amount of adjustment of the trainer's position.
Fixing the front fork mount
With the trainer installed, I fitted the bike frame to the trainer to obtain the location for the fork mount.
To hold the front fork to the base, I used a quick release clamp which is designed to be fitted to a vehicle truck bed and clamps the front fork using a quick release. Other similar mounts are available which can accept both quick release and through axle forks.
It would also be possible to use the front wheel and secure it to the base using straps.
The mount was fitted to a wooden base made from two pieces of 70mm square wood which are screwed and glued together to create a 70mm x 140mm plank. The top mount was secured to the wood via four 20mm thick rubber mounts fitted to the wood with lengths of 6mm threaded bar screwed and glued into the wood. Two of the rubber mounts are bolted to the fork clamp and the other two are used as additional support. The rubber mounts allow a small amount of twisting motion of the handlebars but could be omitted if you prefer a fixed handlebar.
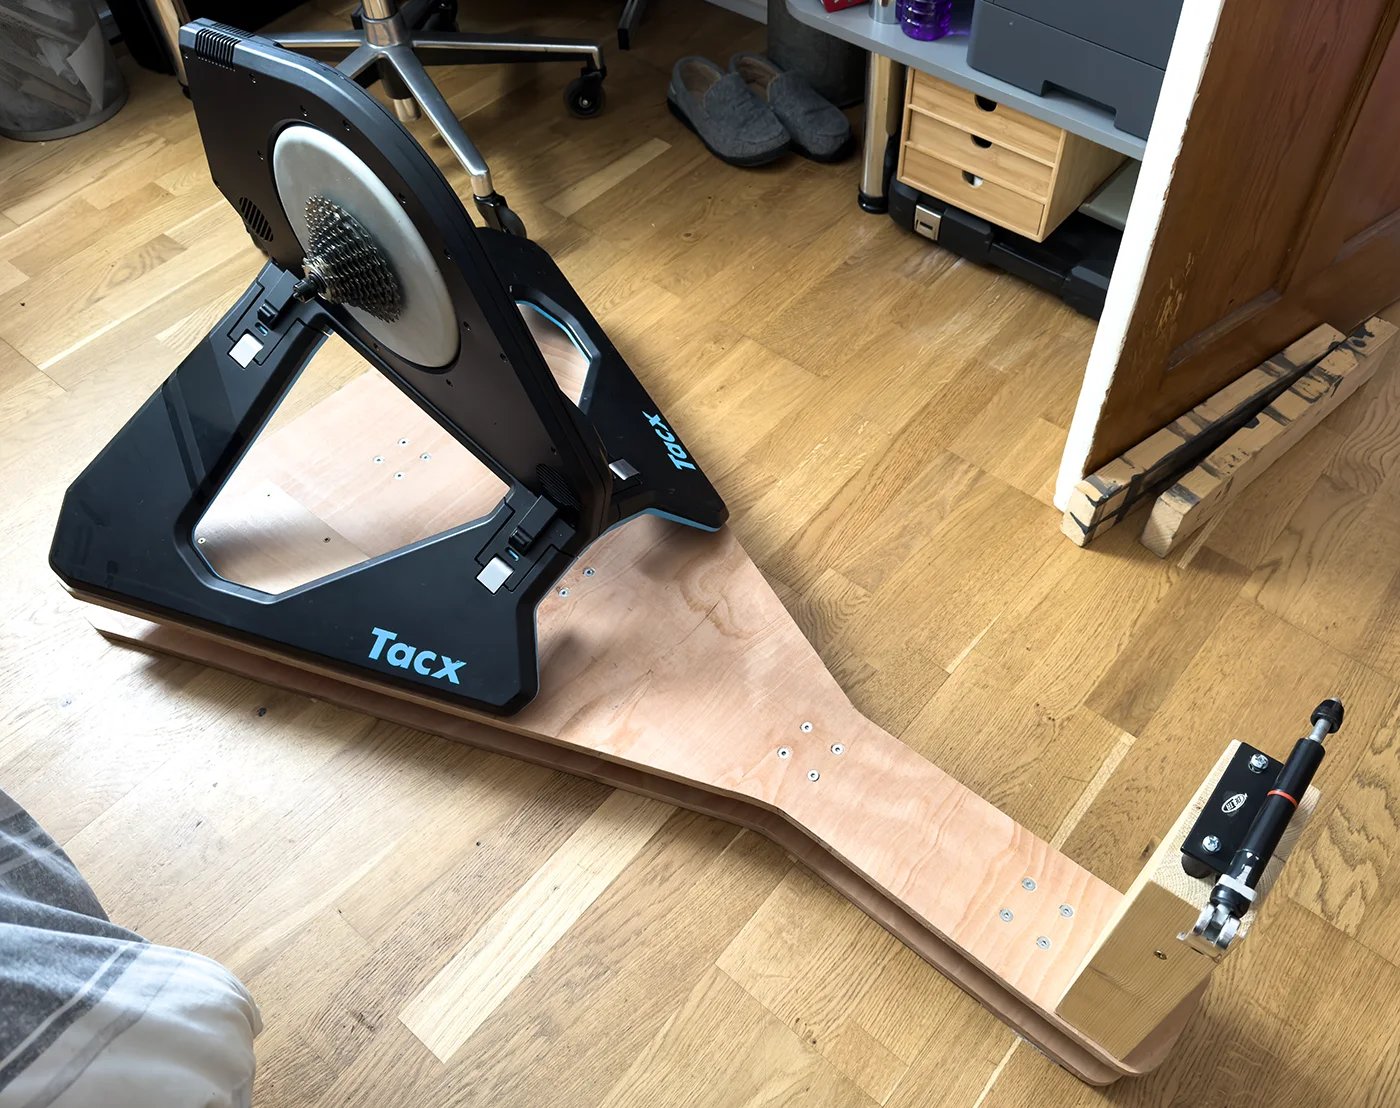
The wooden block is secured to the top plate using 80mm wood screws.
I painted the top surface with varnish to protect it from moisture.
Final setup
With the bike frame attached to the trainer and fork mount, the rubber balls can be installed and inflated to level the side-side movement. I found that approximately 15psi was enough pressure to hold the bike upright when in use and allowed enough side to side movement when pedalling hard.
The adjustable bearing collars are moved and locked in place to preload the springs to control for-aft movement.
First ride experience
I loaded Zwift and tried a 40 minute route with level, hilly sections and sprints. With the bike on the rocker plate there was a small amount of movement on the level sections but when pedalling harder and sprinting the plate rocked further side to side making it feel more like riding outside and the fore-aft movement increased on the pedal strokes. There is a short video on my Youtube channel showing the rocker plate being use.
I could feel the extra movement made me use my core muscles to stay stable on the bike so this should help with overall strength and fitness over the winter months.


Sam
Looking to make a rocker plate for my Saris H3 and just thought id check if your design would work or not? Im not very good at DIY but surely its not that hard right?? 🤔
Many thanks
Sam
Brian
Hi, the design should work for the Saris H3, you would need to modify the shape to work with your trainer but the mechnical parts should all be the same.
Sam
Thanks Brian, will hopefully give it a go making it over the Christmas period.
Tony Stepanek
Hello Brian!
Thanks for posting an inspiring article about your rocker plate design. I use Tacx Neo 2T too, so I was very happy to find it.
You mentioned that the holes you made for the small basketballs were too big, so you had to cover them to prevent the balls from protruding through. What size of the holes would you recommend, given your experience?
What is the height difference between the bottom and upper plates (how big is the space in between)?
Thanks in advance for your help.
Tony
Brian
Hello Tony
Thank you for your comments, I would make the slots for the balls 30mm wide to stop the balls from coming through. The gap between the plates is 50mm.
Tony Stepanek
Thank you, Brian!
Theo
Hi, do the springs have to be exactly 27mm wide and 135mm long or is there a range as i cant find any in my region that are that specific width
Thanks, THeo
Brian
You can use any springs which fit around the central bearing shaft