In a previous post, introducing our allotment, I wrote about adding remote monitoring for soil moisture levels using Raspberry Pi Pico’s and LoRa radio modules.
My brother Andrew, has been busy the past few months working on this new allotment monitoring project in his spare time.
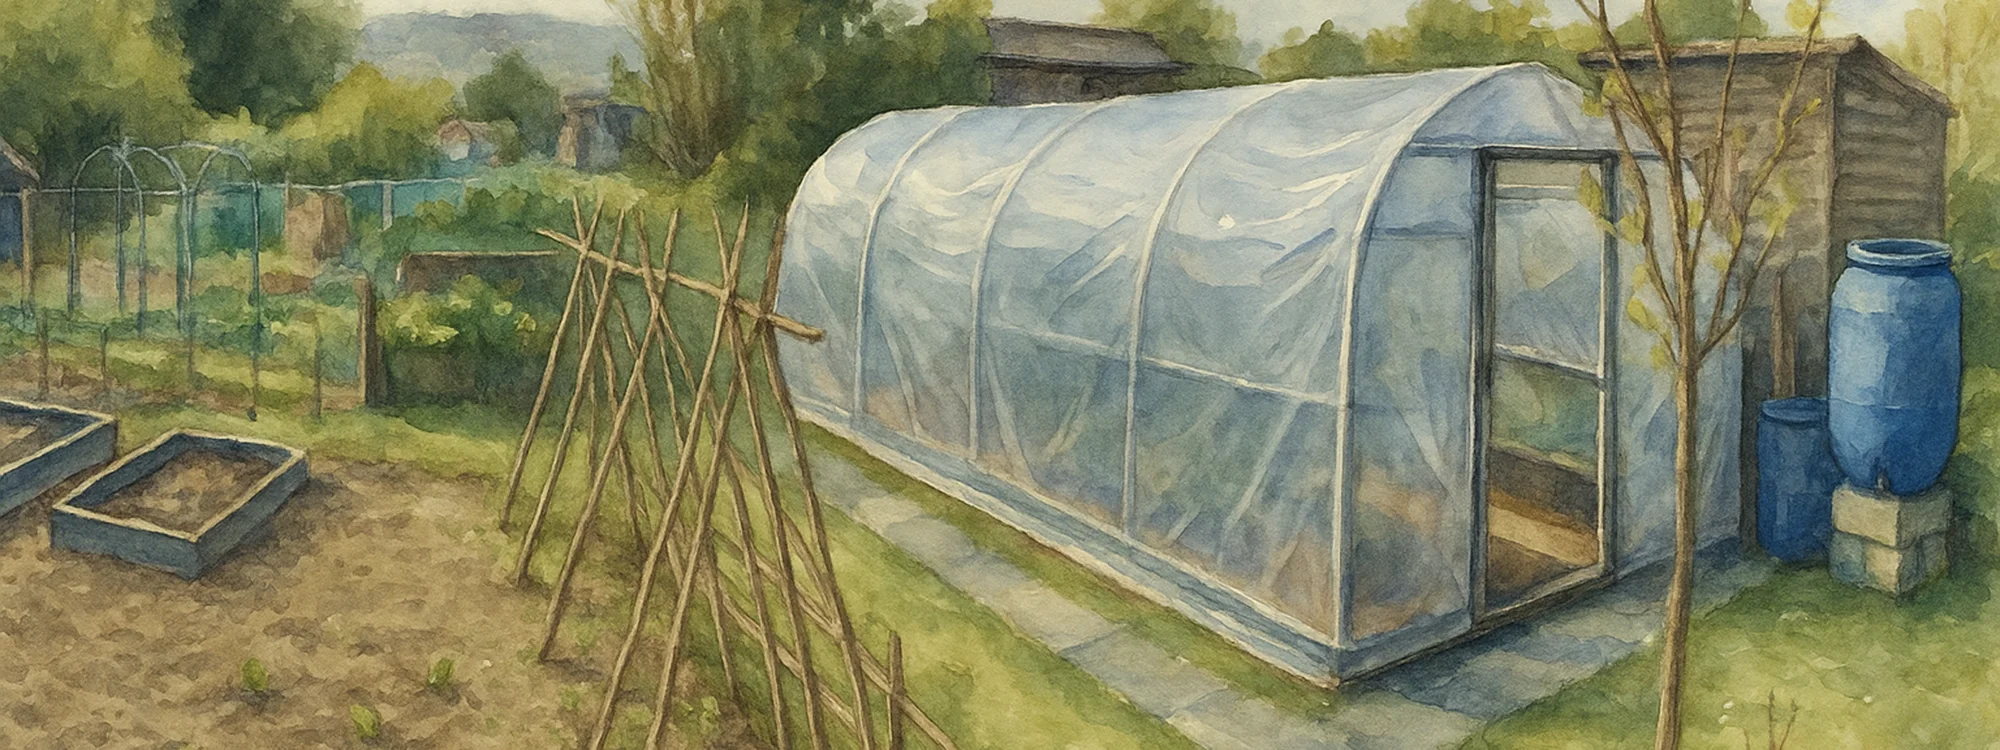
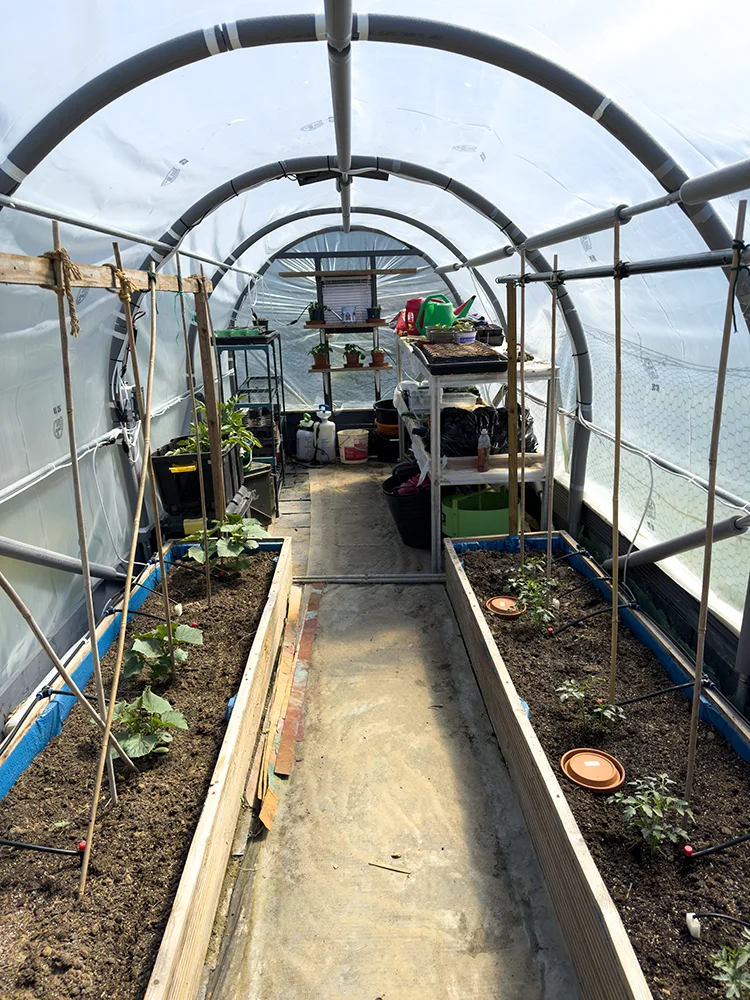
In our polytunnel we have two raised beds where we grow a variety of salad fruit and vegetables and shelves with pots to grow seedlings. In the summer months we go to the allotment to water the plants every other day. However, depending on the temperature, we don’t always need to add water to the plants, so being able to remotely monitor them would be a useful addition to our Home Assistant smart home system, saving unnecessary trips.
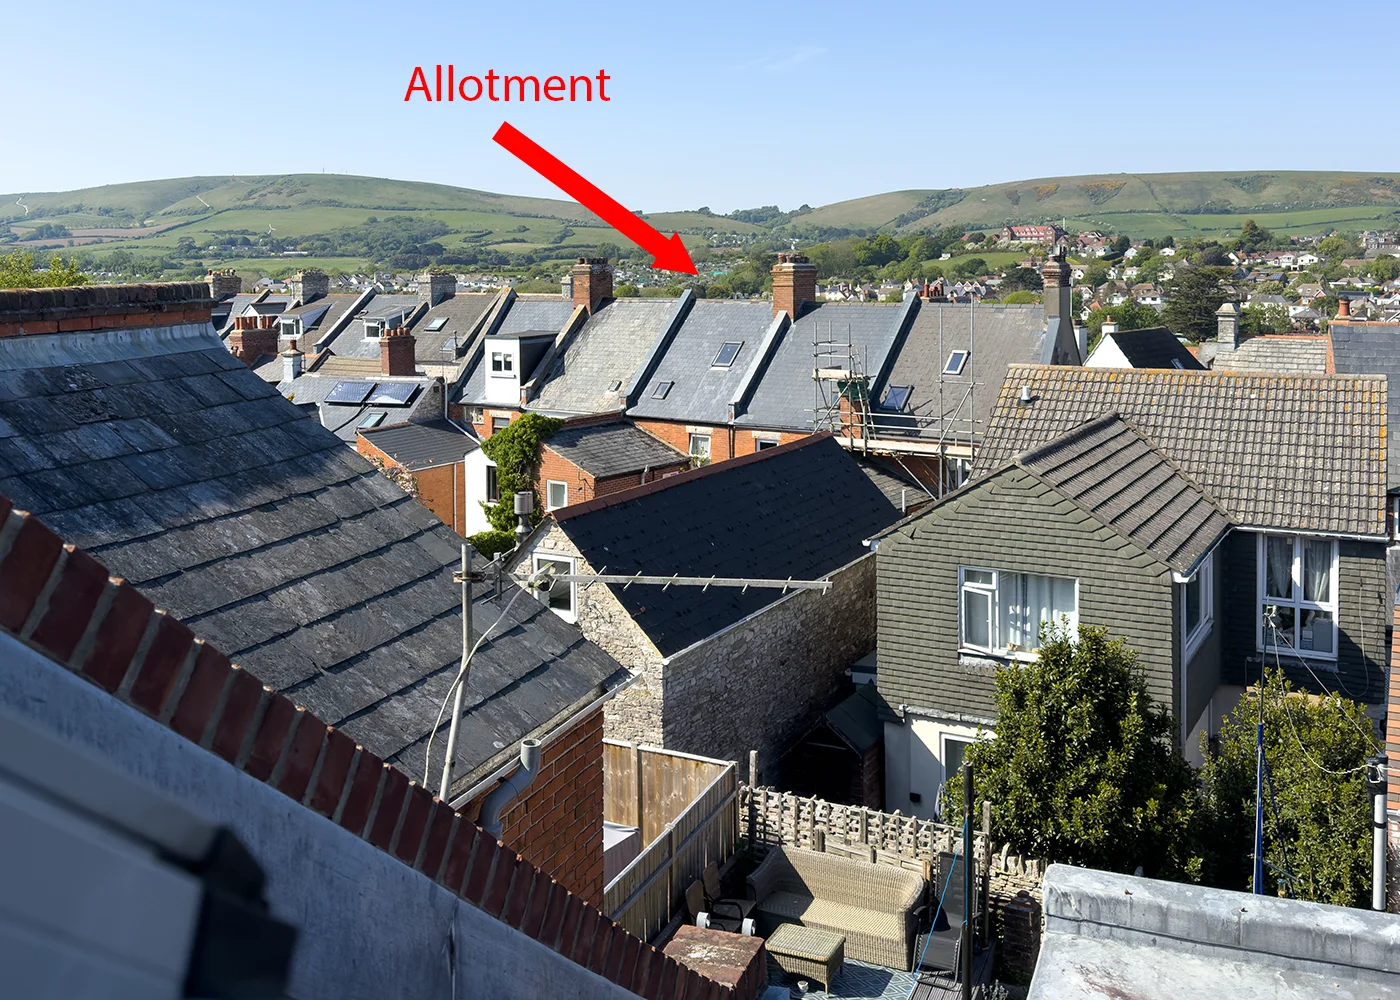
Our allotment is approx 1000 meters (0.6 miles) from our home with almost direct line of sight apart from a few trees blocking the view.
We looked at several communications options before deciding to use LoRa radios. LoRa is a radio communication technology, primarily used for long-range, low-power wireless communication in Internet of Things (IoT) applications and operates in the UK between 863–870Mhz without needing a license.
Allotment Sensors and Transmitter
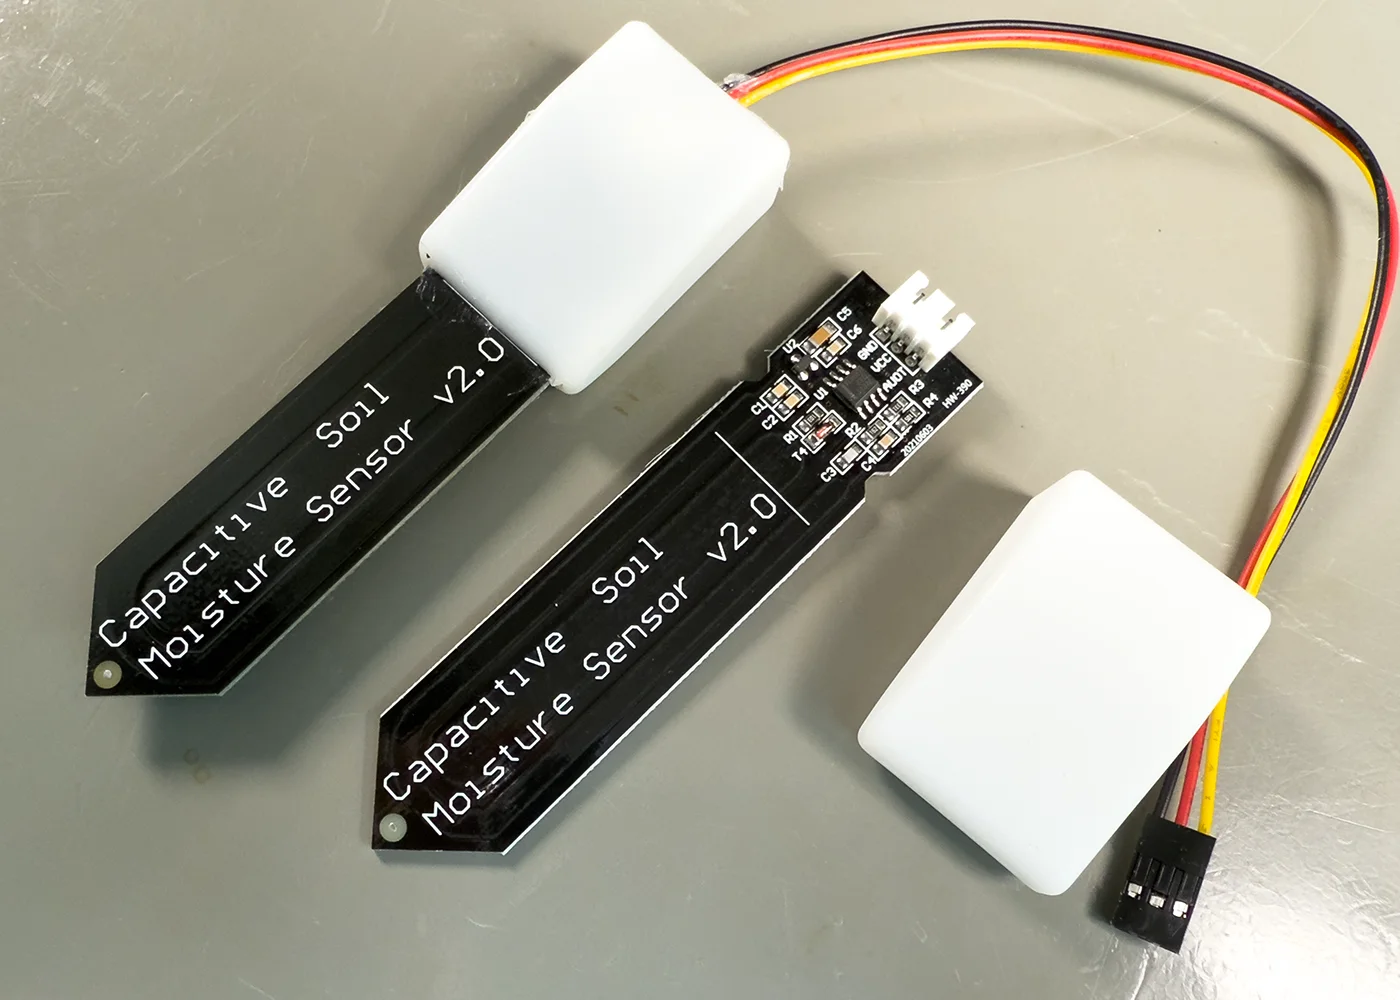
To measure soil moisture levels, we found a low-cost capacitive soil moisture sensor on Aliexpress or from Amazon which operates between 3.3V to 5V and has an output voltage of 0–3.0V.
The sensors are connected to an ADC Pi which is designed for the Raspberry Pi but can be used with other platforms that have an I2C interface. The ADC Pi has eight analogue to digital inputs with a maximum input voltage of 5V.
For a microcontroller we decided to use a Raspberry Pi Pico, which is a board built using RP2040, a microcontroller chip designed by Raspberry Pi in the UK and designed for low-power projects. The Pico can be powered by USB or an external supply and has maximum current consumption of 150 mA, making it suitable for our needs.
We have a MicroPython library to use with the ADC Pi which will simplify the code.
For radio communications we ordered a pair of Pico LoRa SX1262 868M which are LoRa node expansion modules designed for Raspberry Pi Pico and are based on Semtech SX1262, that supports the LoRa protocol and EU868 band. The board is supplied with small 2db gain antennas.
Power is provided by a 10W solar panel from Amazon which has a 5V output connected to the PCB. We only want sensor data to be sent when it is daytime, so a solar panel was the easiest option. We considered using batteries but don’t want to risk any battery overheating or fire problems as the high daytime summer temperatures and low winter temperatures at night could damage lithium batteries.
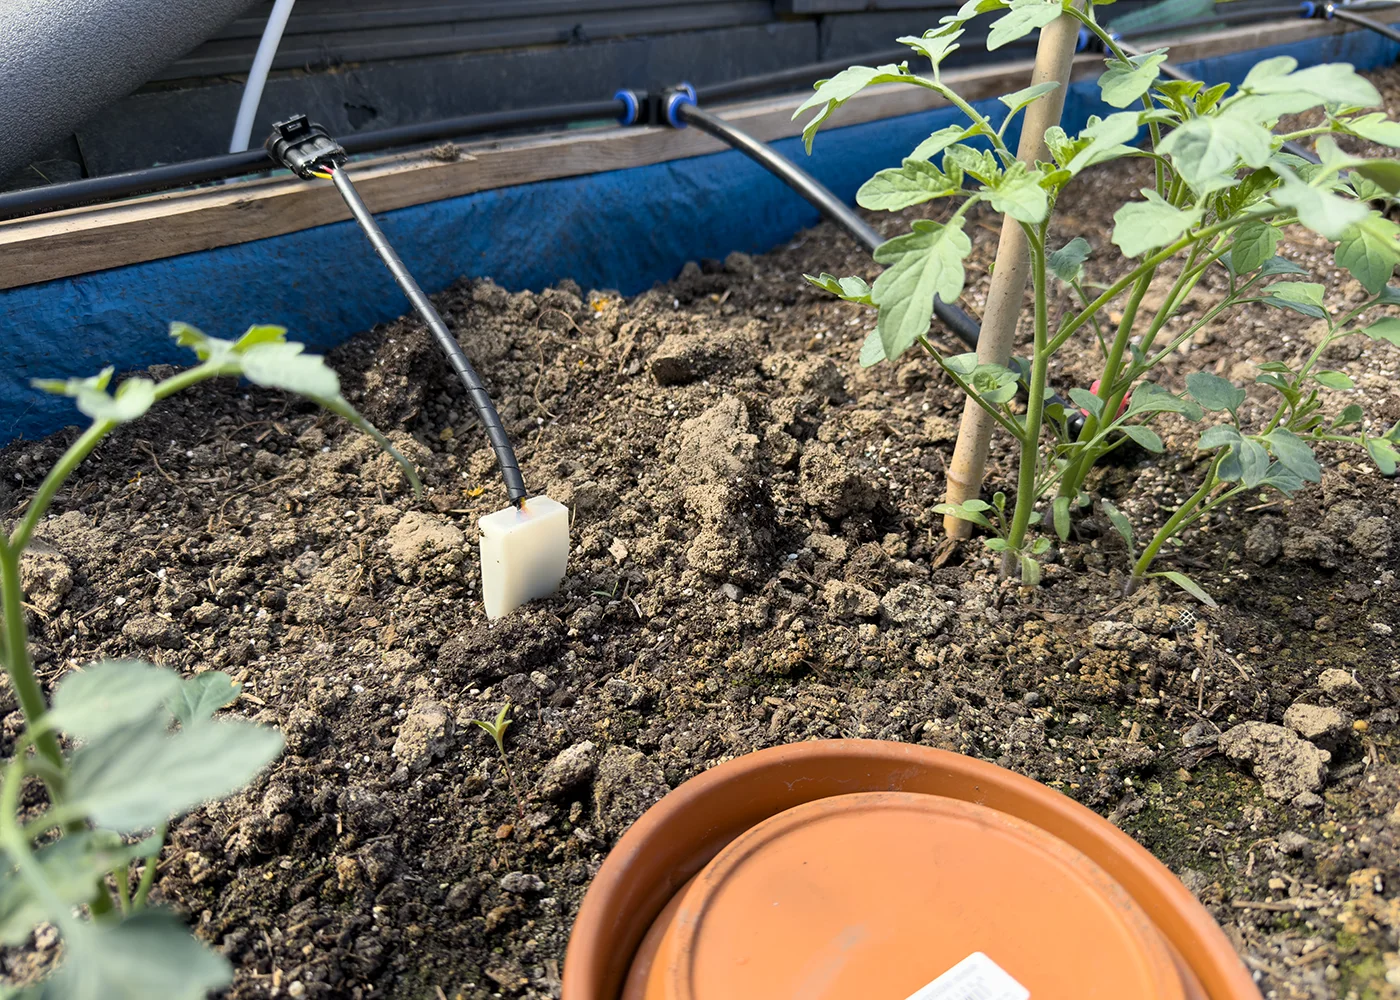
The sensors are built on a single PCB with the control circuit at one end and a connector with a short wiring harness supplied. To stop any moisture from damaging the circuit, we designed a 3D printed cover which slides over the PCB and allows us to cover the top of the PCB and components with silicone to keep out any water. The sides of the sensor PCB were covered in varnish to stop moisture from soaking into the PCB and causing problems with the measurements.
Circuit Board Design
The PCB for the allotment end has headers for the Raspberry Pi Pico, Pico LoRa and ADC Pi boards.
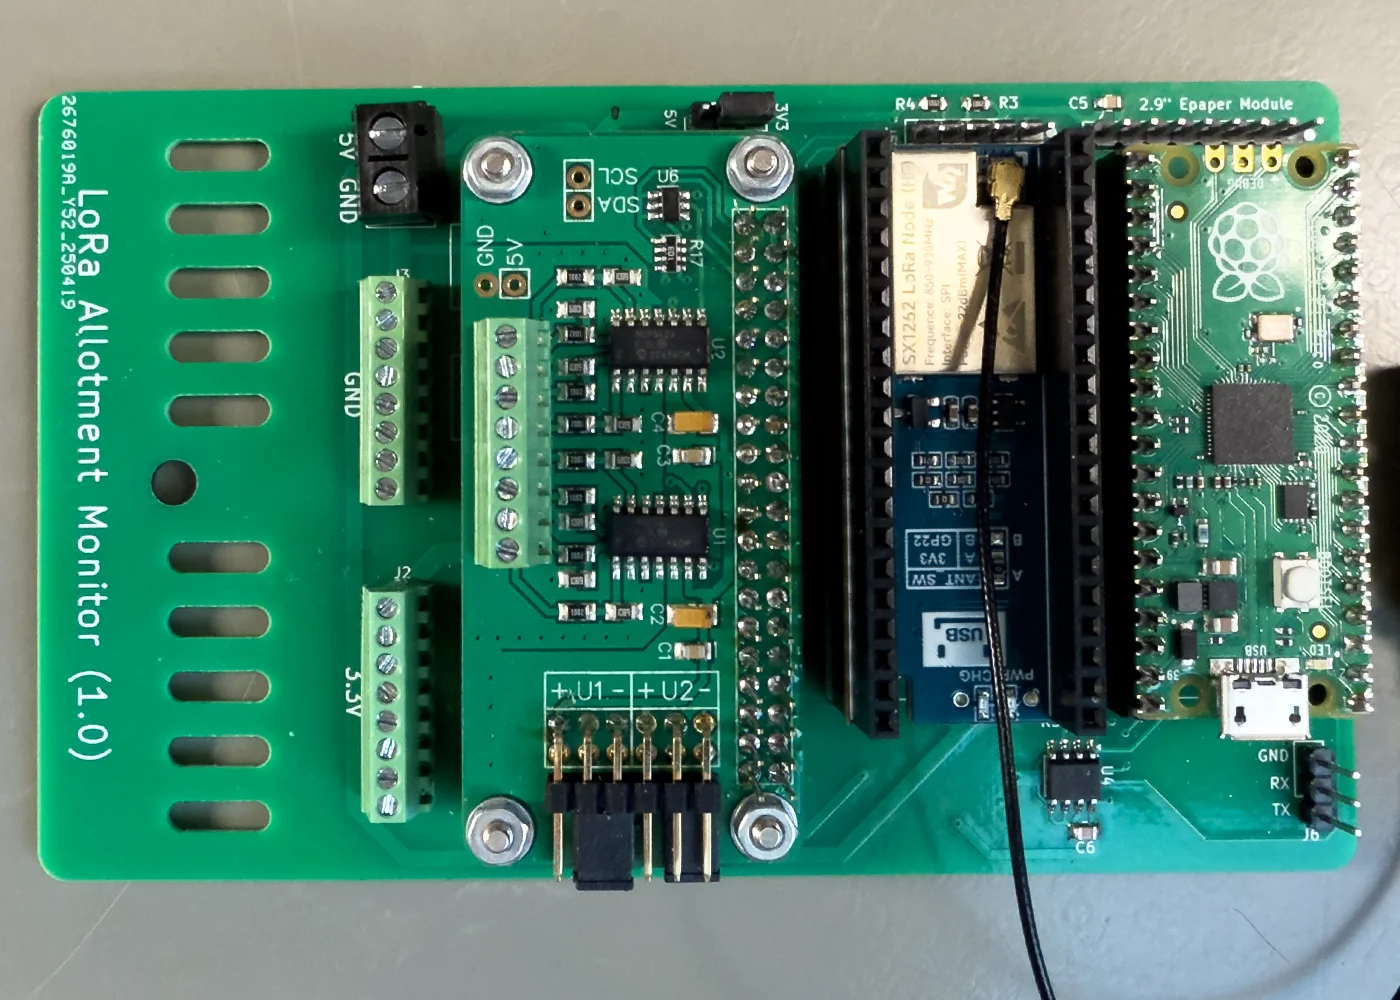
A Texas Instruments LP3878-ADJ 800-mA Low-Noise voltage regulator provides the 3.3 V needed for the temperature and humidity sensors and the ADC Pi. The regulator can be turned on and off via a GPIO pin on the Pico. This allows us to only power on the sensors and ADC when they are needed, reducing power consumption and hopefully extending the life of the moisture sensors.
The power consumption of the board is around 22mA while the Pico is idle, rising to 100mA for three seconds while the sensors are read and then dropping back to 25mA while the data is transmitted through the LoRa radio and the e-paper display is updated.
The Pico and LoRa modules plug into 2.54mm header strips, allowing them to be removed if needed.
A 40-pin header and footprint for a Raspberry Pi Zero were added in the middle of the PCB for the ADC Pi to sit on.
The I2C and UART pins are connected on the Raspberry Pi header. The I2C pins are used by the ADC Pi, and the UART pins and GPIO27 pin were added for future expansion, allowing us to add an RS485 interface to talk to external devices like a water pump or remote sensors.
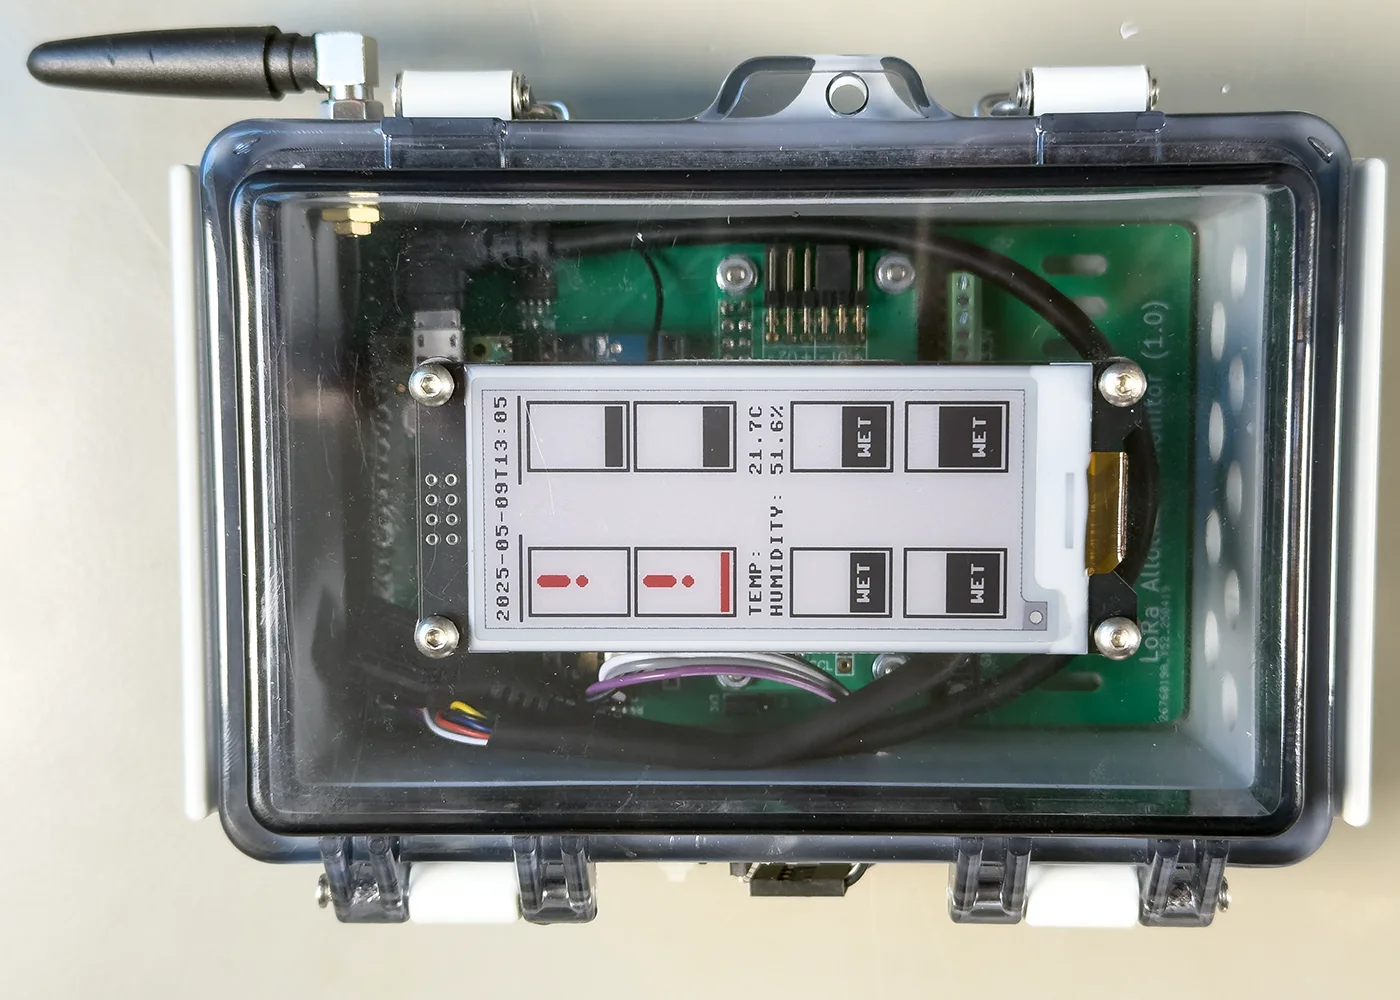
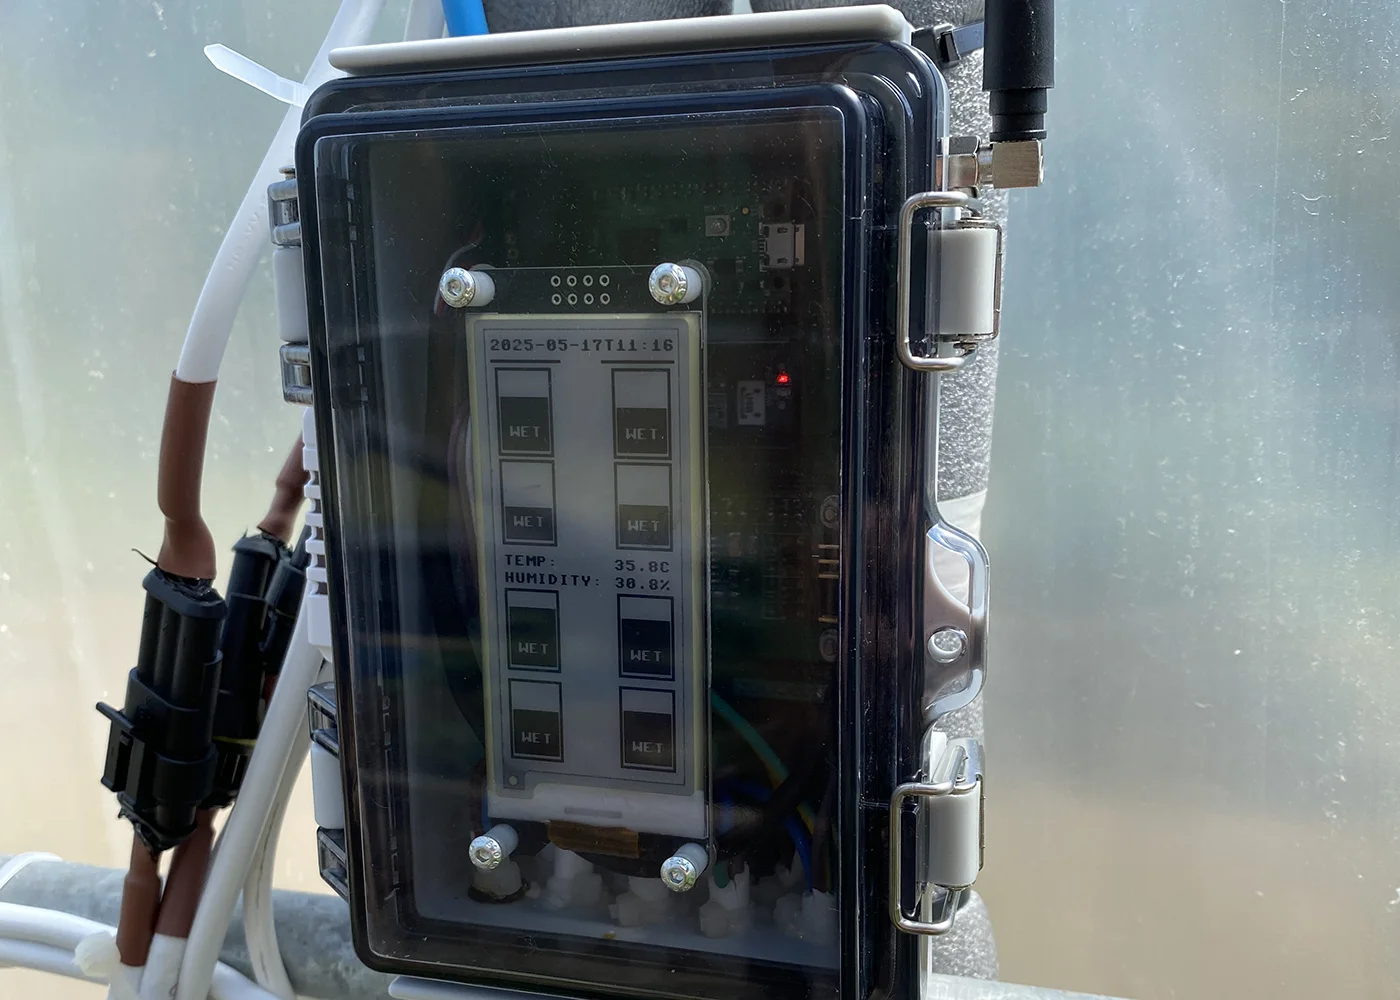
An 8-way header is included to connect to a 2.9-inch e-paper module to show an overview of each sensor. The e-paper module takes around 30 seconds to refresh with new data.
To monitor the PCB and enclosure temperature, we added a Microchip MCP9803 Temperature Sensor on the PCB which connects to the I2C bus. This allows us to see how hot the PCB is getting inside the enclosure. If we did decide to add a battery in the future, it would give us a way to monitor if the battery is getting too hot or cold.
An external I2C header was included, and this connects to a AHT20 I2C Temperature Humidity Sensor Module. This is fitted to the outside of the plastic enclosure and connected via a short cable to monitor humidity and temperature in the polytunnel. The AHT20 was placed on the side of the case facing away from the sun so it will measure the ambient temperature without getting heated directly from the sun.
We chose a waterproof enclosure, and all the cables were sealed where they enter the enclosure using silicon sealant, so the setup should be protected against moisture from humidity or any leaks in the polytunnel roof.
A short micro USB extension cable is plugged into the Raspberry Pi Pico so we can update the firmware if needed once everything has been installed.
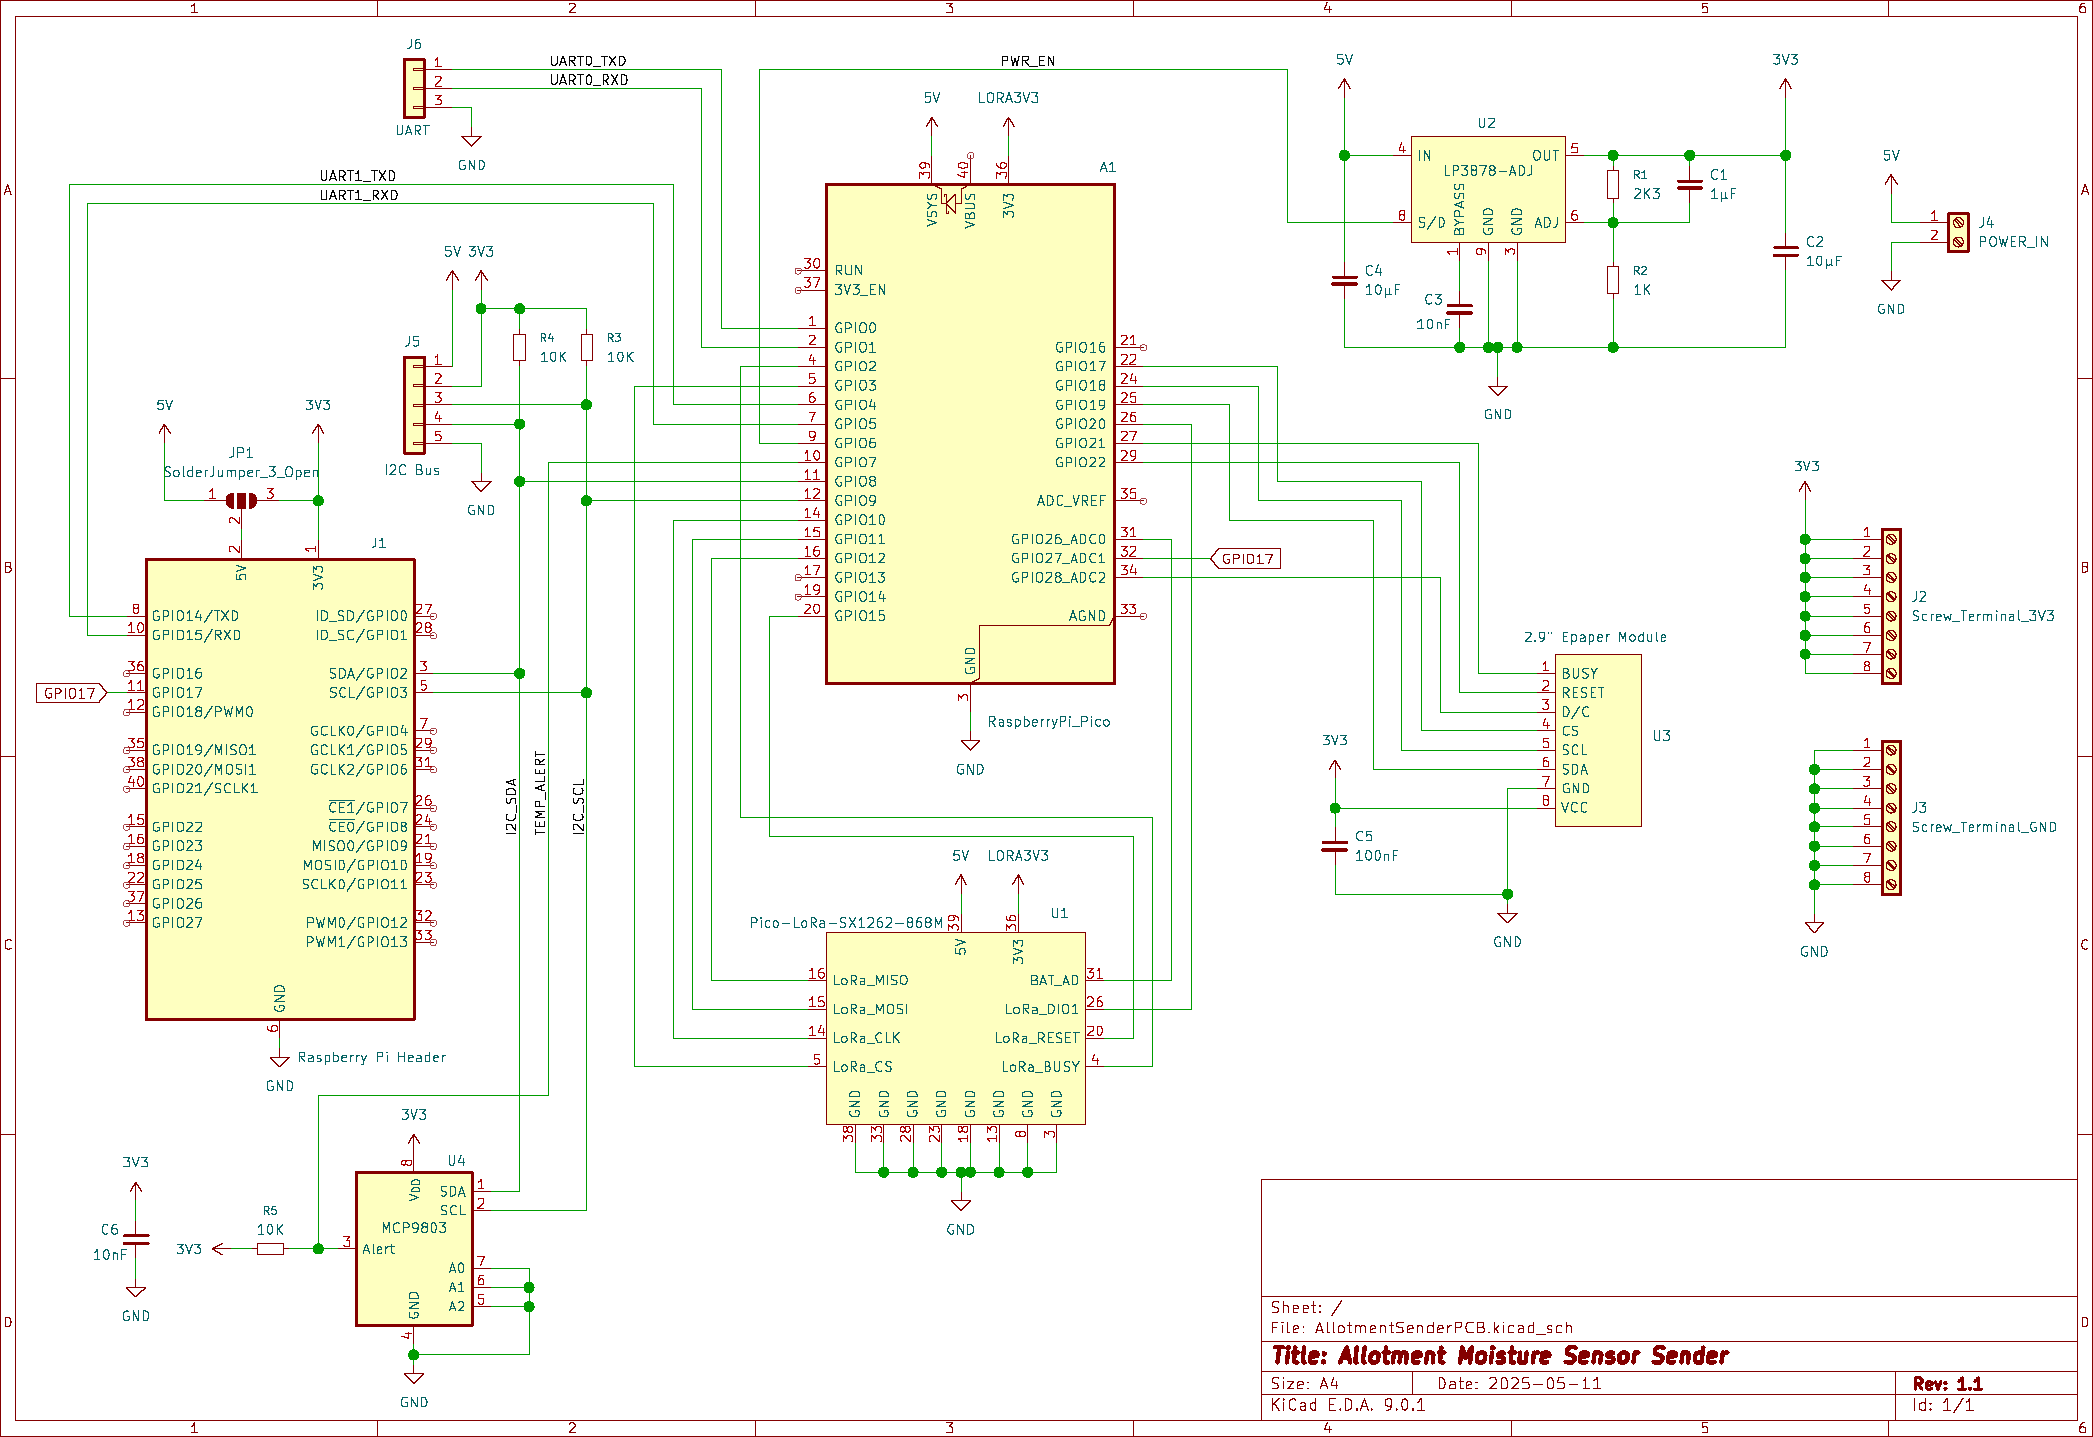
The PCB files can be downloaded from GitHub in KiCad EDA format.
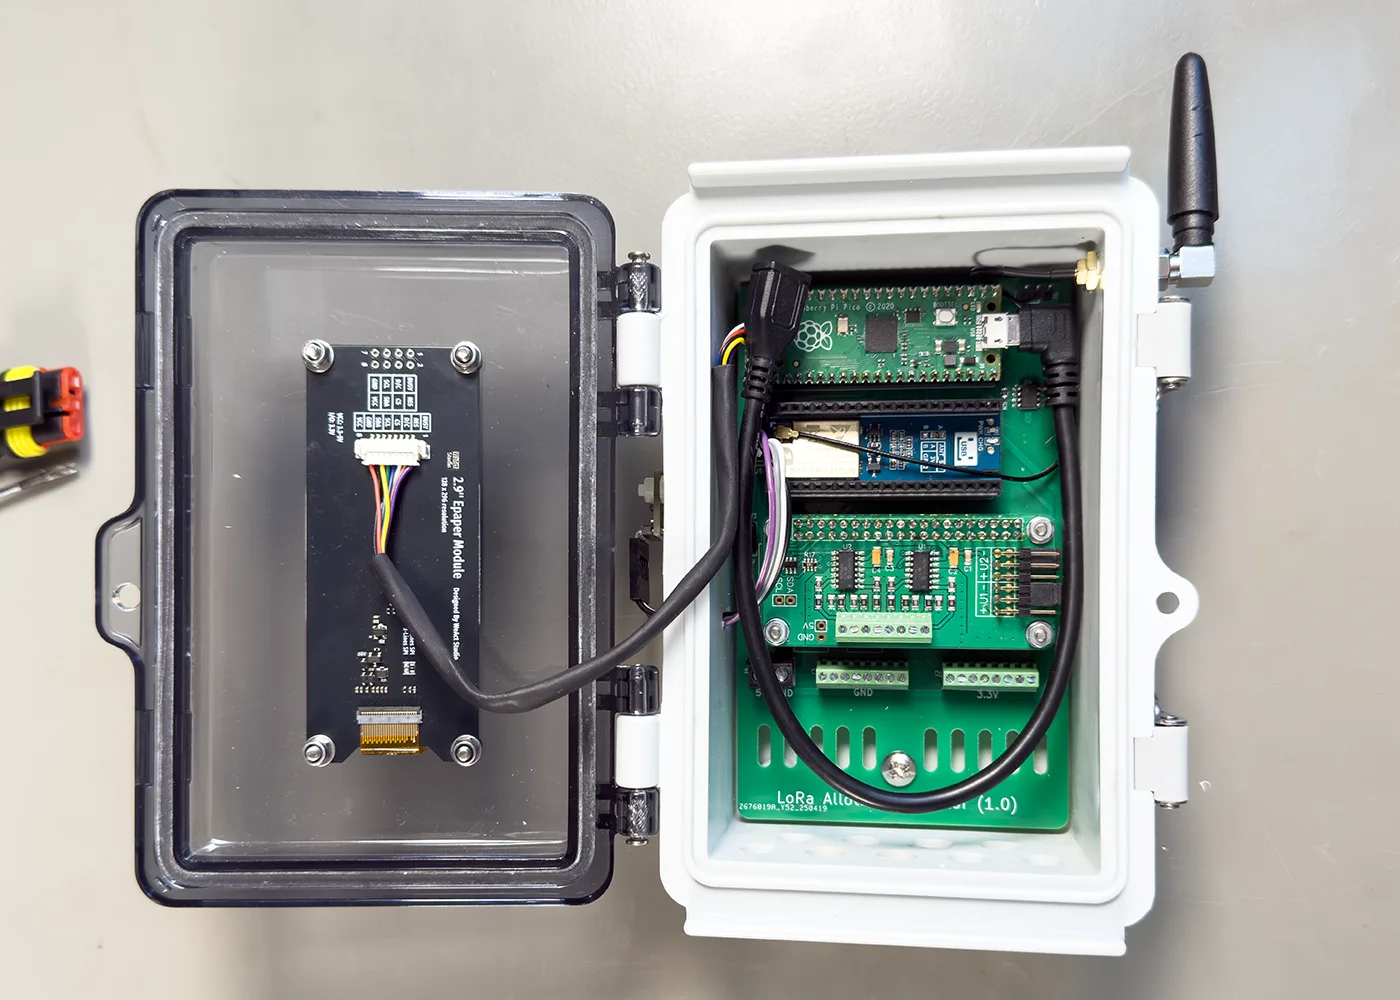
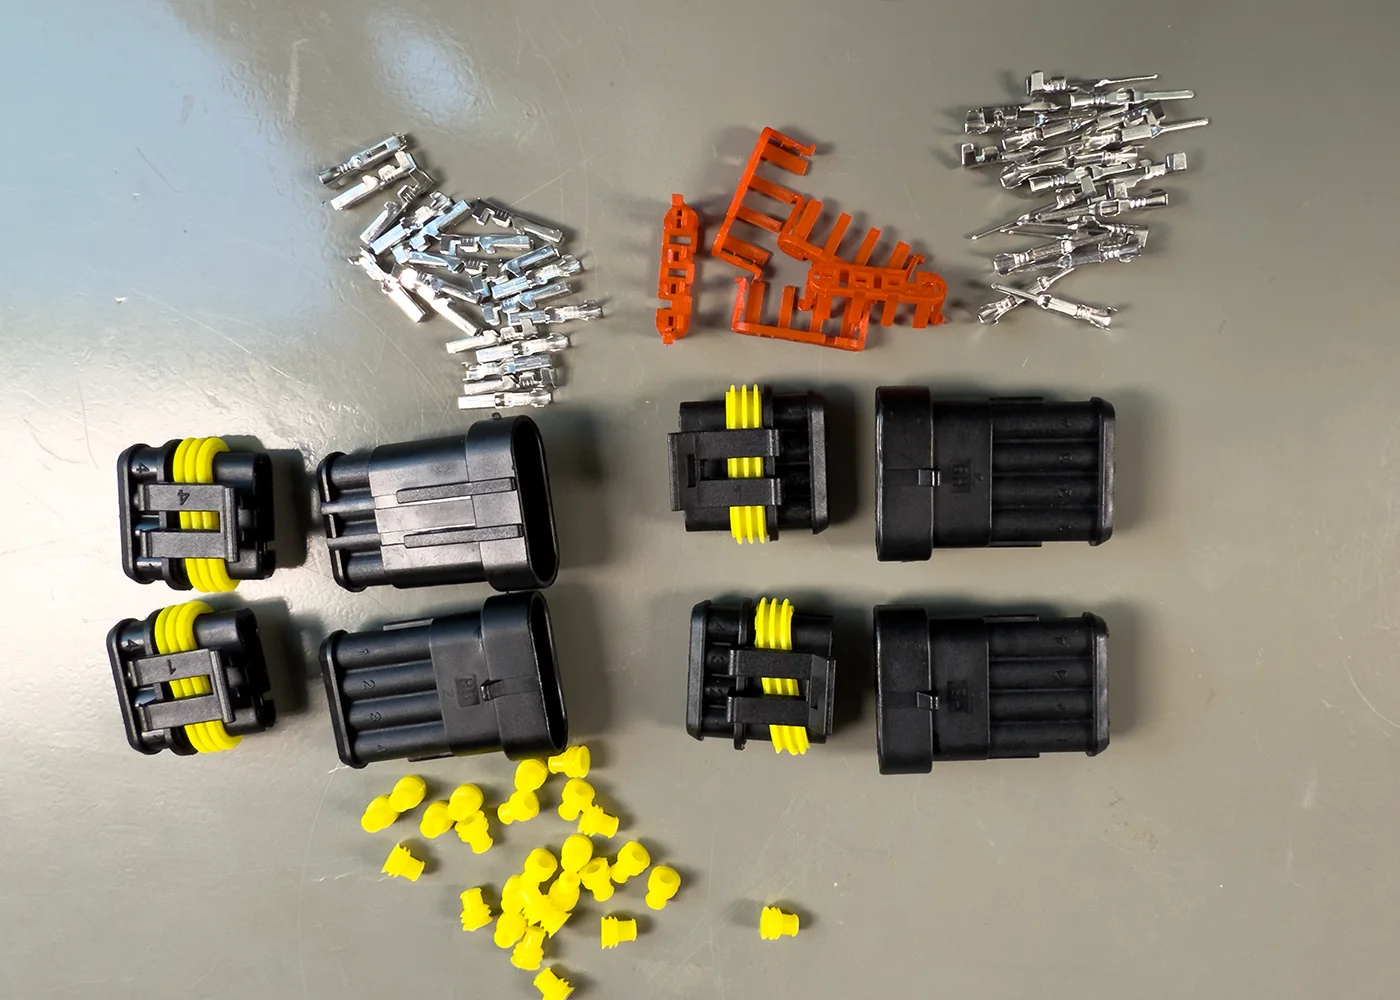
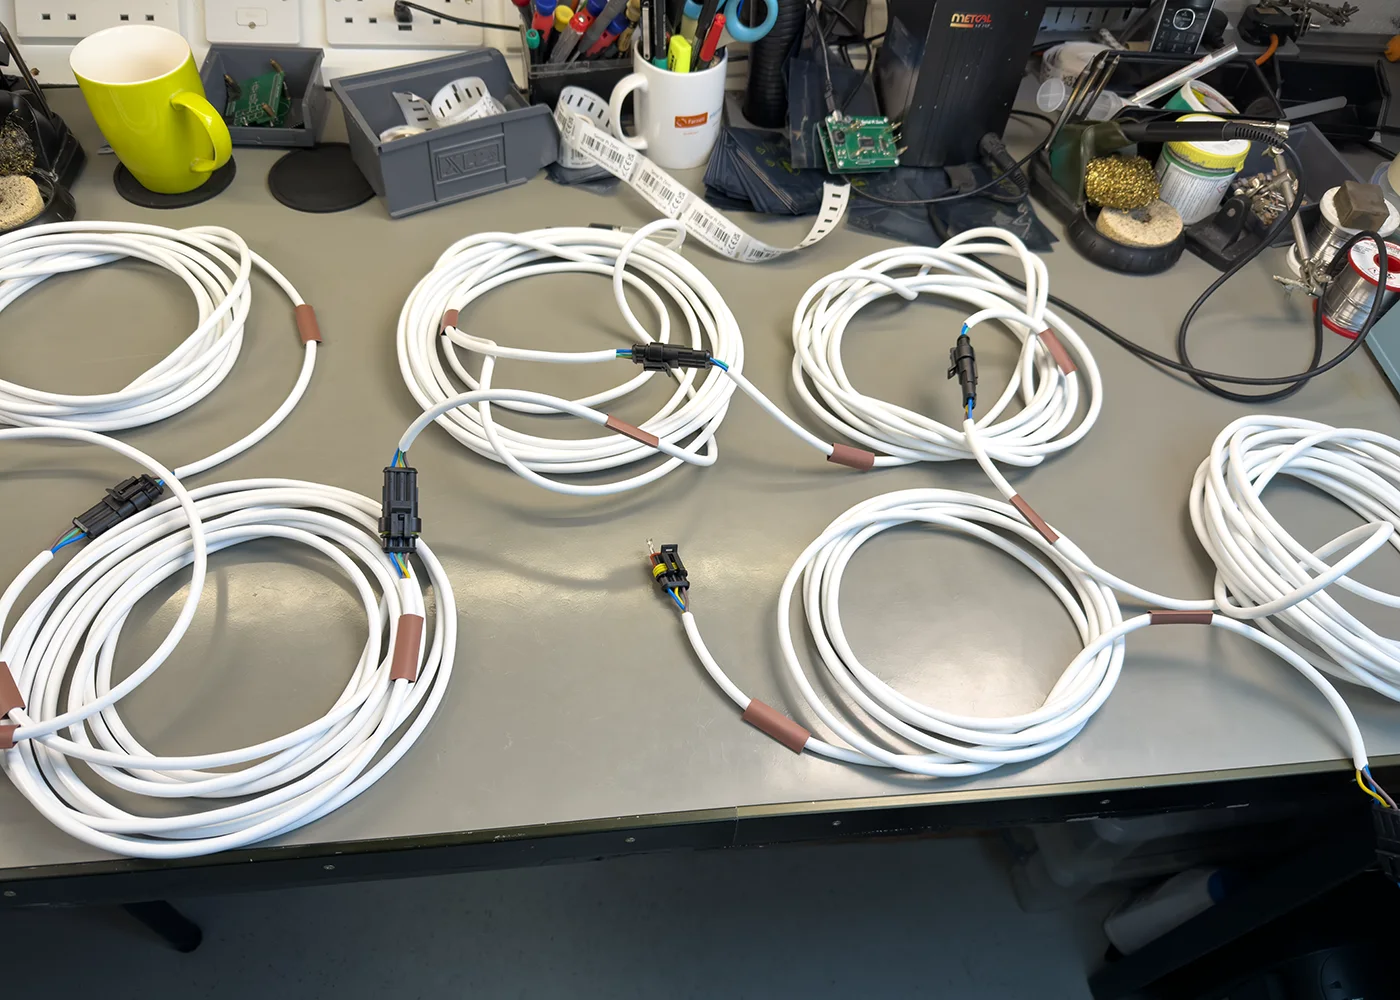
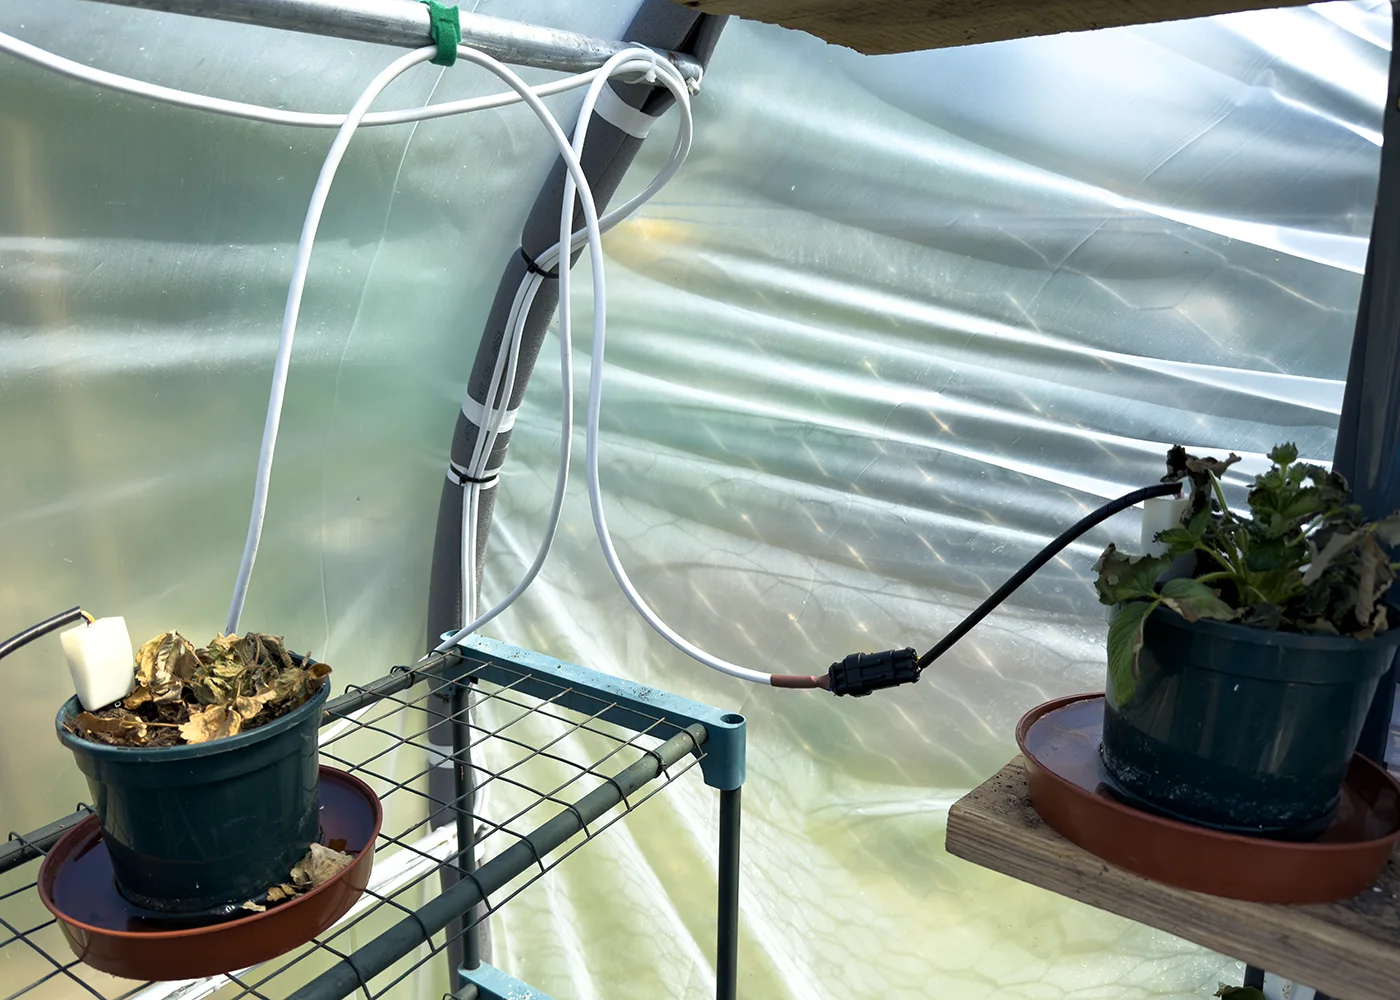
The sensors are connected via three core cables, and we used waterproof automotive connectors to allow us to easily disconnect them to move around to different plant pots.

Software Design
The software for the allotment sender was designed using MicroPython in Visual Studio Code.
The code is split into several files with the main program in main.py and the configuration options in config.py. Separate libraries are used for the sensors and the LoRa module in the lib folder.
The program begins by initialising the LoRa module and the sensors, and the values are read from each sensor.
Next a ping packet is sent to the receiver to check if the receiver is online. The receiver responds with a pong packet, the date and time and the signal-to-noise ratio (SNR) of the received packet.
If no response is received or the SNR is too low, the program will increase the power level and try again.
Once a pong response is received, the program will send the data to the receiver via LoRa. The receiver responds with an ok packet.
The program then updates the e-paper display with the moisture levels for each sensor along with the temperature, humidity and the date and time.
If there was no response from the receiver, a message is displayed at the top of the display showing that LoRa communication failed.
Once the data has been sent and the display updated, the program sleeps for 10 minutes before resetting the Pico and starting again.
Home Receiver to MQTT via Wi-Fi
To receive the data at home and transfer it to Home Assistant, we installed a Raspberry Pi Pico W with Wi-Fi in the loft and used a second Pico-LoRa-SX1262-868M to communicate with the allotment sensors. The Pico is configured to connect to our Wi-Fi network and post any received sensor data to our MQTT broker, which can then be retrieved and displayed in Home Assistant.
We initially tried to use the Raspberry Pi Pico 2 W, but after several days of trying to debug Wi-Fi connection issues and problems with the internal cores not initialising after resets, we decided to use the older Raspberry Pi Pico W model that seems more stable.
An old enclosure from a Wireless Things temperature sensor was modified and used to house the Pico and LoRa module.
Power is supplied using a 5V USB charger.
Calibrating the sensors
Due to differences between soil types, the soil sensors needed to be calibrated to our soil type.
There are many different ways to calculate soil moisture:
Gravimetric Method (Most Accurate)
How it works:
- Collect a soil sample.
- Weigh it (wet weight).
- Dry it in an oven at 105°C (221°F) for 24 hours.
- Weigh again (dry weight).
- Use this formula:
Moisture Content (%)= ((Wet weight - Dry weight) / Dry weight)×100
Pros: Very accurate.
Cons: Time-consuming and labour-intensive.
Time Domain Reflectometry (TDR) / Capacitance Probes
- Use sensors to measure dielectric properties of soil, which relate to moisture content.
- Installed in the field or used as handheld devices.
Pros: Fast, good for automation and large-scale monitoring.
Cons: Expensive upfront, requires calibration.
Other Methods
Use a soil moisture meter (cheap, easy, quick).
We decided to use the Gravimetric Method to calibrate our sensors as it is the most accurate method.
Using the Capacitive Soil Moisture Sensor
The Capacitive Soil Moisture Sensor outputs an analogue voltage that inversely correlates with moisture:
Voltage vs. Moisture Overview
- Dry Soil = Higher Voltage
- Wet Soil = Lower Voltage
Measuring our soil
For our soil we used two different samples, a mix of soil from the ground with 50% compost as used in our raised beds, and a pure compost sample which we use for seedlings in small pots.
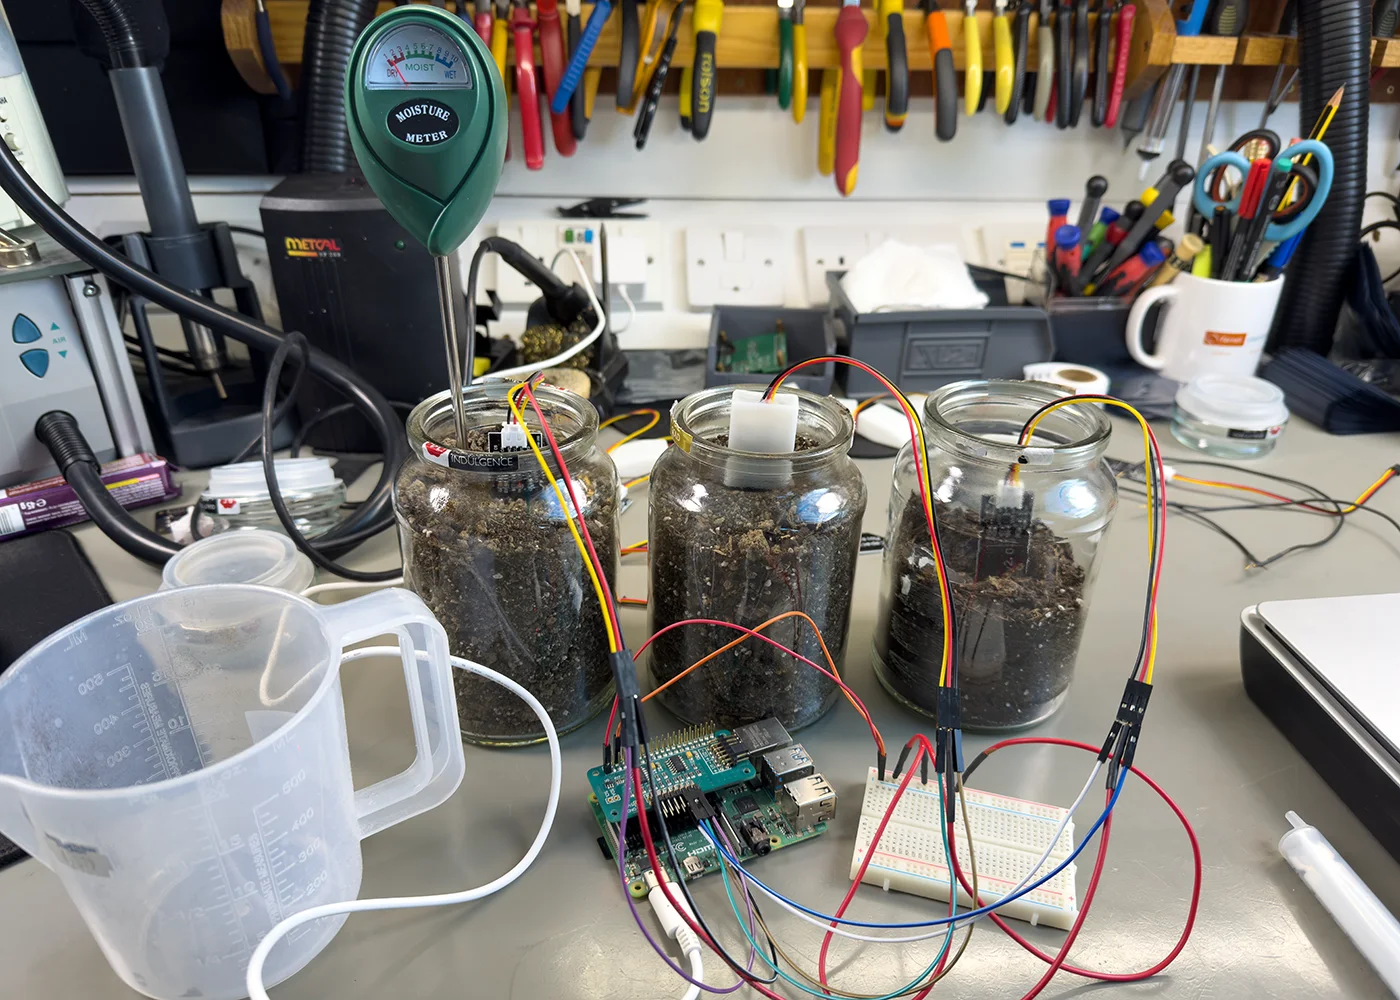
With both soil types dried in the polytunnel for several weeks, we placed a measured amount of each soil type into glass jars and took an initial voltage readings using the ADC Pi connected to a Raspberry Pi. We then added 10ml of water to each sample, mixing thoroughly before taking the next voltage measurement and then repeating until the soil was saturated with water.
| Soil Condition | Compost Mix Soil | Pure Compost |
|---|---|---|
| Very Dry | 0.79V | 0.80V |
| Dry | 0.72V | 0.75V |
| Moist | 0.69V | 0.67V |
| Wet | 0.55V | 0.50V |
| Saturated/Soaked | 0.45V | 0.47V |
The result of these measurements gave us an upper and lower voltage range for the soil which we could use in our Python code to convert the voltage from the ADC Pi into a moisture percentage for the sensors.
A tutorial with sample code for measuring soil moisture levels can be found on our AB Electronics UK website at ADC Pi with Capacitive Soil Sensor
Home Assistant Config
To display the sensor data in Home Assistant, I created new MQTT sensors with the following code:
# Start Allotment Sensors

  - state_topic: "allotment/data"
    name: "Raw Allotment Payload"
    value_template: "{{ value }}"

  - state_topic: "allotment/data"
    name: 'Allotment Board Temperature'
    unit_of_measurement: "°C"
    device_class: temperature
    value_template: "{{ value_json.board_temperature }}"

  - state_topic: "allotment/data"
    name: 'Moisture Sensor 1'
    unit_of_measurement: '%'
    device_class: humidity
    value_template: "{{ value_json.moisture1 }}"

  - state_topic: "allotment/data"
    name: 'Moisture Sensor 2'
    unit_of_measurement: '%'
    device_class: humidity
    value_template: "{{ value_json.moisture2 }}"

  - state_topic: "allotment/data"
    name: 'Moisture Sensor 3'
    unit_of_measurement: '%'
    device_class: humidity
    value_template: "{{ value_json.moisture3 }}"

  - state_topic: "allotment/data"
    name: 'Moisture Sensor 4'
    unit_of_measurement: '%'
    device_class: humidity
    value_template: "{{ value_json.moisture4 }}"

  - state_topic: "allotment/data"
    name: 'Moisture Sensor 5'
    unit_of_measurement: '%'
    device_class: humidity
    value_template: "{{ value_json.moisture5 }}"

  - state_topic: "allotment/data"
    name: 'Moisture Sensor 6'
    unit_of_measurement: '%'
    device_class: humidity
    value_template: "{{ value_json.moisture6 }}"

  - state_topic: "allotment/data"
    name: 'Moisture Sensor 7'
    unit_of_measurement: '%'
    device_class: humidity
    value_template: "{{ value_json.moisture7 }}"

  - state_topic: "allotment/data"
    name: 'Moisture Sensor 8'
    unit_of_measurement: '%'
    device_class: humidity
    value_template: "{{ value_json.moisture8 }}"

  - state_topic: "allotment/data"
    name: 'Allotment Temperature'
    unit_of_measurement: "°C"
    device_class: temperature
    value_template: "{{ value_json.temperature }}"

  - state_topic: "allotment/data"
    name: 'Allotment humidity'
    unit_of_measurement: "%"
    device_class: humidity
    value_template: "{{ value_json.humidity }}"

  - state_topic: "allotment/data"
    name: 'Light Level'
    unit_of_measurement: "lx"
    value_template: "{{ value_json.light  }}"

  - state_topic: "allotment/data"
    name: 'Allotment Sensor Update Time'
    value_template: "{{ value_json.date  }}"


# End Allotment Sensors
To display the data, I found a nice looking plant component from github.com/Olen/homeassistant-plant
I created new plant sensors using the UI, and then the sensor data was then added to a new view using:
- type: custom:flower-card
    entity: plant.bed_one
    show_bars:
      - moisture
      - temperature
The screenshot below shows the new sensor data used with the custom flower card in Home Assistant with plant icons added for each sensor.

Installing the Solar-Powered Monitoring System in the Allotment Polytunnel
To install the new solar-powered monitoring system in our allotment’s polytunnel, we securely attached the solar panel to the top support bar using heavy-duty cable ties.
The control box was mounted onto the side metal supports, also using cable ties. Extension cables were routed carefully to reach each sensor location within the polytunnel. We ensured there was sufficient spare cable to allow easy repositioning of the sensors along the raised beds and within the potting area, accommodating both larger planting areas and smaller plant pots.

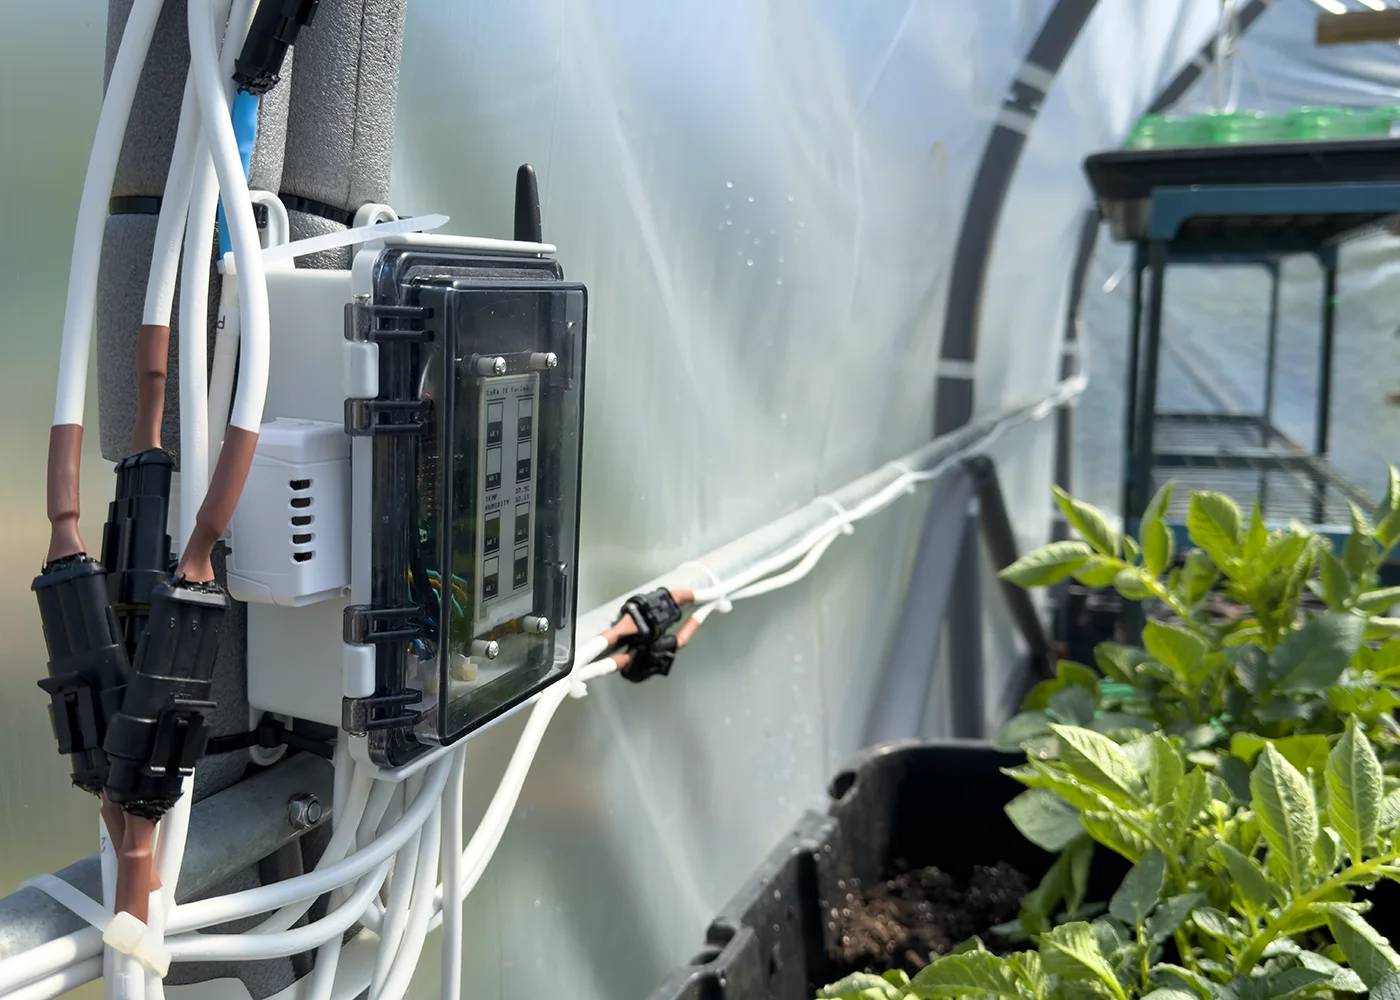
After the installation was complete we found that the signal strength between the allotment and home was lower than expected and didn’t have a reliable stable connection. To resolve this we installed higher gain antennas on both radios which has fixed the issue.
Parts List:
| Item | Supplier / Link | Price |
|---|---|---|
| Raspberry Pi Pico | thepihut.com/products/raspberry-pi-pico | £3.80 |
| Raspberry Pi Pico W | thepihut.com/products/raspberry-pi-pico-w | £5.80 |
| Pico-LoRa-SX1262-868M x 2 | thepihut.com/products/sx1262-868mhz-lora-node-module-for-raspberry-pi-pico | £16.20 each |
| ABElectronics UK ADC Pi | abelectronics.co.uk/p/69/adc-pi | £15.99 + vat |
| Capacitive Soil Moisture Sensor | Amazon | £3.99 for 3, £11.97 total for 9 sensors |
| Ecosonique 10W Portable Solar Panel | Amazon | £26.99 |
| AHT20 I2C Temperature Humidity Sensor Module | Amazon | £7.89 |
| 868Mhz LoraWAN SMA Male Antenna with 5dBi gain | Amazon | £11.99 |
| WeAct 2.92 InchEpaper Module | www.aliexpress.com/item/1005004644515880 | £6.97 |
| Three Core Cable 50m roll | cpc.farnell.com | £29.22 |
| Connectors | www.aliexpress.com/item/32954133958 | £10.95 |
| Plastic Case | www.aliexpress.com/item/1005006620169871 | £8.15 |
| PCB | jlcpcb.com | £9.09 inc shipping |
The cost of the above parts was £180.91 but this excludes the header pins and components on the PCB which would have cost around £10.
The code and PCB files for this project can be downloaded from GitHub at github.com/briandorey/pi-pico-lora-soil-monitor.


Adam
I would use nRf52 ( like seeed xiao ) (nRf52 + SX1262 = ~ 13USD) - this should be more power efficient and work better solar powered.
I use meshtastic nodes to extend coverage. the last node (at home) transfers data to mqtt broker, from where I can use this data on my Home Assistant.
Chris
I was interested to see your post while I was in the process of writing a very similar one for my blog. I just finally published the first installment: https://selectiveappeal.org/posts/garden133/, and have a few more planned.
You use the same moisture sensor as me, but you do a far better job with calibration. I also use LoRa but with an ESP32 board. You have a stronger motivation for LoRa than I do, since you more communicating over a more challenging distance. Nice work!
Konstantin
Great guide, thanks! Our allotment is 1.7miles away so I wonder if having a more powerfull antenna on both sides will still work
Brian
As long as there are not any tall buildings or trees to block the signal, it should work with higher gain antennas
Adeel
Really interesting project. Using a pair of Raspberry Pi Pico boards with LoRa for long-range soil monitoring is a clever approach, especially when the garden is far from the house. The solar-powered transmitter and the integration with Home Assistant via MQTT make it a very practical IoT setup. I also like the idea of calibrating the capacitive soil sensors with the gravimetric method to improve accuracy. Great documentation and a very useful project for smart gardening