We have decided it was time to upgrade our small Linux server which runs Home Assistant and several other docker containers.
In 2017 we installed a Gigabyte EL-20 3700 ultra-small form factor PC which had an Intel Pentium N3710 processor, 8Gb ram and 120Gb drive and this has been running 24/7 for the past six years.
Since setting up the system we have gradually increased the number of docker containers running on the computer and the lack of RAM and drive storage has become an issue.
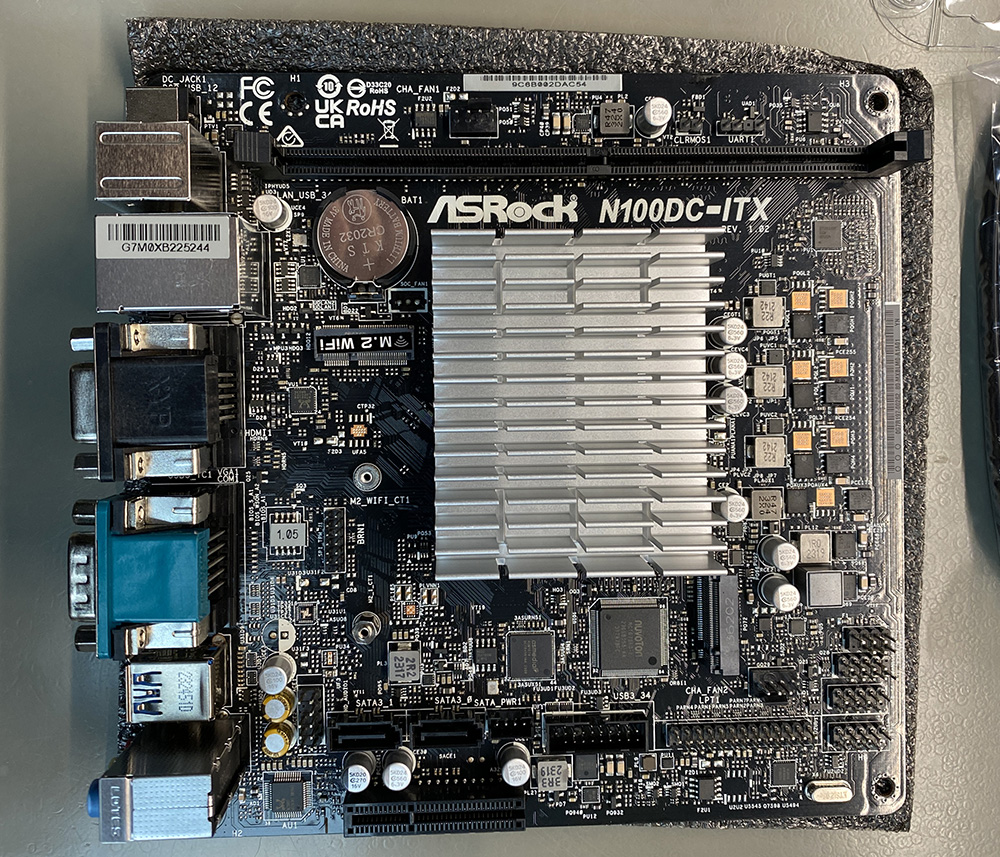
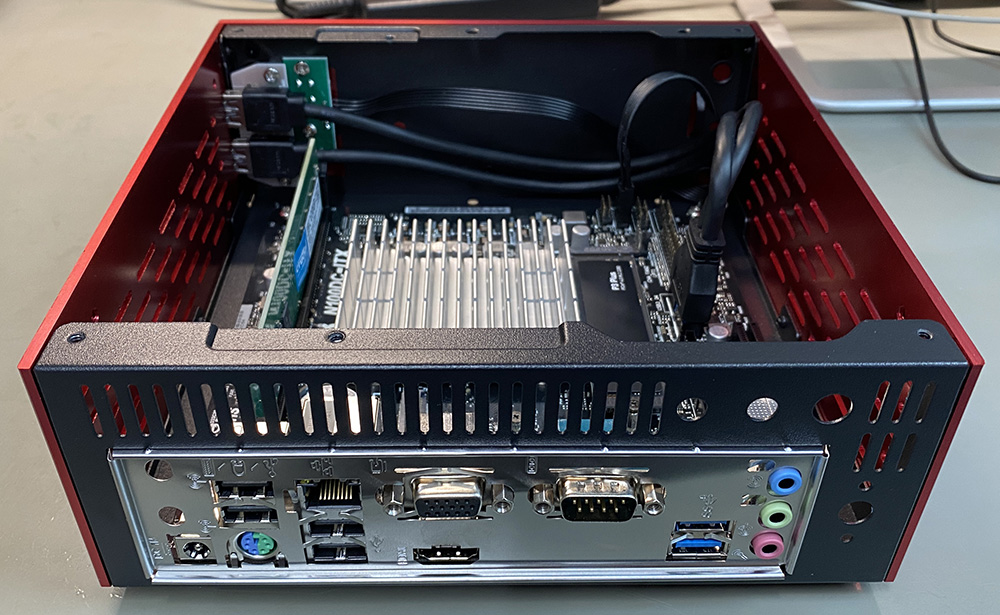
After looking at several options we decided to upgrade to a new system running the Intel Quad-Core Processor N100 chipset and use an ASRock N100DC-ITX motherboard which has similar power consumption.
The motherboard features:
- Intel Quad-Core Processor N100 with 4 E-cores with a turbo frequency of 3.4GHz and Intel UHD Graphics
- Supports 1 DDR4 DIMM
- 1 DC Jack (5.5 x 2.5mm) for an external 19V power adapter
- 1 PCIe 3.0 x4 x2 mode, 1 M.2 Key E for WiFi
- Graphics Output Options: D-Sub, HDMI
- 7.1 CH HD Audio, Realtek ALC897 Audio Codec
- 2 SATA3, 1 M.2 PCIe Gen3x2
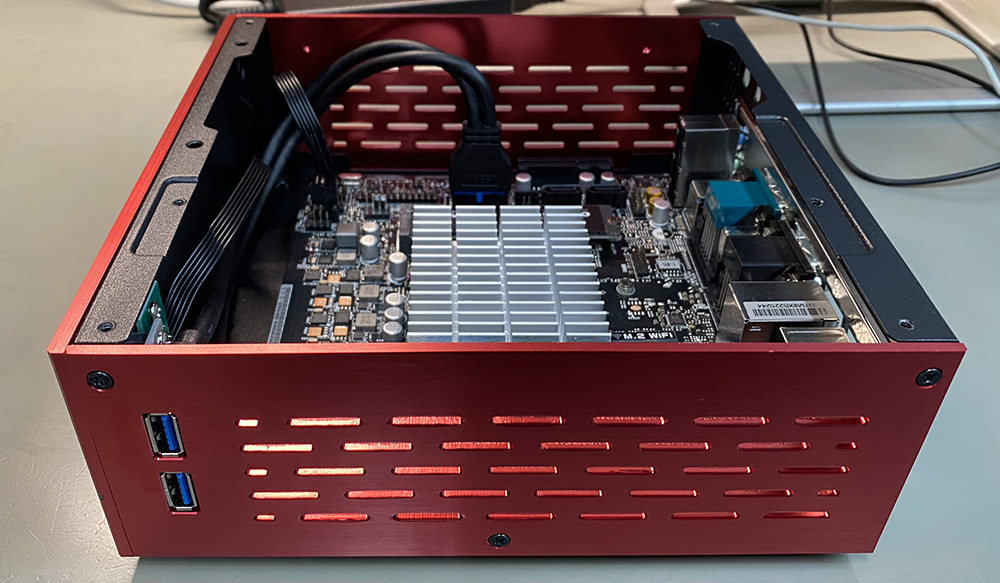
- 4 USB 3.2 Gen1, 2 Rear, 2 Front
- Realtek Gigabit LAN
The motherboard has a built-in heatsink and is a fanless design so we will not have any fan noise from the computer. CPU Comparisons from CPU Benchmark
| Intel N100 | Intel Pentium N3710 | |
|---|---|---|
| Socket Type | NA | FCBGA1170 |
| Max Turbo Frequency | Up to 3.40 GHz | Up to 2.6 GHz |
| Total Cores | 4 | 4 |
| Total Threads | 4 | 4 |
| Graphics | Intel UHD Graphics | Intel HD Graphics 405 |
| Max Resolution | 4096 x 2160 @60Hz | Unknown |
| Thermal Design Power (TDP) | 6 W | 6 W |
| Memory Type | DDR4 3200 MT/s DDR5 4800 MT/s LPDDR5 4800 MT/s |
DDR3L-1600 |
| Released | Q1 2023 | Q1 2016 |
| Single Thread Rating | 1974 | 686 |
| CPU Mark | 5640 | 1383 |
The above benchmarks show the new processor is over 300% faster on the CPU mark and 188% faster on single-threaded applications whilst keeping the same low TDP of 6 watts.
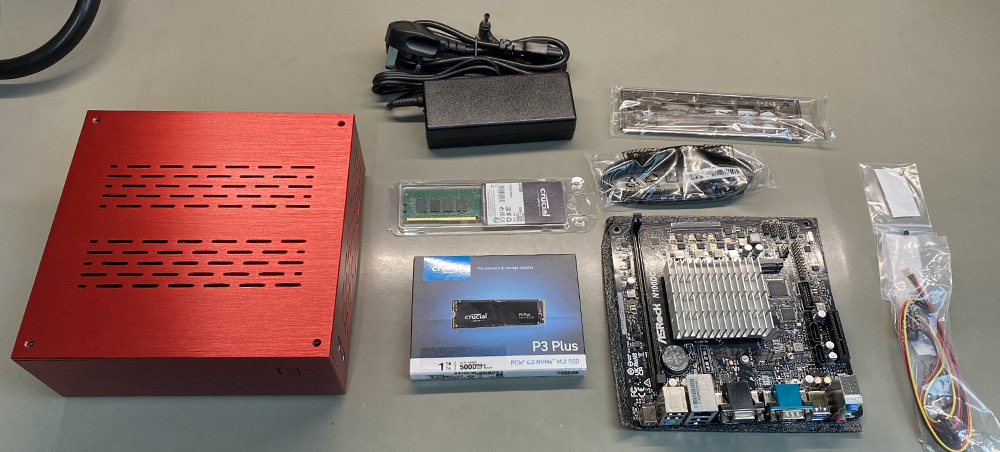
Parts Used and Assembly
| Item | Price | Link |
|---|---|---|
| Asrock N100DC-ITX Motherboard | £123.46 | techimage.co.uk |
| Goodisory A01 Aluminum Mini-ITX HTPC Desktop Computer Chassis (Red Aluminum) | £38.22 | Amazon UK |
| 19V 4.74A 90W Laptop Charger | £19.80 | Amazon UK |
| Crucial 32GB (1x32GB) 3200MHz CL22 DDR4 Desktop Memory | £63.99 | |
| Crucial P3 Plus 1TB PCIe 4.0 3D NAND NVMe M.2 SSD | £55.98 | |
| Total | £301.45 |
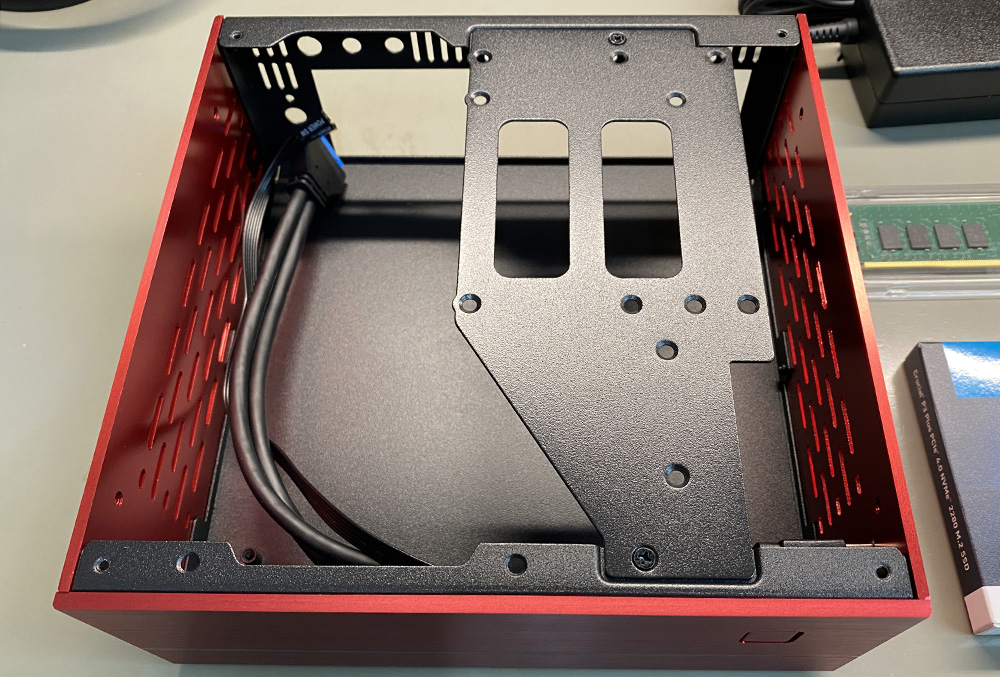
Assembly is straightforward; the top of the case is removed using four screws which reveals a hard drive mount bracket which is held in place with 2 screws. With this removed the motherboard backplate is installed and the motherboard is fitted into the case onto built-in standoffs.
Software Setup
The computer was connected to a monitor, network and keyboard and Ubuntu Server 22.04.3 LTS was installed.
We then proceeded to install the software needed for Home Assistant and other applications including:
Docker Images:
Home Assistant Docker edition.
Firefly III, a free and open-source personal finance manager.
Bookstack is a self-hosted wiki which we use to store documentation for our projects.
Gitlab, self-hosted source code version control.
Uptime Kuma which is an easy-to-use self-hosted monitoring tool for websites.
Zigbee2MQTT is used to communicate between our house’s Zigbee sensors with the MQTT server and Home Assistant.
We also set up a Samba file share to copy the databases and configuration files to the new server from the existing machine.
Moving Home Assistant
Our Home Assistant database is stored on the MySQL server, and we created a backup on the old computer which saved a 1.8Gb database file.
We initially tried to restore this to the new server using phpMyAdmin but this failed due to timeouts. We then proceeded to copy the file to the new server and use the terminal with the following command to restore the database:
mysql -u myusername –p homeassistant < homeassistantbackup.sql
Once the database was restored, we copied the Home Assistant configuration folder for Docker and created the Home Assistant Docker image using docker-compose scripts.
Overheating Problems
Shortly after installing the operating system and setting up the software packages, we found that the new case was very hot and checking the CPU temperatures showed the cores over 95 degrees Celsius.
As this is far too hot for the CPU, we shut down the computer, removed the top of the case and temporarily fitted a spare Noctua NF-A14 140mm fan and connected it to the CPU fan header on the motherboard.
Running the computer for several hours showed CPU temperatures around 35 to 45 degrees Celsius which is a big improvement.
As the motherboard was described as a fanless unit, it must need very good natural airflow and the case we purchased was too restrictive for the heatsink.
The top of the case is a 4mm thick aluminium sheet and it has slots milled for airflow, but these are much too small to allow adequate airflow.
To resolve this, we created a cutout in the top panel on our mill, mounted the Noctua 140mm fan into the panel and added a finger guard over the top to stop any finger loss.
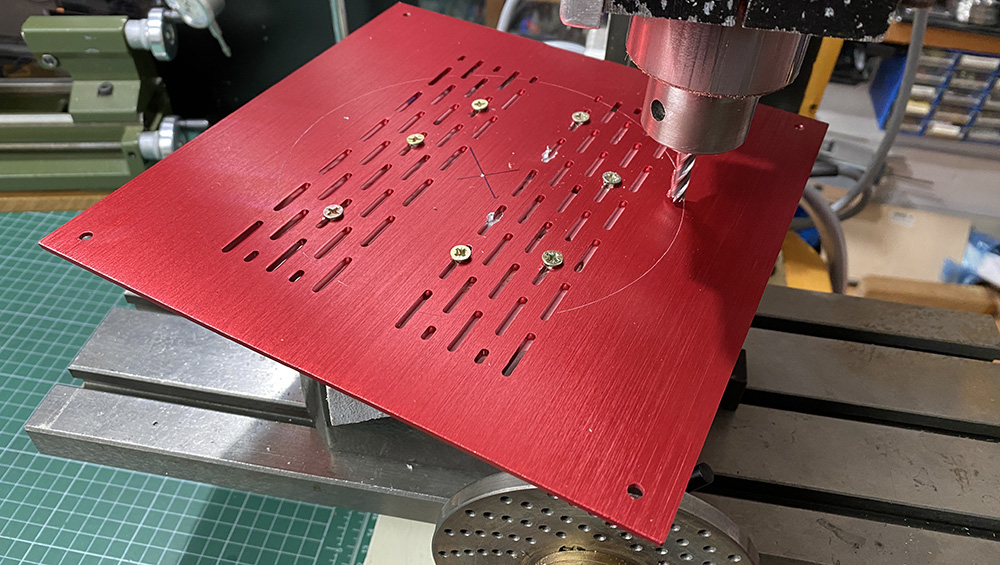
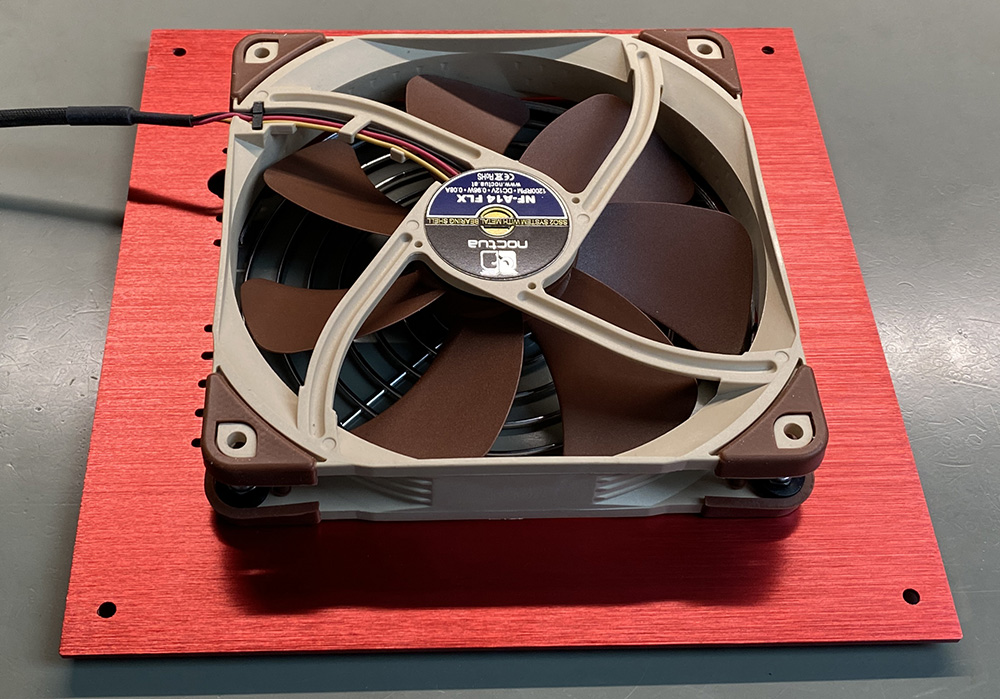
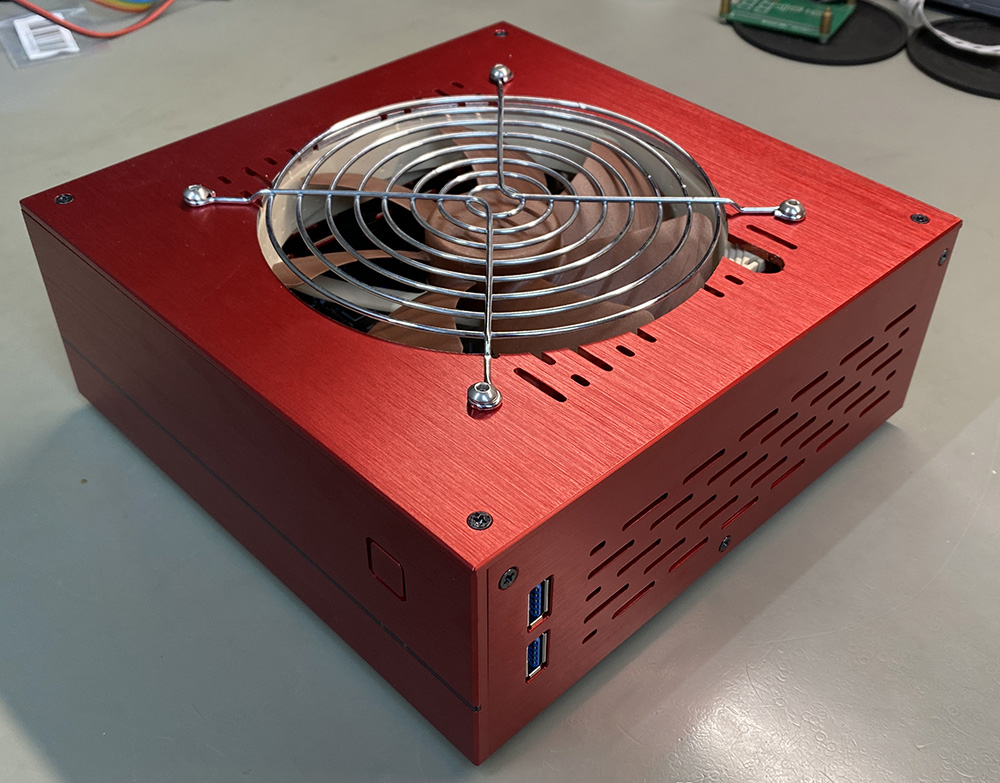
We initially planned to fit the fan on the outside of the case and created an additional cutout for the power cable but after creating the new cutout we found that the fan would fit inside the case and had clearance for the heatsink.


Belushi
Hi,
I was interested in this mobo until I found some reports about overheating problems.
The N100 has a P2 (short time power limit) of 25 Watts, and obviously the heatsinks of both Asrock boards as well as that one from Asus are way to small to deal with that TDP if the CPU runs in turbo mode for more than just a few seconds. Consequently, the CPU is slowed down either by thermal throttling or the BIOS, never reaching it's full potential.
As I did not want to add a fan as reccomended in this video https://www.youtube.com/watch?v=xbuXVVJARbA I went with a J50xx board instead. It may be slower, but no heat problems at all - plus it has 4 SATA connectors. No NVME though, but a MX500 ist fast enough for mostly everything 😉
Obviously, there is a reason why all those chinese "NAS-Boards" with N100 you can find on Amazon all use active cooling - despite already being equipped with much bigger heatsinks!