
In 2020 we added a pair of high-power LED light panels to our workshop for photography and video recording.
These lights worked well for still photographs but for a few projects we needed to be able to record video and we found that the resulting video would have scrolling lines from the PWM frequency of the LED drivers rendering the video footage unusable.
We had a single Elgato Key Light which we used as a third light source, but we could not match the colour of the LEDs across the three lights. The Elgato Key Lights are fully adjustable for both colour and brightness, but we could not find a match across the three lights and the flicker issue was still a problem when recording videos.
The Elgato Key Lights have the following specifications:
- Brightness
- Up to 2800 Lumens
- Colour Range
- 2900 to 7000K
- Power Consumption
- Up to 45W
- Connection
- Wi-Fi 2.4 GHz / 5 GHz 802.11 b, g, n
- Dimensions
- 1.18 x 13.77 x 9.84 in / 30 x 350 x 250 mm (depth x width x height)
- Weight
- 2.86 lb / 1.3 kg
The lights can either be controlled using PC or Mac software or using a mobile app and need to be configured to connect to your Wi-Fi connection before they can be used.

Elgato Key Light control using JSON
The Elgato Key Lights have a REST API which you can use to send and receive commands.
Setting Light Values
The JSON body has three parameters, on/off, brightness and colour temperature.
on = 1 or 0 to turn the light on and off.
brightness = Number between 0 and 100.
temperature = Number between 143 for 7000k to 344 for 2900K
{
    "numberOfLights": 1,
    "lights": [
        {
            "on": 1,
            "brightness": 50,
            "temperature": 206
        }
    ]
}
This JSON command should be sent to the following URL and uses a PUT command with a content type of, Content-Type: 'application/json'.
http://IPaddress:9123/elgato/lights
Get light status
To obtain the status of the light you can send a GET command to the light which will return the status, brightness and colour temperature of the light.
GET http://IPaddress:9123/elgato/lights
Sample response from this API endpoint.
{
    "numberOfLights": 1,
    "lights": [
        {
            "on": 1,
            "brightness": 100,
            "temperature": 200
        }
    ]
}
Get light settings
To obtain the settings of the light you can send a GET command to the light.
GET http://IPaddress:9123/elgato/lights/settings
Sample response from this API endpoint.
{
  "powerOnBehavior": 1,
  "powerOnBrightness": 20,
  "powerOnTemperature": 213,
  "switchOnDurationMs": 100,
  "switchOffDurationMs": 300,
  "colorChangeDurationMs": 100
}
Get accessory information
To obtain the accessory information of the light you can send a GET command to the light.
GET http://IPaddress:9123/elgato/accessory-info
Sample response from this API endpoint.
{
  "productName": "Elgato Key Light",
  "hardwareBoardType": 53,
  "hardwareRevision": 1,
  "macAddress": "AA:AA:AA:AA:AA:AA",
  "firmwareBuildNumber": 218,
  "firmwareVersion": "1.0.3",
  "serialNumber": "BW1234567890",
  "displayName": "Elgato Key Light",
  "features": [
    "lights"
  ],
  "wifi-info": {
    "ssid": "yourssid",
    "frequencyMHz": 2400,
    "rssi": -59
  }
}
Finding your lights hostname
In Windows you can use the Bonjour service from the command line to discover your Elgato Lights on your network and find your lights host name.
The Elgato lights use Multicast DNS (mDNS) which is a protocol that allows devices to resolve hostnames and discover services without relying on a traditional DNS server. mDNS enables devices to communicate and discover each other using multicast packets.
DNS-SD stands for "DNS Service Discovery." It is a protocol that allows network services to be discovered dynamically on a local area network without manual configuration or centralized management.
Enter the following command at the Windows command prompt to discover Elgato Lights on your network.
dns-sd -B _elg._tcp
Sample response
Browsing for _elg._tcp
Timestamp     A/R Flags if Domain                    Service Type              Instance Name
20:05:01.483  Add     2  3 local.                    _elg._tcp.                Elgato Key Light 1123
ESP32 Elgato Remote Control Project
This simple project uses an ESP32 Wi-Fi development board with push switches to toggle one or more Elgato Key Lights on and off on your W-Fi network.
Your Elgato Key Lights will first need to be setup to use your Wi-Fi network using either the desktop software or mobile apps.
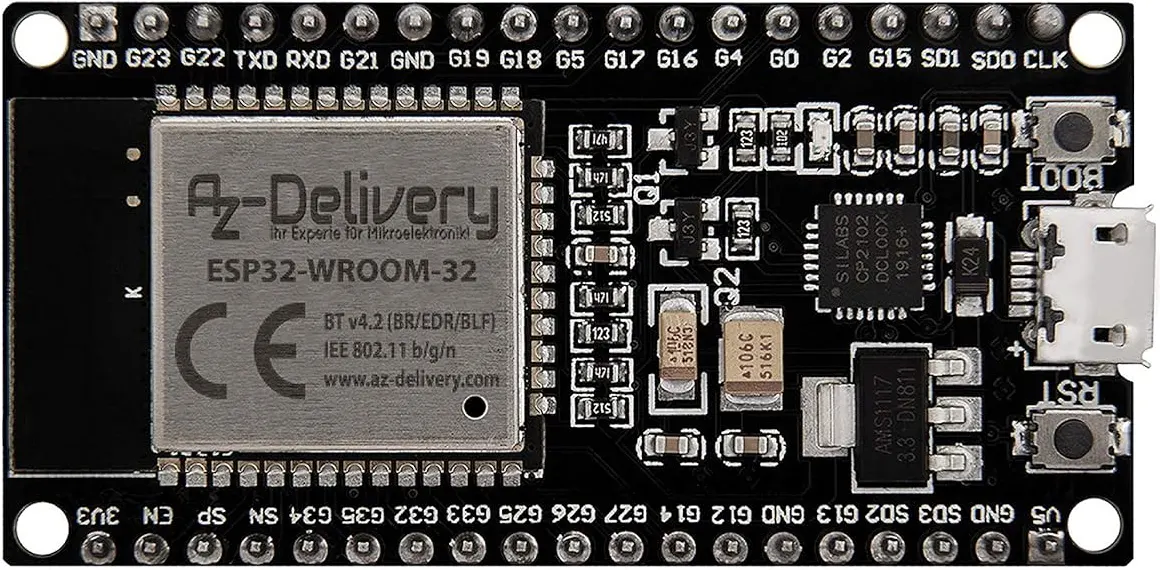
The code below was tested using an AZDelivery ESP32-DevKitC board from Amazon.
Setting up Arduino IDE to use with ESP32 boards
I used the Arduino IDE to program the ESP32 boards and the instructions on circuitdigest.com to install the necessary libraries to support the platform.
We create a new Arduino project and select the ESP32 board and the connected serial port from the tools menu.
If you have a fixed IP address for your Elgato lights you can omit the DNS code below but as most people use Dynamic Host Configuration Protocol (DHCP) which assigns an IP address automatically the DNS resolver code may be easier.
First, we add the includes:
#include
#include
#include
Now add constants for the Wi-Fi username and password:
const char WIFI_SSID[] = "YourUserName";
const char WIFI_PASSWORD[] = "YourPassWord";
Add the hostname of your Elgato Key Light, this can be found in the Elgato app.
String ELGATO_KEY_LIGHT_1_HOST_NAME = "elgato-key-light-1223";
Assign the pin your button is connected to and create variables for the HTTPClient, IPAddress, lastState, currentState and the CurrentLightState. For this version, I added a switch between pin 33 and GND.
const int BUTTON_PIN = 33;
HTTPClient http;

int CurrentLightState = 0;

// Variables will change:
int lastState = HIGH;  // the previous state from the input pin
int currentState;      // the current reading from the input pin

IPAddress serverIp1;
Next, we add the setup function and assign the button pin as an input with pullups enabled.
void setup() {
  Serial.begin(9600);
  pinMode(BUTTON_PIN, INPUT_PULLUP);
We connect to the Wi-Fi network and if successful use MDNS.begin to resolve the IP address of your Elgato Keylight.
  WiFi.begin(WIFI_SSID, WIFI_PASSWORD);
  Serial.println("Connecting");
  while (WiFi.status() != WL_CONNECTED) {
    delay(500);
    Serial.print(".");
  }
  Serial.println("");
  Serial.print("Connected to WiFi network with IP Address: ");
  Serial.println(WiFi.localIP());

  while(!MDNS.begin("esp32Host")) {
     Serial.println("Starting mDNS...");
     delay(1000);
  }

  Serial.println("MDNS started");


  while (serverIp1.toString() == "0.0.0.0") {
    Serial.println("Resolving host...");
    delay(250);
    serverIp1 = MDNS.queryHost(ELGATO_KEY_LIGHT_1_HOST_NAME);
  }
  Serial.println("Host address resolved:");
  Serial.println(serverIp1.toString());
}
We add the main loop which checks the current state of the button using a digialRead and if the current state is different to the lastState we toggle the light using LightOff or LightOn functions.
void loop() {
  currentState = digitalRead(BUTTON_PIN);

  if (lastState == LOW && currentState == HIGH) {
    Serial.println("The state changed from LOW to HIGH");
    if (CurrentLightState == 1) {
 	LightOff(serverIp1.toString());
    } else {
 	LightOn(serverIp1.toString());
    }
  }
  // save the last state
  lastState = currentState;
}
This function sends a JSON string to the Elgato Key Light to turn on the light at 100% brightness and a colour temperature of 206.
void LightOn(String ip) {
    HTTPClient http;
    http.begin("https:// + ip + ":9123/elgato/lights");
    http.addHeader("Content-Type", "application/json");
    String requestBody = "{\"numberOfLights\":1,\"lights\":[{\"on\":1,\"brightness\":100,\"temperature\":206}]}";
    int httpResponseCode = http.PUT(requestBody);
    if(httpResponseCode>0){

      String response = http.getString();

      Serial.println(httpResponseCode);
      Serial.println(response);
    }
    else {

      Serial.printf("Error occurred while sending HTTP POST:");
    }
    http.end();
    CurrentLightState = 1;
}
This function sends a JSON string to the Elgato Key Light to turn off the light with the brightness at 100% and a colour temperature of 206.
void LightOff(String ip) {
  HTTPClient http;
    http.begin("https:// + ip + ":9123/elgato/lights");
    http.addHeader("Content-Type", "application/json");
    String requestBody = "{\"numberOfLights\":1,\"lights\":[{\"on\":0,\"brightness\":100,\"temperature\":206}]}";
    int httpResponseCode = http.PUT(requestBody);

    if(httpResponseCode>0){
      String response = http.getString();
      Serial.println(httpResponseCode);
      Serial.println(response);
    }
    else {
      Serial.printf("Error occurred while sending HTTP POST:");
    }
    http.end();
    CurrentLightState = 0;
}
The full code for this Elgato Key Light remote control is below:
#include
#include
#include

const char WIFI_SSID[] = "YourUserName";
const char WIFI_PASSWORD[] = "YourPassword";

String ELGATO_KEY_LIGHT_1_HOST_NAME = "elgato-key-light-1234";

const int BUTTON_PIN = 33;
HTTPClient http;

int CurrentLightState = 0;

// Variables will change:
int lastState = HIGH;  // the previous state from the input pin
int currentState;      // the current reading from the input pin

IPAddress serverIp1;


void setup() {
  Serial.begin(9600);
  pinMode(BUTTON_PIN, INPUT_PULLUP);

  WiFi.begin(WIFI_SSID, WIFI_PASSWORD);
  Serial.println("Connecting");
  while (WiFi.status() != WL_CONNECTED) {
    delay(500);
    Serial.print(".");
  }
  Serial.println("");
  Serial.print("Connected to WiFi network with IP Address: ");
  Serial.println(WiFi.localIP());

  while(!MDNS.begin("esp32Host")) {
     Serial.println("Starting mDNS...");
     delay(1000);
  }

  Serial.println("MDNS started");

  while (serverIp1.toString() == "0.0.0.0") {
    Serial.println("Resolving host...");
    delay(250);
    serverIp1 = MDNS.queryHost(ELGATO_KEY_LIGHT_1_HOST_NAME);
  }
  Serial.println("Host address resolved:");
  Serial.println(serverIp1.toString());
}
void loop() {
  currentState = digitalRead(BUTTON_PIN);

  if (lastState == LOW && currentState == HIGH) {
    Serial.println("The state changed from LOW to HIGH");
    if (CurrentLightState == 1) {
 LightOff(serverIp1.toString());
    } else {
 LightOn(serverIp1.toString());
    }
  }


  // save the last state
  lastState = currentState;
}

void LightOn(String ip) {
    HTTPClient http;
    http.begin("https:// + ip + ":9123/elgato/lights");
    http.addHeader("Content-Type", "application/json");
    String requestBody = "{\"numberOfLights\":1,\"lights\":[{\"on\":1,\"brightness\":100,\"temperature\":206}]}";
    int httpResponseCode = http.PUT(requestBody);
    if(httpResponseCode>0){

      String response = http.getString();

      Serial.println(httpResponseCode);
      Serial.println(response);
    }
    else {

      Serial.printf("Error occurred while sending HTTP POST:");
    }
    http.end();
    CurrentLightState = 1;
}
void LightOff(String ip) {
  HTTPClient http;
    http.begin("https:// + ip + ":9123/elgato/lights");
    http.addHeader("Content-Type", "application/json");
    String requestBody = "{\"numberOfLights\":1,\"lights\":[{\"on\":0,\"brightness\":100,\"temperature\":206}]}";
    int httpResponseCode = http.PUT(requestBody);

    if(httpResponseCode>0){

      String response = http.getString();

      Serial.println(httpResponseCode);
      Serial.println(response);
    }
    else {

      Serial.printf("Error occurred while sending HTTP POST:");
    }
    http.end();
    CurrentLightState = 0;
}
The code for this project can be downloaded from github.com/briandorey/ElgatoKeyLightESP32Remote


Comments