Home Assistant is an open-source home automation platform running on Python 3 which can run on the Raspberry Pi to interface and control many of the internet of things (IoT) devices available from different manufacturers.
I was first told about Home Assistant a couple of weeks ago by one of our AB Electronics UK customers who wanted to use our IO Pi Plus port expander in his smart home to control lighting and other devices via the Raspberry Pi.
I downloaded the Hass.io release of the Home Assistant software which is a full disk image and after booting it, I found that it was very locked down and I wasn’t able to install any third-party libraries or run any python code to test the boards. I later found that you can run your own python code as “Custom Components” but it is a much more restricted system than I am used to using on the Raspberry Pi.
I then tried the manual installation method on the Raspberry Pi following the instructions on https://home-assistant.io/docs/installation/raspberry-pi/ but found that I couldn’t get the software to install correctly after the “sudo useradd -rm homeassistant” step.
After some research, I found that I needed to set a new password for the new homeassistant account using: “sudo passwd homeassistant” which then resulted in this error when trying to install the software needed: “homeassistant is not in the sudoers file. This incident will be reported.”
Below are the steps I used to get the Raspbian version of Home Assistant running.
Update 17th August 2017
With the new release of Rasbian Stretch today, I downloaded the new release and everything works the same as the instructions for Raspbian Jessie below.
Download Raspbian Jessie/Stretch Lite from https://www.raspberrypi.org/ and burn it to an SD Card.
Open the boot partition in Windows or Mac and add a blank file called SSH to the root of the drive which enables SSH access.
Boot the Pi and login via SSH
Change the default password with:
passwd
Update the system:
sudo apt-get update

sudo apt-get upgrade -y
Update system config to turn on I2c
sudo raspi-config
Select option 5
Select I2C then select Yes
Confirm the change and then select Finish to Exit
Install required software:
sudo apt-get install python3 python3-venv python3-pip python-smbus python3-smbus python-dev python3-dev i2c-tools samba samba-common-bin libffi-dev
Add the new homeassistant user as a system account
sudo useradd -rm homeassistant
Set the password for the new account:
sudo passwd homeassistant
Add both users to i2c
sudo adduser pi i2c

sudo adduser homeassistant i2c
Now reboot:
sudo reboot
The next step caused me problems with permissions and I got this error message: “homeassistant is not in the sudoers file. This incident will be reported.”
After searching for the error, I found that I needed to add the user to the sudoers file by logging in as the pi user and running the following:
sudo adduser homeassistant sudo
Reboot
sudo reboot
Login as the new homeassistant account and create a directory for the installation of Home Assistant
cd /srv

sudo mkdir homeassistant

sudo chown homeassistant:homeassistant homeassistant
Now create a virtual environment for Home Assistant. This will be done using the homeassistant account:
sudo su -s /bin/bash homeassistant

cd /srv/homeassistant

python3 -m venv .

source bin/activate
Once you have activated the virtual environment you will see the prompt change and then you can install Home Assistant, cffi and i2csense.
pip3 install homeassistant

pip install cffi

pip install i2csense==0.0.3
Start Home Assistant for the first time which will create the .homeassistant config directory and install any required files.
Run Home Assistant using:
sudo -u homeassistant -H /srv/homeassistant/bin/hass
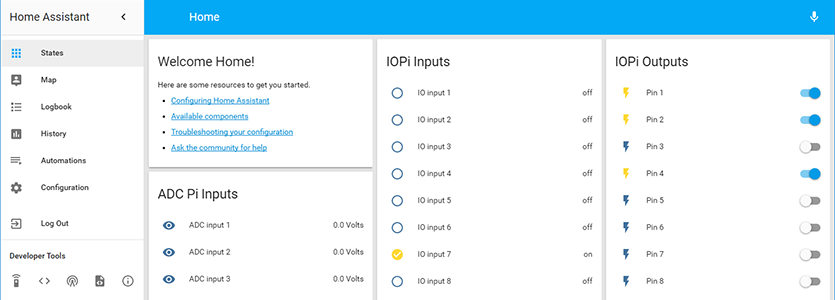
You can now view your installation via the web interface at http://ipaddress:8123
Now, setup Samba so you can access your config directories via the network.
sudo nano /etc/samba/smb.conf
Remove the comment from wins support = no and change the no to yes
At the end of the file add the following to add shares for the pi user and home assistant directories.
[PiHome]
 path = /home/pi
 comment = No comment
 browsable = yes
 read only = no
 valid users =
 writable = yes
 guest ok = yes
 public = yes
 create mask = 0777
 directory mask = 0777
 force user = root
 force create mode = 0777
 force directory mode = 0777
 hosts allow =


 [HOMEASSISTANT]
 path = /home/homeassistant/.homeassistant
 comment = No comment
 browsable = yes
 read only = no
 valid users =
 writable = yes
 guest ok = yes
 public = yes
 create mask = 0777
 directory mask = 0777
 force user = root
 force create mode = 0777
 force directory mode = 0777
hosts allow =
Set the samba password:
sudo smbpasswd -a pi
And restart Samba
sudo /etc/init.d/samba restart
You can now access your Home Assistant config directory via the network.
Johan Melin
Hi! I followed your guide, and everything work perfectly until i change the password for samba. Then i stopped working. When i tried to run the command to restart samba it says it can not be found. It seems that my samba "start file" is named samba-ad-dc.
Do you have any tips?
Om running a raspberry p1 3 b with Raspbian Buster Lite
Svein Erik Duus
Hello Brian. We have been in contact before. Andrew has helped me a lot with different things. I have made a modbus emulator shield on a i2c platform. I am trying to get KNX sensor values read by the shield and further read by the modbus master of my ventilation system. I have looked into several interphases like Homebridge, SmarthomeNG (german) and now I am trying our HomeAssistant. Like you, it feel very strong the boundaries established by hassio in terms of communicating with my Rpi. So I am inclined to follow your instructions. But since 2017 so much has happened. Have you tried this on a RPi4? On buster? And the latest Hassio versions? I am particularly interested to get the i2c tools to work. Please let hear your comments.
Kind regards
Svein Erik Duus
Oslo/Norway