aluminum imac hard drive upgrade guide

16. November 2008 00:46 by Brian in Apple - Comments: (26)

Aluminium iMac Hard Drive upgrade guide

Upgrading the internal hard drive in a 2007-2008 Apple iMac to 1.5TB

The following guide provides step by step instructions on how to disassemble and upgrade your Apple iMac 20" or 24" models.

Tools required:
T6 Torx Driver and T9 Torx Driver
Suction Cups for removing the glass front panel - These can be obtained from many DIY shops or online for less than £10
Philips Screwdriver for removing the memory cover.

New Hard Drive. I used a Segate 1.5TB SATA 7200 rpm model which was £140

http://vimeo.com/moogaloop.swf?clip_id=2252036

Below is a link to a HD video of the work involved in the upgrade:

Apple iMac hard drive upgrade from Brian Dorey on Vimeo.

Please note this is not an official Apple guide so proceed at your own risk!

  1. Remove the memory slot cover from the base of the machine.
  2. Using the suction cups carefully place on the glass screen cover and remove the glass panel. Place somewhere safe and clean.
  3. Remove the torx screws from the front panel surround on the edge of the LCD screen (some of the screws are different sizes)
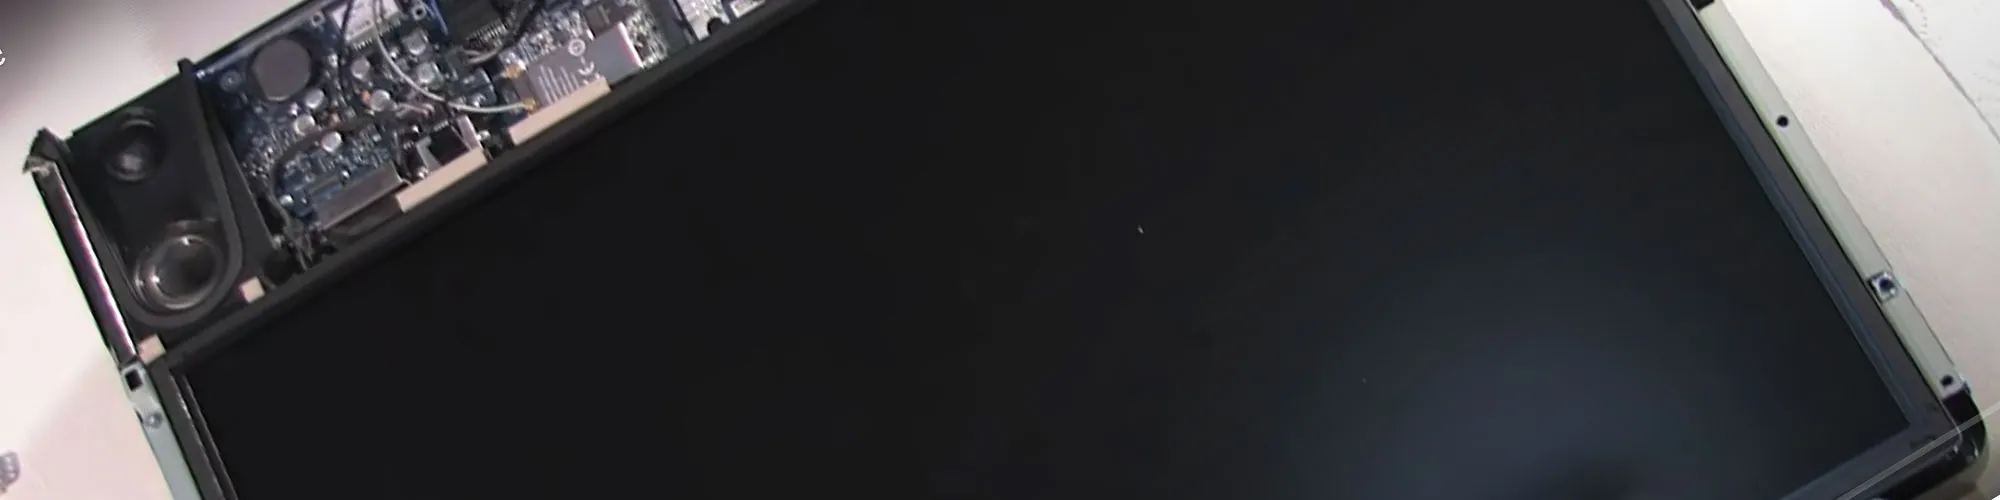
  4. Lift the screen away from the main chassis and life up and over above the computer
  5. Remove the screws holding the LCD panel to the chassis
  6. Remove 2 screws from the LCD connector and remove the connector from the graphics card
  7. Carefully life the LCD panel from the bottom to expose the 4 small connectors for the backlight. Mark the connectors with a marker to aid reassembly and disconnect the connectors
  8. Lift the panel clear of the chassis
  9. Remove the hard drive temperate sensor and place to one side
  10. Unclip the hard drive from the chassis. This plastic bracket can be a tight fit so some force is required to remove it
  11. Remove the power and SATA connectors from the hard drive and remove from the chassis
  12. Remove the screws holding the plastic clip from the hard drive and the 2 mounting pins from the other side of the hard drive
  13. Fit the clip and pins to the new hard drive
  14. Reconnect the power and SATA connectors and clip the new hard drive back into the computer chassis
  15. Refit the LCD screen and reconnect the 4 small backlight connectors
  16. Place the LCD panel flat on the chassis and reconnect the screen connector and refit the two small screws
  17. Refit all the screws from the edge of the LCD screen
  18. Refit front panel and take care not to trap the small cable at the top of the screen
  19. Refit all the front panel screws in the same order as they where removed (some of the screws are different sizes)
  20. Clean any dust from the LCD panel and the front glass panel using a soft screen cleaning cloth (don't use compressed air as this often leaves propellant on the screen which is very hard to remove)
  21. Remove the suction cups from the screen and clean the glass.
  22. Refit the memory slot cover on the base of the machine.

Next you need to reinstall OS X from your operating system disks and then your upgraded iMac is ready to use!

Tags: , , - Posted in: Apple

Comments

By: Andy United Kingdom on 1/26/2009 3:36:22 PM #

Yay! It worked like a charm! Great video thanks! Not even one spare screw!

By: Robert Esmonde Ireland on 1/29/2009 7:15:56 PM #

Brian,
Thanks for that really useful info and tutorial on upgrading the iMac drive.

I"ve a 20" iMac and will have to order a suction tool, so I"m wondering if you can say what size the iMac in the tutorial is?  I'm hoping it's a 20" and that the quad suction tool will fit mine okay.  Also I'm interested if the larger 1.5 TB drive caused any overheating problems?

Thanks,

Robert.

By: Kirby United States on 2/12/2009 7:08:24 PM #

Thanks for the great how-to! Worked perfectly.

By: Brian United Kingdom on 2/12/2009 7:12:46 PM #

Robert, it is a 20 inch iMac, we havent had any heat issues with the 1.5tb drive .

By: Ben Frain United Kingdom on 3/10/2009 12:29:11 PM #

Hi Brian, great video. My cables were a slightly different layout to yours and I have posted the differences on my own site and linked to this post. I would also suggest using canned air to blow any dust from the screen, rather than a cloth but I suppose that is merely preference. Thanks for taking the time to do the video and put it up. Now enjoying a 1TB iMac. Thanks.

By: Brian United Kingdom on 3/10/2009 12:34:19 PM #

Ref: Canned air. Thank you for the suggestion but we did try canned air from Jessops (camera supplier) and we had some liquid come out with the air which took a lot of cleaning to get it off the screen. Perhaps a better quality can of compressed air would be better or use a camera cleaning bulb to blow cleaner air over the screen to remove the dust.

I am glad that you are enjoying your 1tb upgrade. I suppose when 2tb drives are out, we will all be upgrading again.

By: PaulK Australia on 3/24/2009 6:02:58 AM #

Well done Brian! The performance of my 20" 2G iMac is sadly let done by the poorly performing ST3250820AS HDD. The 1.5 TB Seagates are the fastest of their breed and the way to go. Your video now makes my upgrade choice final the drive is ordered. From Mackay, Queensland, Australia.

By: Jim Canada on 3/25/2009 2:08:17 AM #

Brian- Great video, well done- I am looking to get some more storage on my 20" iMac- and you have eased my mind!  
Quick question - how did you migrate all of your info from the internal HDD to the new one?  Did you just buy a firewire HDD Dock or somthing like that?

Thanks again for the great tutorial!

Jim

By: Brian United Kingdom on 3/25/2009 9:02:23 AM #

Jim, I used a external hard drive to backup the old data then restored it onto the new drive once OSX was reinstalled.

By: Jhonny Finland on 4/11/2009 12:27:53 PM #

Hi Brian,

Great video! I'm plannig a HD upgrade myself. I have one question though. How is the glass panel attached to the chassis? You just place it on top of the LCD? What prevents it from falling forward when the iMac is up?

Best Regards,
Jhonny

By: Brian United Kingdom on 4/11/2009 12:34:39 PM #

Hi Jhonny, the glass is held in with small magnets around the edge.

Brian

By: Phillip Deackes United Kingdom on 4/15/2009 1:40:52 PM #

The easiest way to restore the new hard rive is to use Super Duper. Super Duper will back up your current hard drive to an external drive and make it bootable. Once the new drive is fitted in the iMac, you boot up while holding the 'alt' key. You will see any bootable volumes on screen. Select the backup drive. Once booted, you use Disk Utility to format the new drive, run Super Duper and restore to the new drive.

Once the process has completed you can boot from the new internal drive and you will have an exact copy of your previous drive.

A completely painless procedure.

By: PaulK Australia on 6/8/2009 11:32:28 AM #

Well after my 24th of March note here, I got around to cloning my drive a week or two ago. Today I changed out the old drive and the new 1.5T Seagate is up and running. File system operation are now more than twice as fast as the old hobbled ST3250820AS. I used super-duper to do the cloning, totally transparent. I know that my 2Ghz/4Gb iMac is much faster, this is manifested in the much faster startup of VMs via VMware Fusion. Thanks again Brian, great vid and no problems on the way to success.

By: Bill Bates United States on 6/9/2009 6:10:12 PM #

Excellent video! The HD in my iMac died and this video was indispensable! Thank you for creating such a high quality how-to!

I used Time Machine to restore my data and it worked great! I also use SuperDuper to create a monthly bootable copy that I keep offsite.

My only issue was that I could not find suction cups meant for lifting tile or glass at any of the hardware stores near me. I finally found some suction cups meant to hang towels and such in the bath that were rated for 8lbs. I had no problem with them.

Thanks again, great article and video!

Bill

By: Al Perez United States on 6/17/2009 4:16:26 AM #

Thank you for the video and process.  I did the upgrade for my friend and she has baked me several cakes in appreciation! Smile  I'm very tempted to get a Western Digital Caviar Green WD20EADS 2TB 32MB Cache SATA 3.0Gb/s drive from Newegg for myself.  Has anyone any experience with this drive?  It's a "green" drive, supposedly less power on startup, etc.

Thanks,
Al

By: Kenny M on 7/25/2009 11:09:54 PM #

This is an excellent tutorial!  I am wondering if anyone knows if this will void the warranty?  I am under coverage for AppleCare for 1 more year and would like to upgrade my HD now.

Thanks!
Kenny

By: Tako on 8/20/2009 3:29:55 AM #

Thank you so much for your sharing!
I will upgrade my imac's hard drive the coming few days.

By: T on 9/4/2009 11:47:44 PM #

my husband just replaced our imac's hard drive, and I was helping, holding... touched the black lcd screen and left a smudge at the very end.  what to do? wipe it w/ a Q=tip? Kleenex?

By: Brian on 9/4/2009 11:53:04 PM #

I use a camera lens cleaning cloth and if the smudge wont move when rubbing it carefully, apply a drop of camera lens cleaner to the cloth and that should remove the fingerprints.

By: Matt on 9/5/2009 6:33:13 AM #

If you could tell me the manufacturer of the suction tool you used or where you purchased it I would greatly appreciate it.

By: Brian on 9/6/2009 4:27:34 PM #

I got the suction tool from B&Q in the UK but any large diy store should stock this item. You can also get them from ebay

By: Juergen on 10/15/2009 8:00:38 PM #

Thank you so much for the tutorial and the video. With this aid it was actually a piece of cake. !

By: Benjamin Stolz on 10/24/2009 3:14:01 AM #

Question. If I have a Time Machine backup from a smaller HD, can I restore it to the new HD once I have installed the bigger drive. Will it restore everything as it was, but recognize the extra space or am I expecting too much?

By: Brian on 10/24/2009 10:17:42 AM #

I think timemachine will restore to a larger drive but I havent done this myself.

It maybe safer to backup your user files and then do a clean install of your os and apps to the new drive and then restore your user files.

By: Gambri on 11/23/2009 7:31:54 AM #

Thanks for that really useful info and tutorial on upgrading the iMac drive.

By: Thomas Han on 11/24/2009 8:26:51 PM #

thanks so much for your video!  i'm about to change my HD too and I've watched your video several times just to get hang of doing this, thanks!

Comments are closed

RecentComments

Comment RSS
 

About the Blog

Welcome to my space on the web! I made this site as a central place with various links and information for my various hobbies, sports and interests and for anyone who knows me to find out what I have been doing since I left school.

My LinkedIn Profile

My Flickr Profile

My Twitter Profile

Powered by BlogEngine.NET 1.5.1.41 - Theme by apexweb - Log in